Projections in Geogrpahic Information Systems
Objective: gain an understanding of what projections are, how to use them in ArcView and Arcinfo, what they accomplish; their benefits and drawbacks.
What are projections?
Projections are a mathematical transformation that take spherical coordinates (latitude and longitude) and transform them to an XY (planar) coordinate system. This enables you to create a map that accurately shows distances, areas, or directions. With this information, you can accurately work with the data to calculate areas and distances and measure directions. As implemented in Geographic Information Systems, projections are transformations from spherical coordinates to XY coordinates systems and transformations from one XY coordinate system to another.
How can they help you?
Projections are chosen based on the needs of the map or data analysis and on the area of the world. Projections are useful for a limited set of purposes or scales. Finally, projections are based on local needs and standards.
Our experience with projections
In this class, we have used data in two projections, UTM (Universe Transverse Mercator) and Massachusetts State Plane projections. This is because two major data distributors distribute their data in these projections. Both projections are appropriate based on the distributors interests. The State Plane projection is the best overall projection for Massachusetts. The UTM projection is the best projection for distributing data that cross state boundaries. However, this is not optimal for every area that you may be interested in. Unfortunately, UTM boundaries cross state lines. Ultimately, data must be projected into a common, useful projection for the area that you are working in.
What happens when your data is not in the same projection?
We are about to look at the two Digital Elevation Models that we have used in the class so far: ashfield_nos and ashfield_utm. These are of two different projections and, therefore, there are display issues as well as analysis issues.
Before you begin, you need to attach several lockers and add binaries for Arcinfo and ArcView to your paths:
attach gis
attach massgis
add arcview
add arcinfo
What this tells us is that the X and Y coordinates, while not random, are arbitrary relative to other projections. If there was overlap, and there is not in this case, it would be by chance and would not be meaningful.
Checking the projection information using Arcinfo
You can check the projection information using Arcinfo. Use the "describe" command to see the projection information:
arcinfo describe /mit/gis/data/grids/ashfield_nos
arcinfo describe /mit/gis/data/grids/ashfield_utm
The results are stored in http://web.mit.edu/1.961/fall2001/ashfield_projections.txt.
Intrepreting the projection information
The State Plane projection
This projection uses the concept of a FIPSZONE to correctly project the data while the UTM projections uses ZONES. The FIPSZONE is particular to a state and some states, like California, have several zones. Massachusetts has one.
The UTM projection
UTM zones are 6 degrees wide (east-west) and are set as specific 6 degree intervals. That is, you cannot offset a zone to include 6 degrees of longtitude that include your area of interest that may cross between two zones. The further you go out from a zone, the less accurate your representation is.
There are other variables that make up a projection and the State Plane projection has these. These are set by the software that you are using. You will see this when you use ArcView to project datasets.
Projection components:
Projection parameters:
The State Plane and UTM projections use all of the parameters but none of the parameters need to be input directly. That is, the State Plane pojection is a Lambert (Conic) projection with specific standard parallels, central meridian, and false easting and northing.
Projecting Grids in Arcinfo
There are projection rules with the ESRI suite of software tools, as there are with other suites of tools:
You will project a grid in Arcinfo from a geographic projection to UTM. This grid is U.S.G.S 1:250,000 DEM taken from the Eros Data Center Website (http://edc.usgs.gov/doc/edchome/ndcdb/ndcdb.html).
For those interested in this scale DEM, this format is easy to convert to ArcView Grid format. Instructions follow:
On the web:
From Athena:
From ArcView:
For those who are using the DEM already imported into ArcView
The description of the DEM is stored in http://web.mit.edu/1.961/fall2001/albany_proj.txt.
Notice that there is no projection information associated with this DEM. This shows one of the problems with the USGS DEM transfer format, compared to the SDTS format.
This projection is stored in Geographic coordinates (latitude and longitude) but the coordinates are stored in decimal seconds. If you divided the minimum and maximum X and Y by 3600 (the number of seconds in a degree) you would see that this is roughly 42 North and 73 West.
The command to project spatial data in Arcinfo is project. It requires a file that stores the following lines:
You can use the file /mit/gis/data/grids/projectfile.prj.
From the Arc prompt, run the following command:
project grid /mit/gis/data/grids/albany_e /tmp/albany-e_sp /mit/gis/data/grids/projectfile.prj
Looking at the new DEM
Compare the DEM with known data, like the State Plane data in the massgis locker.
Projecting Vector Data in ArcView
ArcView has a dialog interface for projecting data. This is more intuitive than the terse Arcinfo project command. Here you will project the Street network for Ashfield from the State Plane projection to UTM coordinates so that you can use it with
Start ArcView.
Set the working directory to /tmp.
Create two views.
In one view, add Ashfield from the /mit/massgis/1997/tiger/a/ directory.
Warning: ArcView is now looking at this directory and you don't have permission to write to it. ArcView will try to write to the most recent directory that you have looked at. In order to change it to one that you have write permission in, start to add a theme, navigate to the /tmp directory, and then click on Cancel.
Change the Map Units for the projection: from the View menu, select Properties. Use the Map Units scrolling list to select meter.on the dialog box that appears.
Start the Projector extension. From the File menu, select Extension. Scroll down to Projector! and click on the checkbox. Scroll to Spatial Analyst and click on its checkbox. Click OK.
With the View with the street network open, and the Ashfield theme active:
Click on the North Arrow button (on the far right of the buttons). You will be prompted to select the input projection. Click on OK.
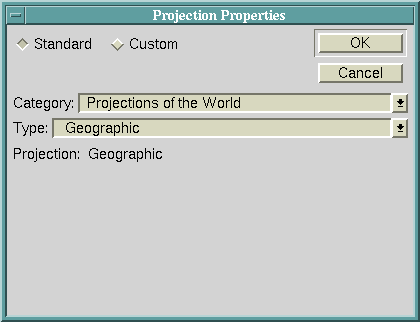
Result: The Projection Properties dialog box appears.
In the Category field, from the pulldown list, select State Plane - 1983, and click OK.
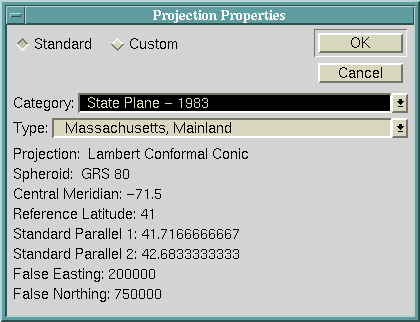
Notice that this projection is Conic and has two standard parallels and that the easting and northing are set to positive values. Click OK.
Result: The Projector! dialog box appear prompting you to pick outout units. Select Meters and click OK.
Result: A new Projection Properties dialog box appears. This is for the output projection.
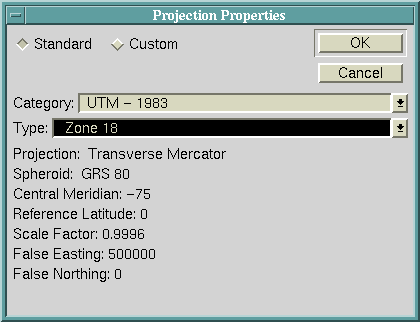
In the Category field, from the pulldown list, select UTM - 1983, and click OK.
Result: The projection information is completed. You should be using Zone 18.Notice that the zone may be incorrect. This depends on the zone you selected when you last used the projection facility. Click OK.
Result: The dialog box asks you if you want perimeter and area information recalculated. Click Yes.
Result: A second dialog box asks if you want to add the projected shapefile to a view. Click Yes.
Result: The Projector! dialog box presents you with a list of views. Select the second view you created (which should still be empty) and click OK.
Result: the Project Ashfield dialog box appears. Rename the shapefile to ashstr_utm.shp and click OK.
Result: The second view is opened with the new shapefile added but not visible.
Make the theme visible.
Add the ashfield_utm grid from the /mit/gis/data/grids/ directory.
Make the grid visible. Move the street theme up on the table of contents and make the grid visible.
Result: You should see the street network over the DEM.
Projecting data in a view
You can project shapefiles (vector data) in a view if the data is in latitude and longitude. You cannot project grids (raster data).
Open a new view.
Add counties.shp from the /mit/gis/data/shapefiles/ directory.
Make the theme visible.
From the View menu, select Properties.
Click on Projection on the View Properties dialog box.
Result: You get the same Projection Properties menu that you saw when you projected shapefiles.
Change the Categories to Projections of the United States.
Click on OK.
Click on OK on the View Properties dialog box.
Look at the map.
Go back to the View Properties dialogbox and again click on projection.
Now click on Custom.
You can change any of the parameters. I accepted standard parallels are 1/6 of the way up from the bottom of the map and 1/6 from the top of the map. Try changing these. Change the Central Meridian also. Remember to TAB between the values and that you must hit TAB after the last value you changed. Your changes will be lost if you do not TAB after changing a value!
Try other projections.