| 11.520: A Workshop on Geographic Information Systems |
| 11.188: Urban Planning and Social Science Laboratory |
In this lab exercise, you will explore using ArcMap's data manipulation and charting tools. The motivating example is one of the complications that we listed when discussing GIS data models. When we obtain maps and data from different sources, there may not be a one-to-one match between the spatial objects in the map and the rows in the data table. For example. there are 351 towns in Massachusetts, but the MassGIS map of town boundaries has 631 rows! Why so many? Because some towns are split into two or more parts by rivers. Other towns include islands with boundaries that don't connect with the other parts of the town. But our data source for town-by-town population probably has only the total population for each town. So, the usual way to create a population density map won't work well. If we choose a thematic map of population divided by area, the Boston harbor islands will show up as the densest part of the state - with an average of 170+ people per square meter of land area! Try it!
In order to develop an appropriate thematic map of population density, we must aggregate the area across all parts of each town before we compute density as town-population divided by town-area. We will use the 'Summarize Table' function to create a new table from the Attributes-of-Town table. We will also use the Chart functions to create business graphics of Town density. Producing the charts will involve another complication because of the multiple rows per town in the Attributes-of-Town table. Handling this density-map problem will give us a better understanding of ArcMap and, moreover, a better understanding of the one-to-many problems that often complicate good data analysis when we mix and match data from different sources.
As we did in previous labs, attach Drive M: before you start the exercise. Here is a link to the 'in-lab' notes: lab4_inlab_notes.html
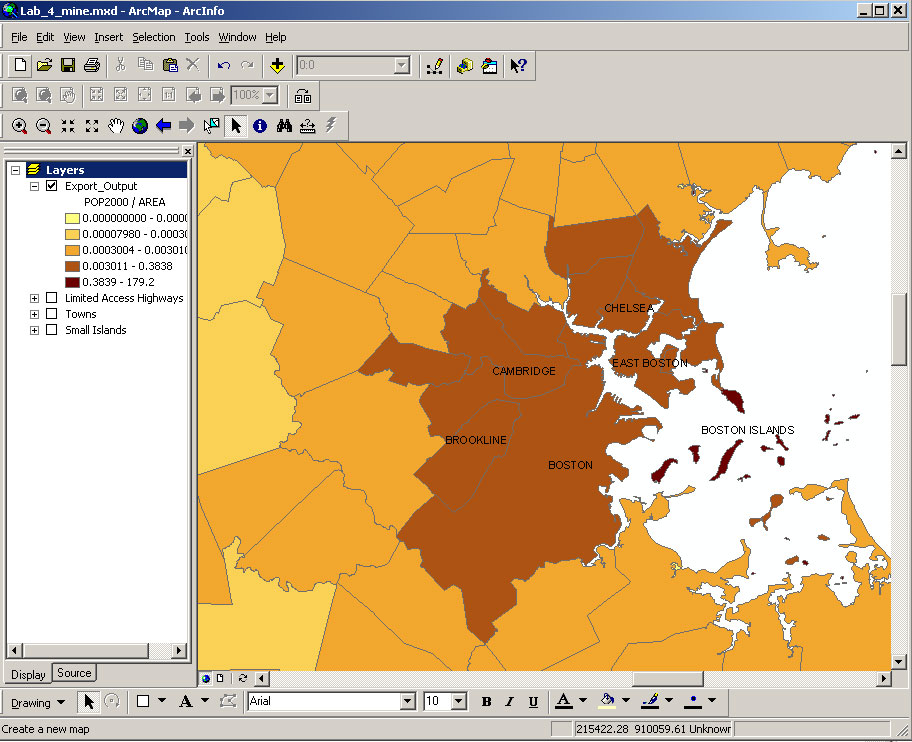
First let's generate a quick-n-dirty (but wrong) population density map. Add the MassGIS shapefile of Massachusetts city and town boundaries from M:\data\matown00.shp and produce a thematic map of the 1990 population (pop90) divided by 'area'. When zoomed in on Boston, the thematic map will look something like this:
|
| Fig. 1. Population density map without considering one-to-many relationship |
The results look strange and we notice that the density of some small areas appears to be extremely high. On looking more closely, we find that small islands in Boston Harbor have a small area but are associated with all of Boston's population, thereby creating the impression that these islands were extraordinarily densely populated. In fact, many of these islands have no population at all. The basic problem is that the population data counted people in each entire city (or town) whereas the map sometimes had multiple polygons for a single city. In the case of Boston, for example, East Boston and Charlestown are separated from the rest of Boston by Boston Harbor and the Charles River and each of the harbor islands is represented by a its own polygon - and a separate row in the Attributes of matown00 table. Hence, we have a 'one-to-many' database problem whereby each city or town may be associated with more than one spatial feature. We can find a way to resolve this problem using ArcMap's 'Summarize Table' function. In this part of the lab, you will solve this problem, with some modest variations in the basic procedure. In particular, we will strive to obtain a better estimate of population density by excluding small islands of 100,000 square meters (10 hectares) or less.
Open ArcMap and add the MassGIS shapefile for Massachusetts municipal boundaries from M:\data\matown00.shp. Make a copy of the matown00 layer by copying and pasting it into the same dataframe. Now you have two matown00 layers in your dataframe. Rename one of the layers to Towns and modify its layer properties so that the layer's definition (in the 'definition query' tab of the layer properties window is defined by this query:.
( "Area"> 100000 )
Now modify the other copy of the matown00 layer so that it is defined by this query:
( "Area"<= 100000 )
Rename this theme to Small Islands. Zoom into Boston and the harbor and turn the Small Islands layer on and turn the Towns layer off. Now you can see the smaller harbor islands that you excluded from Towns.
Next we want to create a new table that aggregates the area by town for the Towns layer. The new table will contain the name of the town, the total area for that town (exclusive of the islands), and the town's population for 1980 and 1990. Open the attribute table for the Towns layer first. Since we want to do the aggregation by town, right click on the column name "Town_Name". On the pop-up menu, select Summarize. The "Summarize" window appears.

On the "summarize" window, select the Town field in the table as the field to summarize. (The "TOWN-NAME" field shown in the attribute table is an alias of the field "TOWN"). Make sure that none of the towns are selected; if any are, then your summary table will contain records for only those selected towns. Then, change the name of the output file from the default to I:\[your working directory]\town_density.dbf. For the statistics to summarize, select the Sum for AREA field, Minimum for POP1980, and POP1990 fields, (Why don't we use sum for POP1980, and POP1990? Can we use Maximum or average for POP1980, and POP1990? )
ArcMap will ask you whether you want to add the new table to the map document. Select Yes. town_density.dbf will be added to your document. We now have the raw data we want -- the town areas and the populations -- but we have not yet computed the densities. Let's do that now. Using the techniques you learned in Lab 3 for editing data tables, add these fields to your table:
AreaMi2 Town's area in square miles PopDen80 Population density per mile in 1980 PopDen90 Population density per mile in 1990
To convert square meters (the units of area used in Towns layer) to square miles, divide by 2589988.
When you're finished with the calculations, join the town_density.dbf table to the Towns layer, as described in the section entitled "Merging Data Tables" in Lab 3. Now create a thematic map of the population density in 1990. Focus your map on eastern Massachusetts just beyond Interstate 95 ( known as Route 128), Boston's inner ring road. (You can add the majmhda1.shp that you used in lab #3 to locate the ring road.) Use the Small Islands theme to show the islands colored white. Export your map to a PDF file and put it in your personal web space.
If you have extra time, you can consider making a similar map of the 1980 population density and comparing it with the 1990 density map and a map that shows 1980 to 1990 population density change.
ArcMap's charting tools are somewhat meager compared with, say, a spreadsheet like Excel. For example, you can't easily plot a histogram of the population density that you just computed since it is cumbersome (using ArcMap's table manipulation tools) to group the data into intervals. Nevertheless, the charting tool is still handy for exploring geographical patterns. To illustrate this, let's chart our newly computed population density and examine the relationship between population density and town size.
Go to Tools > Graphs > Create. This opens the graph wizard. On the first wizard window, select "Bar" as the graph type (either "Horizontal Bar" or "Vertical Bar"). And select "towns" as the layer. Select PopDen90 as the value field to graph. Check the show legend option and label X-axis ("Y-axis" if you chose "Horizontal Bar") with town name. Click "Next," and make sure to check the option "show all features/records on graph". Type in the title Population density in 1990. Click finish, a graph will appear.
Notice that this graph is not readable because it contains too may towns.
Although we request showing legend and labels, they can't all show up. We can
make it readable
by selecting fewer towns. Highlight the map window, make sure the Towns
layer is selected and use the point-and-drag selection tool ![]() to highlight several towns on the map. Notice that the chart window is *not*
updated automatically. If you have closed the chart window already,
go to Tools > Graphs >
Population density in 1990 to open the chart. Right click on the
window bar of the chart to open the chart property window. In the "Appearance" tab,
check "show only selected features/records on the graph". Click OK. You'll notice that
the chart window now shows a bar chart of the population density for the selected
towns.
to highlight several towns on the map. Notice that the chart window is *not*
updated automatically. If you have closed the chart window already,
go to Tools > Graphs >
Population density in 1990 to open the chart. Right click on the
window bar of the chart to open the chart property window. In the "Appearance" tab,
check "show only selected features/records on the graph". Click OK. You'll notice that
the chart window now shows a bar chart of the population density for the selected
towns.
On closer inspection, you'll notice that the chart is misleading. If you zoom in near Boston and select towns near Boston Harbor, this time, the chart will be updated automatically. Maximize the chart window, you'll notice that Boston shows up more than once in the bar chart. This is because the Attributes of Towns table has more than one row for Boston -- one for each harbor island and for other isolated parts of Boston such as East Boston and Charlestown. Each piece of Boston is estimated to have the same density and we'd like to have Boston (and the other towns) show up only once on the chart. We can accomplish this by using the table town_density.dbf that we created in Part I in order to compute a more meaningful population density. At the moment, this table is joined into the Attributes of Towns table (so we can create a thematic plot of population density). We still want that thematic map, but we also want to work with the grouped table to get a meaningful chart. To do this, we can 'relate' the grouped table town_density.dbf to Attributes of Towns. Make a new copy of the Towns layer and rename it Town_chart. Open its layer property window and go to the tab joins and relates. Since it is a copy of Towns layer, it keeps all joins that Towns layer has. Remove the existing join first. And then add a relate to it in the similar way as we joined the town_density.dbf to the layer and click Apply.
If town_density.dbf were joined into Attributes of Town_chart, then selecting a row in Attributes of Town_chart will select the corresponding row in town_density.dbf. However, the behavior is different for related tables. ArcMap (unlike an earlier version called ArcView), selecting rows in one table does not automatically select corresponding rows of a related table. To see the corresponding rows in a related table, you should click option in the bottom of the table and select related tables > [name of relation]. Then the corresponding rows in the town_density table will be shown.
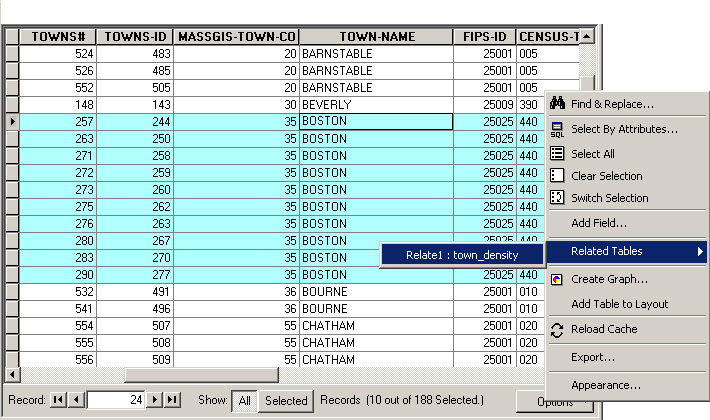 |
Linking in this manner is useful here because we can select towns on the map, which will
in turn select rows in both tables. We can then use town_density.dbf
to make a good chart, since this table has only one row per town, unlike Attributes
of Towns.
Make sure the town_chart layer is active. Select
several
towns around Boston , including the city of Boston. Then, open the
attribute
table of town_chart layer. Select options. On the pop-up menu,
go to related tables > town_density. The town_density table appears.
Compare the number of the selected records in these two tables.
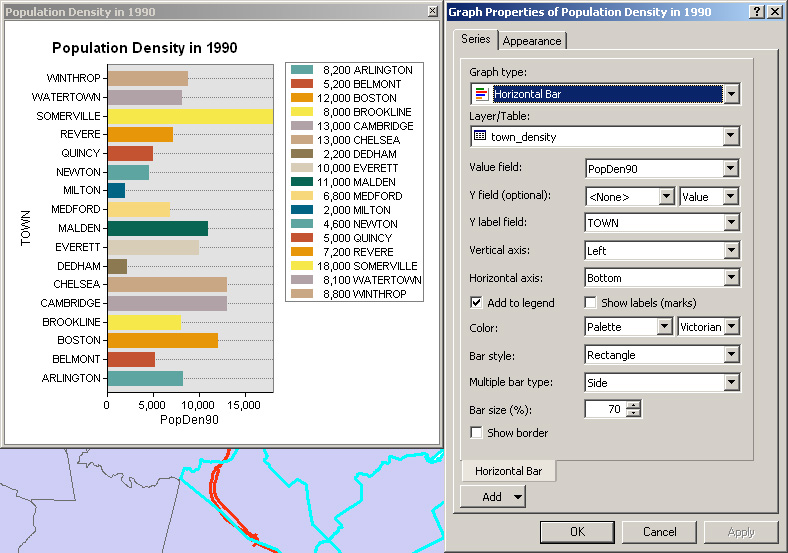
Now, we can change the data source of the chart to town_density.dbf. Open the graph property window, under the Series tab, pick up town_density as the table containing the data. Pick up PopDen90 as the field to graph. Make sure the option "show only selected features/records on the graph" is checked. Click OK and go back to the chart window. You'll see the updated bar graph of population density -- with only one bar per town (Note, that the images below are only examples and the numbers in your images will be different depending upon which towns (or municipalities) are in your selected set.)
|
|
Notice that whenever you select a new set of the towns in towns_chart layer, you need to update the selection set of the related table, town_density.dbf, by opening the town_density.dbf from the attribute table of towns_chart layer. (Go to Options > Related tables > Towns_density.) And update the graph in the graph property window as well. Now test this by selecting a few towns from the map in the view window.
Create a layout that includes a map indicating the dozen or so towns you've highlighted on the map, a table listing those towns, and the chart you created. You will need to add chart and table frames to a basic map layout. Be sure to include Boston so we know that you've properly collapsed the town. Create a PDF file from the layout and save it in your athena locker.
If you have extra time, experiment with other chart types. In particular, experiment with plotting population density vs. town size (area) and population change (the 1990/1980 population ratio). You may also want to experiment with the use of MS-Access and MS-Excel to calculate and plot Massachusetts densities. For example, you might import a copy of the matown00.dbf part of the shapefile into MS-Access and then write a query that groups the rows by town and compute population density (in the same manner that was illustrated in the previous lecture).
Extra note
Another feature in ArcGIS (and ArcMap) that is different from the earlier ArcVIEW
is that the links are bidirectional rather than unidirectional,
which means that you can choose rows in town_density table
and see the corresponding rows and polygons of Towns layer (instead of working only in the other direction).
Let's test it. First, open the town_density table and select
a row in Boston. Click the option button in the bottom of
the table, then related tables > [relate name]. Three
tables will pop up: the Attribute table of Towns, the Attribute
table of Small_islands, and the Attribute table of Town_chart.
That's because those three layers are basically one coverage with different
names.
Created September 2001 and modified 2001-2008 by Joseph
Ferreira, Jr. and Thomas H. Grayson, Jeeseong
Chung. Jinhua
Zhao, Mi Diao. Yang Chen, and Yi Zhu.
Last modified 29 September 2008 by Joe Ferreira
Back to the 11.520
Home
Page.
Back to the CRON
Home
Page.