STISIM Drive - Driver Information Option
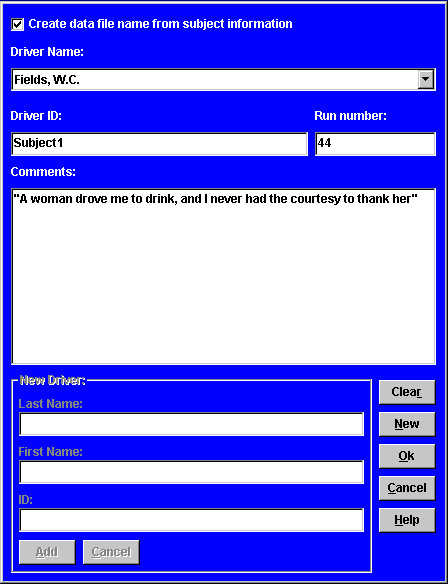
At some point during every project where a large amount of driving data will be collected using STISIM Drive, the same question always occurs, "How are we going to catalog all of this data?" This is a good question and raises a potentially complex issue about data collection and archiving. Somehow the data must be saved so that it can easily be recalled and associated with a particular participant. STISIM Drive offers some capability in this area with its driver information dialog window. When clicking on the "Driver Information" option (from the Run menu in the main menu bar), the following dialog window will be displayed:

Looking at the dialog window, you will see that there are several different areas where you can input some information. At the top of the dialog window is a check box that informs the program whether or not to use the information to create a file name. This is a handy option if you will be running multiple subjects, multiple times because it will automatically create the data file name for you. If this option is checked, the program will take the "Driver ID" field and combine it with the "Run Number" field (with an underscore between them and a .DAT extension) to create the simulation run data files. For example, if the screen shown above was used, the STISIM Drive data file would be named Subject1_44.DAT. By providing a unique identifier for each driver and then specifying the run number, you can easily create and track the data files that are created.
The next piece of information the program requests is the driver's name. If the driver has already been entered into the system, then you can click on the down arrow at the right of the text box to get an alphabetized list of all the current drivers. Simply go through the list and choose the desired driver. If the driver does not currently exist within the database, then you can simply add them by clicking on the "New" button (we will talk more about this later). After a driver's name has been chosen, the window will display the driver's ID and the number for the last run the driver attempted. You can not change the driver's ID but you can change their run number. To change the run number, simply highlight the field and change it to the desired value. The run numbers don't have to be numerical, you can use A, B, C etc., if desired. Once the driver has been chosen and the run number established, any final information that you would like to enter about the driver can be specified inside the comments text box. This way you can track developments on a day to day or run to run basis.
The section above dealt only with drivers that are currently in the STISIM Drive database. What about new driver's who are just starting? These drivers can be added by choosing the "New" button from the group of buttons in the lower right section of the window. When the new button is chosen, frame and text boxes to its left will be activated. At this point, simple enter the last name, first name and a unique identifier for the new driver. The unique identifier will be used create output file names if desired as well as giving you a way to distinguish between people with the same names. If the information is correct and you would like to add the new driver to the database, simply click on the "Add" button. If for any reason you change your mind and decide not to add the new driver, simply click on the "Cancel" button and the information you entered will be deleted. Once you add a new user, the dialog window will default to this setting so that all you need to do is enter a run number and click "Ok" and you will be ready to go. If you try to add a new driver by using a name and ID pair that currently exists, the program will display a warning message. You should also note that the driver's name and ID are case insensitive.
As was mentioned above, when you have specified the driver and their new run number, all that is left is to choose "Ok" and the simulation will proceed. However, if for any reason you decide not to use this information, clicking on the "Cancel" button will disregard the information entered and continue on with the simulation run. When STISIM Drive determines the file name that will be used, it will still check to make sure that this file does not currently exist. If the file does exist, a warning message will be issued and you will have the choice of overwriting the file or stopping and trying again.
A couple of final notes on the driver information dialog window. You may notice that we did not say anything about the "Clear" button. Well here it is. The "Clear" button clears the comments field. If you run one run right after the other, the program will automatically load the information from the previous run. This means that the comment field will remain the same. If you want to delete the comments in the comment field, simple click on the "Clear" button. Even more important than the "Clear" button is the ability to always have the driver information dialog window appear before the start of the next simulation run. If you know that you want to enter driver information before each run, there is an option in the simulator configuration that forces the program to prompt you for the information before each run (review the Other tab options in the configuration option).