Running STISIM Drive
Your ultimate objective
when using STISIM Drive is to design a scenario that depicts a realistic
roadway environment that a person can navigate through and interact with the various
events that you have inserted into the environment. Each STISIM Drive scenario
is comprised of 2 completely separate yet integrated parts:
1.
Simulation Configuration
2. Simulation Events
The simulator configuration
consists of all of the simulator parameters that you can set that are specific
to the way the simulator will run and not to a specific simulation event (Options). These parameters include such things as
simulation colors, graphics modes, various hardware configurations, etc. These
parameters are grouped together and saved in a single configuration file. You
can have numerous configuration files each with different parameters so that
you easily swap your simulator configuration as needed. The configuration files
are loaded and saved using the Files menu option
in the main menu bar.
The simulation scenario is
designed using STISIM Drive's Scenario Definition Language
(SDL). The individual events are grouped into a project file that is
specified by the user and then read into memory by STISIM Drive. As the
simulation runs, it will use the various events from the file to generate the
roadway environment that the driver will navigate. Like the configuration file,
you can create and save an infinite number of project files. Project files are
simple ASCII text files that can be created and saved using any text editor.
Loading a project file is discussed later (Input/Output_Files).
You have just learned that every simulation run is comprised of 2 integrated
parts, the simulation configuration and the simulation events. To actually run
a simulation, you must first supply configuration and project files, and then
you can run the simulation (Running_A_Simulation_Run).
STISIM Drive comes in a
couple of configurations, a simple single screen simulator, a wide field of
view simulator and with an optional advanced dynamics option. If you have a
system that is just the single screen without advanced dynamics, you can skip
the remainder of this paragraph. With the multiple configurations, there are
multiple ways to run the program. If you have a system that uses the advanced
dynamics, you will need to run the VDANL Drive program before starting STISIM
Drive. To execute VDANL Drive, simply click on the VDANL Drive icon located on
the Windows desktop, this will start VDANL Drive and that is all you need to
do. VDANL Drive will create a window that will contain information about its
current status and then wait for the initialization and startup commands from
STISIM Drive. If you are using a wide field of view system you will need to
start the STISIM Drive program on both the left and the right computers. When
the program is started, an information box will be displayed informing you that
the computer is waiting for commands from the center system. To start the
program, use the STISIM Drive icon located on the Windows desktop. That is all
you need to do to get the peripheral systems running. On each of the peripheral
computers, the installation procedure places a shortcut to the program in the
Windows StartUp directory. This means that if Windows is rebooted, the program
will activate immediately and you will not have to start it using the icon. On
the wide field of view system, all of the program files, models, projects, etc.
are stored on the center system and are accessed by the side systems through a
network map. This means that none of the files has to be present on the side
machines in order for the program to work. This greatly reduces the number of
files that you must keep track of and makes updating the simulation software
much easier. For the advanced dynamics system, the program files are located on
the dynamics computer.
All of the actual user
input, configuration selection and project selection occurs on the center
computer, therefore the remainder of this section pertains to what you must do
on the center system. On the center system there are 2 basic ways to run STISIM
Drive, either in a stand alone mode where you interact with the STISIM Drive
environment, or in a batch mode where everything is already setup and all it
does is run. Either approach is acceptable and in reality you will most likely
use a combination of the two, where you use the interactive approach to design
and setup a final scenario that is then repeatedly run using the batch
approach. Since the batch approach is the easiest, it will be discussed first,
followed by a much more lengthy and detailed discussion of using the STISIM
Drive environment.
The easiest way to run in
batch mode is to setup a shortcut in a STISIM Drive batch folder or on your
Windows desktop. To do this, first launch the STISIM Drive program group.
Generally you will do this by right clicking on the Windows "Start"
button. Your startup folders will be shown. Next, double click with the left
mouse button on the "Programs" folder. This should display another
group of folders. Next, double click with the left mouse button on the folder
called "STISIM Drive". This will open yet another group that contains
the STISIM Drive icon. Using your mouse, point at the STISIM Drive icon and
hold down the right mouse button (don't release it yet). Now, still holding the
right mouse button down, drag the icon until it is on your desktop or in the
folder where you would like the shortcut to reside (you may have to launch the
Windows explorer in order to create a folder and have it available) and then
release the right mouse button. A menu will appear giving you several options.
Choose the create shortcut option and click on it with the left mouse
button. This will create a shortcut to the STISIM Drive program. You can then
close all of the windows that you had to open to get to this point. Now, right
click on the STISIM Drive shortcut icon that you just created. Once again a
menu of choices will appear. Go to the bottom and choose the
"Properties" option. A tabbed dialog box with 2 tabs should appear.
Choose the "Shortcut" tab using the left mouse button. There will be
a dialog box entitled "Target:". This shows the location and name of
the program that will be run. You can modify this line so that when the icon is
chosen, the program will automatically run the simulation of your choice. The
line uses the following syntax:
{Program} {Project file
name} /{Data file name} /{Configuration name}
For example:
"STISIM Drive"
Sample.evt /Sample.dat /Sample.cfg
In this example, when
STISIM Drive is launched, it will bypass the STISIM Drive environment and go
right to running the simulation. It will first load the configuration file
Sample.cfg followed by loading the project file Sample.evt. At the completion
of the simulation run, a data file named Sample.dat will be created. That is
all that is required for running in batch mode, however all of the leg work was
done previously when the configuration and project files were designed. This is
just a convenient way to run the same scenario over and over again.
The STISIM Drive environment
is comprised of 4 elements that all appear in the main window when the program
is launched, 1) Main_Menu_Bar, 2) Information_Boxes, 3) Input/Output_Files, and 4) General Information.
The first element is a standard Windows menu bar that is common to most
Windows programs. Each of the options in the menu bar controls a different capability
of the program and most contain multiple options from which you can choose
additional functionality. The menu options are:
The second element of the STISIM Drive environment is comprised of the
following 2 information boxes:
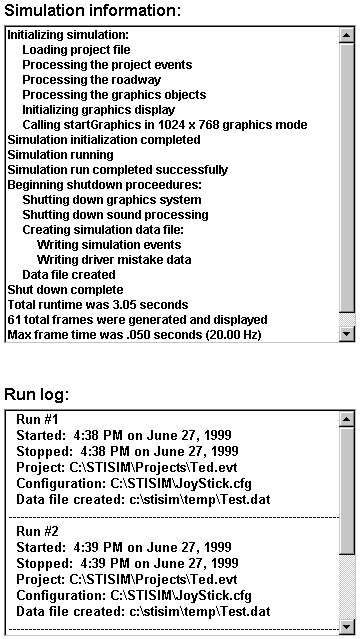
These information boxes are
intended to provide you with some timely feedback on the simulator
configuration and how well it is functioning and also on previous simulation
runs. The top box (labeled Simulation Information) provides a running list of
what the simulator has done as it prepares your simulation run. This is
invaluable information especially if you are having trouble getting the
simulator running. This box will list the last successful operation that the
simulator performed before the system crashed thus providing us with some idea
of what the problem may be. As the simulator initializes useful information
such as the graphics mode being used and the status of any network
communication will be displayed. At the completion of a simulation run additional
information such as the slowest frame and the total length of the run will also
be displayed. In general if you never have to look at the simulation
information list you are doing good, however it is worthwhile to look at its
contents every now and then. Each time a new simulation run is requested, the
simulation information list will be deleted and a new list started.
The run log list keeps a running log of each simulation run that has been conducted since the program was started. Contained in this list is information about the start and end of the run, the project file that was run, the configuration that was run and the data file that was created. Once you exit the program, the run log list will be deleted and will no longer be available. A vertical scroll bar will allow you to scroll through information if numerous runs have been conducted.
The third element of the STISIM Drive development environment are the
following 2 data file entry boxes:
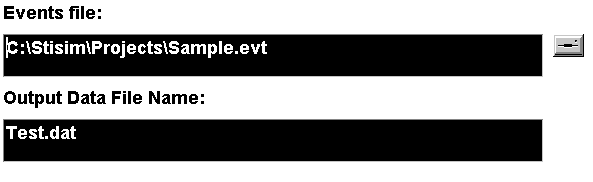
These text boxes are extremely important because they offer the only capability for entering the name of your desired events file, and the data file that will be created at the conclusion of the simulation run. As you learned earlier the roadway driving environment and all of the events that the driver will see are grouped together in an events file, therefore you must submit the name of an events file before the program will allow you to run a simulation. You may either type in the name of the file that will be used or you can click on the disk browsing icon (disk drive looking thing to the right of the events file text box) and choose a file from the Windows file dialog box that will be displayed. For the output data file name you must type in the name (without a subdirectory) of the file where the data will be stored. In the Configuration option, you can specify a subdirectory where all of the data files will be stored. A discussion of the data that is contained in the output file can be found in the section on STISIM Drive data file.
The fourth and final element of the STISIM Drive development environment is the small gray status bar at the bottom of the window. On occasion this bar will display some useful information to you as you design and run your scenarios. One piece of information that will always be displayed to you is the current configuration file that is being used. This appears in a small box on the left side of the status bar. In the more advanced models of the simulator (to be more specific, systems that use network communications to link multiple computers) the status bar also displays the state of the network communications before the run begins. If you have a system using network communications, display boxes will appear in the status bar and they will contain either a red or green light and the name of the system that is being referenced. If the light is red then the external system is not quite ready, once it turns green then it is ready to go. If the light does not turn green within some reasonable amount of time (dependent on the length of your scenario), then there is probably some problem with the system that has not been cleared to go.
Up till now we have described the critical parts of the simulator and
the STISIM Drive user's environment. Now it is time to impart upon you the
simple steps that are required to actually execute a simulation run. Remember
that these are just a simple set of guidelines and your use may vary,
especially if you are in the development stage and not the actual final run
stage. These guidelines also assume that the hardware is installed correctly
and that there are no hardware related problems that currently exist. In any
event, here are the general guidelines:
Scenario Development:
1. Using the Options option in the
program's main menu bar, choose the Configuration option. Navigate through the
various configuration tabs setting the various parameters to the values you
desire.
2. Using the Options option in the
program's main menu bar, choose the Set Simulation Colors option. Go through
and define any special colors that you would like to use during the simulation
run.
3. Using the Options option in the
program's main menu bar, choose the Assign Simulation Colors option. Go through
the list and assign colors to the various simulation objects.
4. Using the File option from the
program's main menu bar, choose the Save Configuration option. This allows you
to save any changes that you made during steps 1-3. You can name your
configuration file anything that you like and there can be an infinite number
of configurations (hard disk space dependent). When STISIM Drive starts, it
automatically loads the first configuration file in the most recent file list,
or a default file named STISIM.CFG. If you will be using the same configuration
on a regular basis, you may consider saving it and then creating another copy
and calling it STISIM.CFG.
5. Using the Edit option (or any editor of
your choice) begin creating a project file by placing various events from the SDL in the file. When you are ready to test your roadway
environment save the file to a file name of your choice.
6. Using the project file name text box, the disk browsing icon, or the
most recent file list, choose the project file that you would like to test.
7. Using the output data file name text box, enter a data file where any
data from the test run will be stored. Since you are in development mode, using
the same name over and over works pretty well. However, we tend to use original
files names such as Test.dat so that we don't get confused.
8. Using the Run option in the program's
main menu bar, choose the Begin Simulation Run option. This will display the
simulation run time information box. When the command button changes from Abort
to Start, click on start to begin the simulation run.
9. Repeat steps 1-8 in an iterative pattern until you have created your
final project.
Simulation Runs:
1. Using the File option in the program's
main menu bar, choose the Load Configuration option. Choose or enter the name
of the configuration file that you would like to use.
2. Using the project file name text box, the disk browsing icon, or the
most recent file list, choose the project file that you would like to run.
3. Using the output data file name text box, enter a data file where any
data from the test run will be stored.
4. Using the Run option in the program's
main menu bar, choose the Begin Simulation Run option. This will display the
simulation run time information box. When the command button changes from Abort
to Start, click on start to begin the simulation run.
That is basically all there is to it, just a few minor details left out
here and there and you will be up and running in no time.