SPICE is a handy computational tool to do circuit simulation. It can perform steady state DC, small signal AC, and transient analyses. This handout will cover the basics to get you started.
We will be using the version of spice available on Athena called hspice. The basic steps used to simulate a circuit are:
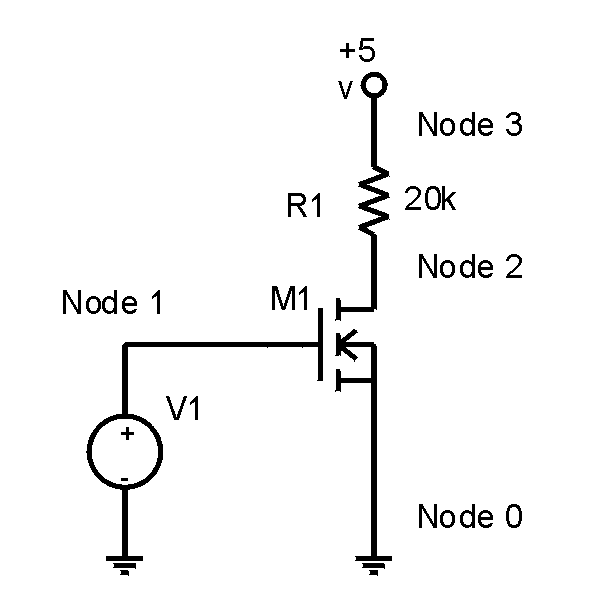
As a demonstration, let’s analyze the following n-MOS inverter circuit using SPICE.
To begin, label each node in the circuit. Note that the ground node should always be node 0. The others can be arbitrarily assigned. It’s good to use some sort of convention: it makes debugging easier when the circuits get more complicated. Be sure that every node has at least two elements connected to it. SPICE won’t let you simulate with floating nodes.
Next we suggest that you create a new directory to keep all your 6.012 SPICE files in one place. Then add the 6.012 and hspice lockers:
athena% mkdir my_spice_stuff
athena% cd my_spice_stuff
athena% add 6.012
athena% add hspice
Some homework problems will require that you use device models provided in the 6.012 locker. Copy these files to your working directory:
athena% cp ~6.012/hspice/models/* .
Now open a file for editing using your favorite editor. This will be the file that SPICE reads to simulate the circuit.
athena% emacs my_inverter.sp &
Here’s some SPICE code basics. The first line of code is the title used to reference the circuit throughout the output file. This is especially important for big circuits consisting of many small sub-circuits from different files. The SPICE comment character is the asterisk, "*". Be sure to comment your code when the circuits get complex or you want include information like your name, the problem number, the date, etc. SPICE commands begin with a period. The most important is .end: each .sp file should end with .end. To include any device models from other files use an .inc command. Also be sure to put in a .op and .options post.
To illustrate, here’s the code for the n-MOS inverter:
My first inverter * Title
.options post * Required
.op
.inc "mos_models" * Includes the mos_models
M1 2 1 0 0 NMOS L=1.5u W=3u * The MOSFET
R1 3 2 20k * 20k resistor
Vdd 3 0 dc 5 * Supply voltage Vdd=5V
Vin 1 0 dc 0 * Initialize Vin=0V
.dc Vin 0 5 0.1 * Sweeps Vin from 0V to 5V
* in increments of 0.1V
.end * .end - gotta have it
After the initial header, the "netlist" begins. This is where all the circuit information is entered. Lines have a very specific syntax: they begin with an element label and are followed by the node numbers and values for the part. Labels must begin with the proper letter, nodes must be entered in a certain order, and parameters have assumed units. Active devices must include a model name. This is outlined below.
|
Component |
Name |
Nodes and values |
Units |
|
Resistor |
Rxxxxx |
N+ N- VALUE |
ohms |
|
Capacitor |
Cxxxxx |
N+ N- VALUE |
farads |
|
Inductor |
Lxxxxx |
N+ N- VALUE |
henries |
|
Voltage source |
Vxxxxx |
N+ N- QUALS VALUE |
volts |
|
Current source |
Ixxxxx |
N+ N- QUALS VALUE |
amps |
|
Diode |
Dxxxxx |
N+ N- MOD_NAME AREA(opt) |
meter2 |
|
BJT |
Qxxxxx |
NC NB NE NS(opt) MOD_NAME AREA(opt) |
meter2 |
|
MOSFET |
Mxxxxx |
ND NG NS NB MOD_NAME L= W= |
meters |
Component names can include letters and numbers, but must begin with the specified letter. N+ and N- are the positive and negative nodes of a device (if it matters). Node names can consist of letters and numbers. The QUALS for the two sources are a set of qualifiers specifying whether the source is dc (with amplitude) or ac (with magnitude and phase). The default is a dc source as in the example. To apply a step input, using a piece-wise linear modifier is helpful. The form is "VNAME N+ N- PWL(T1 V1 T2 V2 …)" where T1, T2, … are the times when the voltage is V1, V2, … respectively. The voltage is connected linearly between points. To illustrate, a step in Vin from 0V to 5V after 10ns that takes 0.1ns and lasts until 150ns would be:
Vin 1 0 PWL(0 0 10ns 0 10.1ns 5 150ns 5)
For the semiconductors, the MOD_NAME is user specified. If you look in the file mos_models, you will see two models with model names NMOS and PMOS. The AREA is optional for both diodes and BJT’s. For the BJT, NC, NB, NE, and NS are the collector, base, emitter, and substrate nodes respectively. For the MOSFET, ND, NG, NS, and NB are the drain, gate, source, and back nodes respectively. L and W are the channel length and width.
After the netlist comes simulation controls. The example has the line:
.dc Vin 0 5 0.1
which tells SPICE to sweep Vin from 0V to 5V in steps of 0.1V. The general form of this command is ".dc SRCNAME VSTART VSTOP VINC" where SRCNAME is swept from VSTART to VSTOP in steps of VINC. We’ll be able to view the results of sweeps using "awaves".
Another control (not used above) is an ac frequency sweep. If we had an ac source somewhere in the circuit, we can use ".ac TYPE NP FSTART FSTOP". TYPE is either DEC, LIN, or OCT specifying a decade variation (ie: log sweep), a linear sweep, or an octave sweep respectively. NP is the number of points per decade/octave for DEC/OCT or the total points for LIN. FSTART and FSTOP are the beginning and ending frequencies. For example:
.ac DEC 20 1 10k
runs a logarithmic ac sweep from 1 Hz to 10 kHz with 20 points per decade. Note, if there are multiple ac sources, all the sources will sweep together.
A third way to look at a circuit is to use transient analysis. Transient analysis will show what happens temporally during a given time period. The syntax is
".tran TSTEP TSTART(opt) TSTOP" where TSTEP is the time step size and TSTART/TSTOP are the beginning and ending times of the analysis. If TSTART is omitted, the analysis will begin at time zero. For example:
.tran 10ns 1us
will run a 1 msec transient analysis at 10-ns increments.
SPICE is case-insensitive which leads to some ambiguity when using prefixes with units (ie: is MV micro-volts or milli-volts or mega-volts?). When in doubt, scientific notation can always be used. Also note that any letters following a prefix are disregarded. Thus 10G is the same as 10GHZ is the same as 10GV. SPICE knows the unit type by where the number is, not by what is typed. An outline of the prefixes is shown below.
|
Prefix |
Multiplier |
Prefix |
Multiplier |
|
|
K |
1e3 |
M |
1e-3 |
|
|
MEG |
1e6 |
U |
1e-6 |
|
|
G |
1e9 |
N |
1e-9 |
|
|
T |
1e12 |
P |
1e-12 |
|
|
F |
1e-15 |
One of SPICE’s most useful features is its ability to model many devices, given their model parameters. If we’re given measured data on a component, we can easily create a new model and see how this device works. To do this, the .model line is used with the general form of
".model MOD_NAME TYPE <PARAMS>". MOD_NAME is the user-defined name that will be used in the netlist. TYPE is one of 5 semiconductor device abbreviations: D, NPN, PNP, NMOS, and PMOS. D is for a diode, NPN and PNP are for BJT’s, and NMOS and PMOS are for MOSFETS. The PARAMS are a list of model parameters defining the device. There are many different things that can be specified about a given device, and SPICE has a huge list of abbreviations for them (I won’t even try to list them). If a model line runs over one line in
your text editor, begin the second line with a "+" to denote a continuation. For example:
.MODEL NMOS NMOS LEVEL=2 LD=0.15U TOX=200E-10
+ NSUB=5.37E15 VTO=0.74 KP=8E-5 GAMMA=0.54
+ PHI=0.6 U0=656 UEXP=0.157 UCRIT=31444
+ DELTA=2.34 VMAX=55261 XJ=0.25U LAMBDA=0.037
+ NFS=1E12 NEFF=1.001 NSS=1E11 TPG=1.0 RSH=70
+ CGDO=4.3E-10 CGSO=4.3E-10 CJ=0.0003 MJ=0.66
+ CJSW=8E-10 MJSW=0.24 PB=0.58
is the NMOS model called NMOS given in the file mos_models. Note that it is really bad practice to name your model after the model type as done above. As in our example file above, if the model is defined in a separate file, simply use a .inc "filename" to include that model. If you are asked to vary a parameter, you can define a new device with the new parameter and re-run the simulation. To do this in a single simulation, the .alter command can be used. Every time that .alter appears, the simulation is repeated with everything the same except for the change in the line following the .alter command. A single .sp file can have many alterations. For example, to re-simulate our inverter with a 15mm width instead of a 3mm width, all we need to add is:
.alter
M1 2 1 0 0 NMOS L=1.5u W=15U
When the .sp file is completed, run hspice to simulate. The simulation results are put in the output file specified when hspice was called. If you re-run a simulation, you must delete previous output files (use the "rm filename" command). The output file contains a lot of information about bias points, the states of devices, power consumption in the circuit, etc. To view analysis information like the results of a dc sweep, a graphical program "awaves" is used. Awaves, short for Avanwaves, is pretty user-friendly and easy to learn. After simulating the .sp file, type:
athena% awaves &
Use <Design><Open> to select a .sp file and click OK. The Results Browser window should pop-up with the top portion listing the available analyses. When you click on one, the appropriate x-axis will be chosen (although you can change it if you want), and you can pick from a listing of the node voltages and currents. Double-click on a node to display it. You can choose another analysis within the same simulation and double-click on a voltage to plot multiple curves on the same graph. If you change something in your .sp file and re-run hspice, you can update your awaves plots using <Panels><Update>. Awaves has many zoom and measurement features you can explore.
This brief introduction to SPICE is by no means comprehensive. Feel free to ask about other features or ways of doing things.