Useful links
Goal
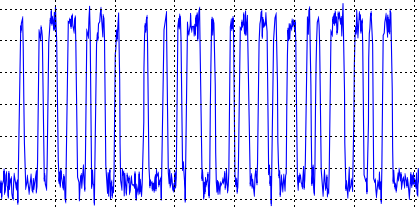
In this lab we'll work on decoding sequences of received voltage samples like this:
into a string containing the transmitted message (in this case "hi there").
Instructions
If you work on your own machine, you'll need to download and install the software we'll be using. Stand-alone installers exist for almost any modern computing environment. For package-based systems, there are packages you can install to supply the needed software. You'll need:
If you use an Athena workstation, issue the add 6.02 command to gain access to the 6.02 locker which has all the needed software installed. After adding the course locker, run your Python code using either the python602 or ipython602 command to start up a version of Python/IPython customized with all the necessary modules.
ipython602 offers an effective and convenient "calculator mode" interface to Python, making it easy to explore and debug. To test your modules as they evolve, just type %run xxx to the iPython prompt, which will reload xxx.py and run it.
Task 1: Plotting received data samples (1 point)
Many wire-based digital signaling systems encode data by transmitting a sequence of voltages down the wire which are then sampled by the receiver. The exact assignment of voltages depends on the communication protocol, but typically a single data bit is represented by one of two voltages and there's a specification that tells how to interpret the voltages as bits. Here's the specification we'll be using:
For this task the transmitter will be sending either -0.5V or +0.5 volts with quick transitions between signaling levels. But by the time the signal reaches the receiver we'd expect to find slower transitions and some amount of noise added to the signal. We'd also expect some attenuation (i.e., reduced voltage swings), but we'll be ignoring this effect for this lab since it's easily corrected by an amplifier whose gain is automatically adjusted to restore the signal to it's original levels (usually labeled "AGC" in receiver block diagrams).
The received signal is represented by a numpy array containing floating point numbers representing voltages sampled from the wire at 256,000 samples/second. The symbol rate is 32,000 symbols/second, i.e., each data bit appears as eight consecutive samples (assuming the receiver's sampling clock is exactly matched to the transmitter's -- more about this in Task 3).
Write a Python procedure plot_data that takes a single argument -- the numpy array described above -- and plots it as a new figure using routines from the matplotlib.pyplot module.
Start by downloading lab1.py to the directory in which you'll be doing your code development. This file contains code for testing your implementation. As second file, lab1_1.py, is a template for your Task #1 design file that shows how to use the testing code.
# lab1_1.py -- template for your Task #1 design file
import matplotlib.pyplot as p
import lab1

# if you're using iPython, the following call enable matplotlib's
# interactive mode so plots will appear immediately -- useful
# when experimenting...
p.ion()

def plot_data(data):
    """
    Create a new figure and plot data
    """
    pass # replace this with your commented code

# testing code.  Do it this way so we can import this file
# and use its functions without also running the test code.
if __name__ == '__main__':
    # supply some test data to plot_data...
    lab1.task1_test(plot_data)
Interview questions:
Looking at the plot:
Task 2: Recover digital data (4 points)
In this task the transmitter has been designed to send sequences of characters; each character is an 8-bit value. In the discussion below, we'll use "bit" to refer to a message bit, "voltage sample" to refer to a sampled voltage value and "digitized sample" to refer to a digitized voltage sample. Remember that in our scheme each bit appears as eight consecutive samples.
If there's nothing to transmit, 0-bits are sent. If there's a message to send, each character of the message is sent in turn using the following wire protocol:
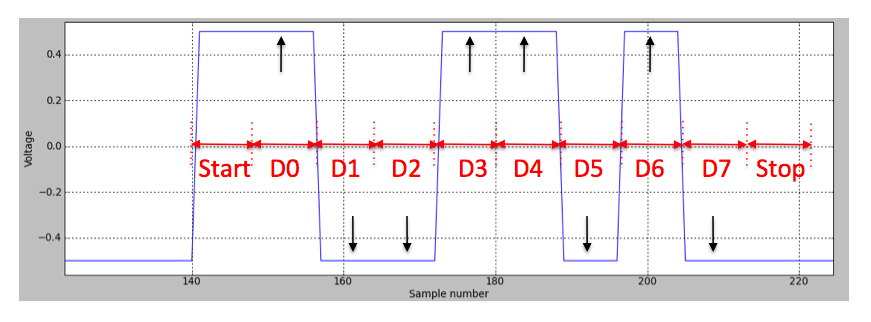
The following figure shows the transmission of the letter 'Y' which has an 8-bit representation (msb-to-lsb) of 01011001. During the active portion of the transmission a total of 10 bits are sent: the start bit, eight data bits and a stop bit. The black arrows mark the samples which the receiver should use to determine whether the received data bit is 0 or 1.
Write a Python procedure receive that takes a single argument -- a numpy array of sampled voltages -- and returns a string of the characters in the transmitted message. It's easiest if we break this down into several procedures:
Hint: consider comparing the samples array against a scalar threshold value using Python's > operator, which numpy extends to work with arrays. What threshold should you use? The comparison will return an array of boolean values showing the result of the element-by-element comparison. You can then turn an array of booleans into an array of 0's and 1's by multiplying the boolean array by 1. Note that multiplication of arrays with other arrays or scalars does element-by-element multiplication -- this is different behavior than for Python lists where multiplication makes multiple copies of the list.
Your code can assume that the digitized sample at d_samples[start] is a 0, i.e., the search is staring at a sample between transmitted characters. Good Python coders often include assert statements to check the truth of assumptions that are crucial to the correct operation of their code.
# lab1_2.py -- template for your Task #2 design file
import numpy
import matplotlib
import matplotlib.pyplot as p
import lab1

matplotlib.interactive(True)

def v_samples_to_d_samples(samples):
    """
    Convert an array of voltage samples into an array of
    digitized samples.
    """
    pass  # replace this with your commented code

def find_center_of_start_bit(d_samples,start,samples_per_bit):
    """
    Starting at d_samples[start] find the middle of the next
    START bit returning -1 if no start bit is found.
    """
    pass  # replace this with your commented code

def decode_data(d_samples,start,nbits,samples_per_bit):
    """
    Select specific data bits from digitized samples:
      start is the index of the first selected bit
      nbits is the number of bits to select
      samples_per_bit is the interval between selections
    Return selected bits as a list or array.
    """
    pass  # replace this with your commented code

def receive(samples):
    """
    Convert an array of voltage samples into a message string.
    """
    # digitize the voltage samples
    d_samples = v_samples_to_d_samples(samples)
    nsamples = len(d_samples)

    # search through the samples starting at the beginning
    message = []
    start = 0
    while True:
        # locate sample at middle of next START bit
        start = find_center_of_start_bit(d_samples,start,8)
        if start < 0 or start + 10*8 >= nsamples:
            break  # no START bit found or too near end of samples

        # grab the eight data bits which follow
        bits = decode_data(d_samples,start+8,8,8)

        # first convert bit sequence to an int
        # and then to a character, append to message
        message.append(chr(lab1.bits_to_int(bits)))

        # finally skip to the middle of the STOP bit
        # and start looking for the next START bit
        start += 9*8

    # join all the message characters into a single string
    return "".join(message)

# testing code.  Do it this way so we can import this file
# and use its functions without also running the test code.
if __name__ == '__main__':
    # see if we can decode the message
    lab1.task2_test(receive,'hi there')
While debugging your code, you might want to modify the test to first try a single-character message. You can use the plot_data function implemented in Task #1 to visualize what's in the various arrays.
Interview questions:
Task 3: Modern digital signaling protocols (5 points)
The simple START/STOP bit wire protocol described above is used in the RS-232 standard for sending data at modest rates (up to around 100,000 bits per second). It's quite serviceable but there's room for improvement:
To address these issues we use can an encoder at the transmitter to recode the message bits into a sequence that has the properties we want, and use a decoder at the receiver to recover the original message bits. Many of today's high-speed data links (e.g., PCI-e and SATA) use an 8b/10b encoding scheme developed at IBM. The 8b/10b encoder converts 8-bit message symbols into 10 transmitted bits; the transmitted bit sequences have the following properties:
Write a Python procedure receive that takes a single argument -- a numpy array of sampled voltages -- and returns a string of the characters in a message which has been sent using a 8b/10b encoder. Here's how to proceed:
A simple implementation would just locate the first instance of one of these patterns and decode the rest of the transmission based on that single synchronization. A better implementation would resynchronize on each occurrence of this bit pattern.
lab1_3.py is a template file for this task. The call to lab1.task3_test() invokes your receive function with an array of voltage samples resulting from encoding and transmitting the given message using an 8b/10b encoder. The encoder periodically inserts the special 10-bit synchronization sequences.
# lab1_3.py -- template for your Task #3 design file
import numpy
import matplotlib.pyplot as p
import lab1

def receive_8b10b(samples):
    """
    Convert an array of voltage samples transmitted by a
    8b/10b encoder into a message string.
    """
    pass # replace this with your commented code

# testing code.  Do it this way so we can import this file
# and use its functions without also running the test code.
if __name__ == '__main__':
    # supply some test data....
    lab1.task3_test(receive_8b10b,lab1.long_message)
You'll probably want to define some additional helper functions as we did for Task #2. And you can replace the lab1.long_message argument in the test with a shorter string when debugging your code.
Interview questions: