This lab will be held on Thursday, February 11, 2016 at 7:30 P.M. in 32-082.
This is a non-compulsory programming lab to help students familiarize themselves with programming with JavaScript and jQuery.
Last Updated: Sun, Feb 2 2015 at 10:30 P.M.
In this programming lab, you will be completing a series of exercises that will help you implement functionality in your web-pages. You'll be using the set of core technologies that drive most modern web applications, namely HTML, CSS, and JavaScript. We provide basic templates of the application interface in the form of HTML and CSS files. Your job is to implement it using the behaviors and functionality using JavaScript and jQuery.
Required Resources
You will need a a text editor, preferably with syntax highlighting. We recommend using Sublime Text, available on OS X, Windows and Linux.
References
Helpful videos selected by TAsGiven Files
Download the files required for this lab here.
Download the complete solution for this lab here.
Exercise 1: Selecting Elements, Getting Values, and Setting Values
For this exercise, open up lab2_ex1.html in your internet browser. You should see the a page that looks something like this:

Try clicking on the button named Change!. You will notice that it doesn't do anything currently. This is because our JavaScript and jQuery code has not yet been put in place.
The desired behavior is when the button is clicked, all occurrences of the word Blue should be changed to the text specified in the input field. The input field currently has the world Purple.
Now, open lab2_ex1.html in your text editor. Take a moment to understand HTML/CSS code that's present. Note that:
- The Change! button has the
id="button_change" - The input field has the
id="input_color" - All occurrences of the desired text to be replaced are enclosed within
<span>tags, and have theclass="cow_color".
Instructions
You will need to:
- Select the Change! button.
- Set a click listener on the button to capture click events.
- Retrieve and store the value currently in the input field.
- Find and select all occurrences of the relevant text.
- Replace the text with the stored value.
Detailed Instructions
Step 1: Selecting the Change! button
First, you want some way to get the button element and assign it to a variable. Because the button has the id="button_change", we can make use of jQuery's ID Selector. Thus, write the following line.
var button = $("#button_change");
Be sure to include the # symbol. This ensures you are selecting the element with id="button_change".
Step 2: Setting a click listener
Next, we want to attach a listener for clicks on the button. As such, we will make use of jQuery's .click() method. Attaching the listener to the button should be done as follows:
$(button).click(function() {
  // Actions to take upon button click goes here.

});
Step 3: Retrieving and storing the input value
In order to retrieve the text currently in the input field, we will first need to use the ID Selector, as we did in Step 1, but with id="input_color". Next, we will make use of jQuery's .val() method to retrieve the current entered text in the input field. So, next add in the following two lines, making sure that they are in the click function.
var input = $("#input_color");
var inputValue = $(input).val();
It is worth noting that you can actually perform the same action without the use of the input variable as follows:
var inputValue = $("#input_color").val();
Step 4: Select all appropriate text
We know that all the text to be replaced is within <span> elements, and has the class="cow_color". Instead of using the ID Selector, this time we make use of the jQuery Class Selector. Note the similarity with the jQuery ID Selector, except that instead of the hash symbol #, we use the period . symbol. So, add the following line to your function:
var element = $(".cow_color");
Step 5: Replace the text with the stored value
Finally, we replace the elements with the class="cow_color" from Step 4 with the value we retrieved from the input in Step 3. In order to perform the replacement, we essentially need to replace the contents between the tags <span> </span>. This is done using jQuery's .html() method. Thus, add the following line to your function:
$(element).html(inputValue);
When you complete this step, you should be done. Test the functionality of the application by saving and reloading lab2_ex1.html in your browser. Press the Change! button, and you should see both occurrences of the word Blue in the text get changed to Purple.
Exercise 2: Attributes, Classes and CSS Manipulation
For this exercise, open up lab2_ex2.html in your internet browser. You should see the a page that looks something like this:
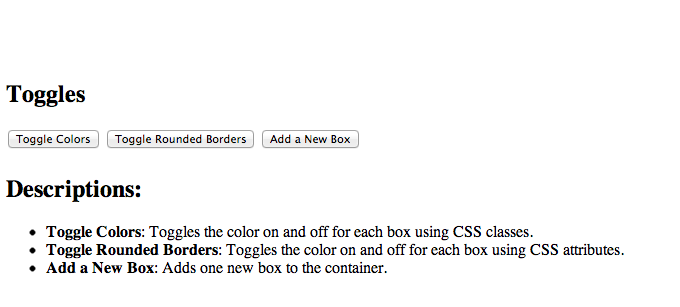
Try clicking on any of the three buttons on the page. You will notice that none of them do anything currently. This is because our JavaScript and jQuery code has not yet been put in place.
The desired behavior for each of the buttons are:
- Toggle Colors: Toggles the color between white and cardinal.
- Toggle Rounded Borders: Toggles the appearance of a border on the boxes.
- Add a New Box: Adds one new box to the container.
Now, open lab2_ex2.html in your text editor. Take a moment to understand HTML/CSS code that's present. Note that
- The
<div>withid="boxes"contains three boxes. - Each of the boxes are of
class="box". - The
<div>withid="toggles"contains three buttons. - Button
id="button_toggle_colors"should toggles the color of the boxes - Button
id="button_toggle_roundedges"should toggle the rounded borders of the boxes - Button
id="button_add_box"should add an additional box
We have already added in the .click() listeners for each of the buttons for you. Your job is to fill in the code within those listeners. You may refer to Exercise 1 to refresh your memory about jQuery button click listeners.
Instructions
You will need to:
- Add the
outlinedCSS class to each of the 3 boxes. - Modify the
background-colorCSS attribute on the boxes whenever the Toggle Colors button is clicked. - Add/Remove the
round-edgeclass on the boxes whenever the Toggle Rounded Borders button is clicked. - Add a new box
<div>whenever the Add new box button is clicked.
Detailed Instructions
Step 1: Adding a CSS class manually
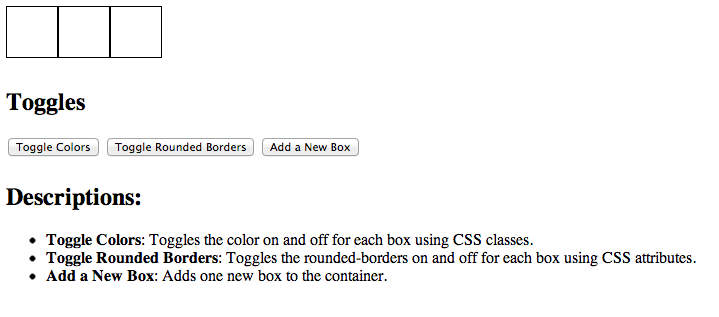
We want there to be borders around all our boxes, and in this step we do this using a manual process. We have already created a CSS class named outlined for you, so we need to add that class to each box <div>. This is done by adding the string outlined to the class attribute of the boxes, after the box string. Remember to include a space between the two words. You should end up with the following code.
<div id="box1" class="box outlined"></div>
<div id="box2" class="box outlined"></div>
<div id="box3" class="box outlined"></div>
Refresh the page, and you should now see the following:
Step 2: Modifying CSS attributes with .css()
We will now handle the button that changes the boxes' background color. We have already created the color colorCardinal which we would like to color the boxes with. We'd like to take an approach to accomplish this task which doesn't involve the use of CSS classes, and instead modifies the CSS templates of an element directly.
Locate the button click listener for the id="button_toggle_color" button. Once again, we will need to to use a jQuery Class Selector and and the jQuery .each() method to select all elements with the CSS class box, on the selector. You should add the the code and have the following:
$("#button_toggle_color").click(function() {
  $(".box").each(function () {

  });
});
Next, we want to check if the element has the CSS attribute background-color with a value of colorCardinal. We make use of the jQuery method .css() to check the current value of the element's CSS value.
if ($(this).css('background-color') == colorCardinal) {
    // element currently has cardinal background color
    // remove it

}
else {
    // element currently has the no background color
    // add it

}
We made use of the .css() method, with one argument, to check the value of an element's CSS attribute. In order to set the value, we use the same method, but include a second argument to specify the value to set the CSS value to.
if ($(this).css('background-color') == colorCardinal) {
    // element currently has cardinal background color
    // remove it
    $(this).css('background-color', '');
}
else {
    // element currently has the no background color
    // add it
    $(this).css('background-color', colorCardinal);
}
Step 3: Adding/Removing classes using jQuery's .addClass() and .removeClass()
In step 2, we modified CSS templates directly, which can get unwieldy when you have to get, check and set multiple values each time. This is why we make use of CSS classes to define how we want certain elements to look, and subsequently attach them to the relevant elements. This is what we did in in step 1 where we added the class outlined to the <div> elements manually. The method introduced in step 1 is a manual process, and one can see how this becomes unfeasible with many elements.Also, what we want is to procedurally toggle the classes on the elements when the appropriate buttons are clicked. As such, we shall use jQuery to achieve these aims.
We will now handle the button that changes the boxes' border style from straight-edges to round-edges.. We have already created the CSS class named round-edge for you. What we want to do is to add the round-edge class to each of the boxes if they do not have them, which would cause them to be have rounded edges. If a box already has the round-edge class, we remove it.
Locate the button click listener for the id="button_toggle_roundedges" button. The first thing we will need to do is to use a jQuery Class Selector to select all elements with the CSS class box. Because we want to manipulate each element, we will need to make use of the jQuery method .each() on the selector. Type the following into the .click() listener:
$(".box").each(function () {


});
Take a moment to understand what's happening with this code. The selector $(".box") is a Class Selector which selects all the elements with the CSS class box assigned to it. The .each() method acts as an iterator, such that any code that we put within the function() block affects the individual elements.
Within the function () in the .each() method, we can access the element we are currently affecting using the $(this) method. You probably have seen similar mechanisms for self-reference in other programming languages such as this in Java or self in Python.
The first thing is to detect if the current element has the round-edge class assigned to it already. We use the jQuery method .hasClass() method to do so. So, add the following code within the function ():
if ($(this).hasClass('round-edge')) {
 // element currently has rounded edges
 // remove it
}
else {
  // element does not have rounded edges
  // add it
}
Finally, we need to fill in the code for each of the two cases. For the first case, the element already has the round-edge class assigned to it, so we make use of the jQuery .removeClass() method to remove the round-edge class from the element. For the second case, the opposite case is true, meaning that the element does not have the round-edge class. We make use of the jQuery .addClass() method to add the round-edge class to it. Your code should look like this:
if ($(this).hasClass('round-edge')) {
  // element currently has rounded edges
  // remove it
  $(this).removeClass('round-edge');
}
else {
  // element does not have rounded edges
  // add it
  $(this).addClass('round-edge');
}
It is worth noting that this is a verbose way of performing toggle functionality. To leverage the power of jQuery even more, you can actually make use of the jQuery .toggleClass() method to achieve everything you did in the previous steps. In other word, the entire if-else block can be replaced with just the following line of code:
$(this).toggleClass('round-edge');
This line of code does everything we want it to do. It checks for the presence of a class on an element, and removes it if it is already present. If not, it adds it. This showcases the power of using jQuery and CSS classes.
Step 4: Adding new elements
In our final step, we will show how to dynamically add elements to your web interface using a combination of JavaScript and jQuery. With the Add a New Box button, it needs to create a box similar to what we had originally. This is achieved by creating a new <div> element. However, to be a box, it needs to have the classes outlined and box.
Locate the button click listener for the id="button_add_box" button. Within the listener, we need to create a new <div> element. This is achieved by using JavaScript's document.createElement() method. Add the following line into the listener method
var new_box = document.createElement('div');
First, we need to set the attribute id for the new box. We currently have three boxes, so we would like the next one to have id="box4", and the next id="box5" and so on. We simply need to count the number of existing box <div>s in the document. We first can use a jQuery Class Selector to get all the required elements, and then make use of the jQuery field .length to get the number of elements.
var new_box = document.createElement('div');
var existingBoxes = $(".box").length;
We thus just need to set the id attribute of the new box by using the jQuery .attr() method to set the id attribute of the new box.
var new_id = existingBoxes+1;
$(new_box).attr("id", "box"+new_id);
Next, we want to add the two classes, box and outlined to the new box. We once again make use of the .addClass() method.
$(new_box).addClass("box");
$(new_box).addClass("outlined");
Finally, to add the new <div> we just created for the new box to the current list of boxes, we use an ID Selector first to find the element boxes, and then use the jQuery .append() method to add the new box.
$("#boxes").append(new_box);
Testing
You should now test your implementation to make sure that everything works correctly. Perform the following steps, and your set of boxes should resemble the output we present.
Perform the following
- Click Toggle Colors
- Click Add a New Box
- Click Add a New Box
- Click Add a New Box
- Click Toggle Colors
- Click Add a New Box
- Click Add a New Box
- Click Add a New Box
- Click Toggle Rounded Borders
If you follow the above steps, your output should resemble the following image.

Exercise 3: jQuery UI
For this exercise, open up lab2_ex3.html in your internet browser. You should see the a page that looks something like this:
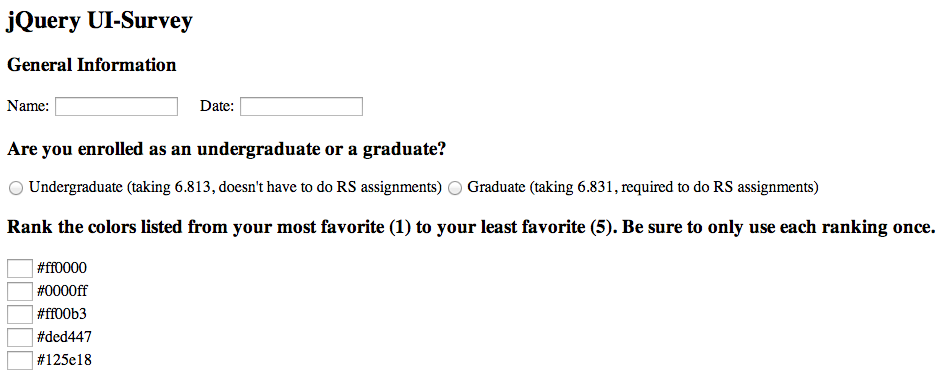
Notice that this link contains a pretty boring survey which is not very user friendly. This exercise will step you through a number of improvements to make the front end of the survey better using the jQuery UI library. The jQuery UI library contains code for performing UI interactions as well as useful widgets and effects. In addition, you can easily define CSS themes to color these different widgets using the ThemeRoller.
We will be seeking to make a page that looks like this:

Now, open lab2_ex3.html in your text editor. Take a moment to understand HTML/CSS code that's present. Note that
- We now also have the jQuery UI JavaScript file for functionality, as well as the CSS file for jQuery UI styling (which uses a number of images, also included in the jquery folder).
- There exists a text box to input a date in a
<div>with iddate_input. - There exist radio buttons to determine whether the user is an undergraduate or a graduate in a
<div>with idyear_input. - There exists a series of inputs to rank the color options given.
- There are places in the form where there is a lot of extra information in parentheses. There are also places where not enough information is given to discern options (ex: colors).
Instructions
You will need to:
- Add Datepicker for selecting dates.
- Use the Selectable interaction for selecting year.
- Use the Sortable widget to allow draggable color rankings.
- Use the Tooltip widget to add extra information to year/color options
Step 1: Inserting Datepicker into Date Input
For the date input, we will be using Datepicker widget. The nice thing about jQuery UI is that it takes very little code to get each of the widgets up and running. To bring up a calendar to select dates when the date input (id="date") gets focussed, you simply have to add the following code to the document.ready function:
$("#date").datepicker();
However, you can easily augment the datepicker with more options. Say, for example, you wanted to limit the selectable date range to only include dates from the previous two weeks to the next two weeks. We could then initialize our datepicker one of the following ways:
//Using numeric offsets
$("#date").datepicker({minDate:-14, maxDate: 14});
//Using string offsets
$("#date").datepicker({minDate:"-2W", maxDate: "+14D"});
//Using actual dates (note that months are indexed by zero)
$("#date").datepicker({minDate:(new Date(2013, 0, 28)), maxDate:(new Date(2013, 1, 25)) });
If you have time, take a look at the Datepicker page to see other ways you can use this widget.
Step 2: Using Selectable for Year Input
Next, we will use the Selectable class instead of radio buttons for selecting Undergraduate/Graduate. However, our current html approach will have to be rewritten using an ordered list instead of input elements. Note the addition of the selectable id and the ui-widget-content class. The class on the list elements in particular utilizes one of the css classes provided in the jQuery UI css file.
<ol id="selectable">
  <li class="ui-widget-content">Undergraduate (taking 6.813, doesn't have to do RS assignments)</li>
  <li class="ui-widget-content">Graduate (taking 6.831, required to do RS assignments)</li>
</ol>
Next we add the JavaScript code to initialize the Selectable. Note how the initial setup is just as simple as the Datepicker:
$("#selectable").selectable();
Refresh the page. It's starting to look slightly better, but it isn't entirely there yet. Open up the debugging console and inspect the list elements as you're clicking on them. Note that whichever option is selected gets the class ui-selected, and if you hold your mouse down on an option it gains the class ui-selecting. We can use this to write CSS to style our selectable! In addition, we will add some extra CSS to remove the list numbers as well as tweak the margins/padding/font size (style taken from jQuery UI sample Selectable page):
#selectable .ui-selecting {
   background: #FECA40;
}
#selectable .ui-selected {
   background: #F39814;
   color: white;
}
#selectable {
   list-style-type: none;
   margin: 0;
   padding: 0;
   width: 60%;
}
#selectable li {
   margin: 3px;
   padding: 0.4em;
   font-size: 1.0em;
   height: 12px;
}
Note that you can get the text of the selected element with the following code:
$(".ui-selected").text()
Step 3: Using Sortable for Color Input
Now we will use the Sortable interaction to provide a simpler UI for ranking colors. Like we previously did with the Selectable, we will need to rewrite the html in terms of a list, only this time, we will use an unordered list. Again, we are adding a css class defined in the jQuery UI CSS to each of the list elements:
<ul id="sortable">
  <li class="ui-state-default">#ff0000</li>
  <li class="ui-state-default">#0000ff</li>
  <li class="ui-state-default">#ff00b3</li>
  <li class="ui-state-default">#ded447</li>
  <li class="ui-state-default">#125e18</li>
</ul>
Next, we will initialize the Sortable using JavaScript. To prevent the user from accidentally selecting text during a drag operation, we will also add a line of code that prevents the user from selecting the text.
$("#sortable").sortable();
$("#sortable").disableSelection();
Refresh the page. You should now be able to drag the elements around. However, they are not yet fully styled. As before, open up the debugging console and inspect the elements of the sortable list. Pick up, drag, and drop elements, noting the different classes that are added to the elements. For now, we will just apply some basic styling to the sortable list and list elements (style taken from jQuery UI sample Sortable page):
#sortable {
   list-style-type: none;
   margin: 0;
   padding: 0;
   width: 60%;
}
#sortable li {
   margin: 0 3px 3px 3px;
   padding: 0.4em;
   padding-left: 1.5em;
   font-size: 1.0em;
   height: 12px;
}
At this point, we are almost done. However, we want to clue the user into draggable sorting by adding an icon to each of our sortable elements. Luckily, jQuery UI has plenty of symbols to help us out with that task. In this case, we want the double-ended vertical arrow to indicate sorting. To add this, we first augment our list elements with an additional <span> element. To make the icon show up, we give the <span> the class for the desired icon (you can find out the class of other icons by inspecting the elements on the jQuery UI icon page):
<ul id="sortable">
  <li class="ui-state-default"><span class="ui-icon ui-icon-arrowthick-2-n-s"></span>#ff0000</li>
  <li class="ui-state-default"><span class="ui-icon ui-icon-arrowthick-2-n-s"></span>#0000ff</li>
  <li class="ui-state-default"><span class="ui-icon ui-icon-arrowthick-2-n-s"></span>#ff00b3</li>
  <li class="ui-state-default"><span class="ui-icon ui-icon-arrowthick-2-n-s"></span>#ded447</li>
  <li class="ui-state-default"><span class="ui-icon ui-icon-arrowthick-2-n-s"></span>#125e18</li>
</ul>
Finally, we style the icons with some CSS:
#sortable li span {
   position: absolute;
   margin-left: -1.3em;
}
Step 4: Using Tooltips for Clarification
Note how our Selectable elements have a lot of extra text and our Sortable colors could use some visual clarification. For this, we are going to experiment with the Tooltip widget. First, we'll add clarification tooltips for the Selectables.
To do this, we will first slightly alter the html by putting the extra text in parentheses into the title property of the element:
<ol id="selectable">
  <li class="ui-widget-content" title="taking 6.813, doesn't have to do RS assignments">Undergraduate</li>
  <li class="ui-widget-content" title="taking 6.831, required to do RS assignments">Graduate</li>
</ol>
Then, all we have to do to get the tooltips to show up is to add the following js code:
$(document).tooltip()
We will need to do something a little more complicated to get tooltip color swatches for the Sortable colors. In this case, we will have the tooltip contain a 50px by 50px <div> that matches the color of the selection (Note: there are definitely better ways to do this than with a popup <div>--we use this example to illustrate custom tooltip content only).
The tooltip function can take in an object that defines a number of properties. In this case, we will define the items that will have a tooltip and the content that the tooltip will contain. We will trigger the tooltip when an element has a title defined or a class defined (we will have another check later on to narrow down to the particular class of elements--in this case, we want ui-state-default, the class of the Sortable colors). For the content, we will define a function that will return what the tooltip should contain. If the element has a title, we will simply fill the tooltip with the text of the title. If the element has a class and that class is ui-state-default, then we will fill the tooltip with a div that has a background color equal to the text of the element (conveniently a hexadecimal color). This is accomplished by replacing your simple tooltip code with the following:
$(document).tooltip({
   /*
      An item in brackets refers to taking all elements with the attribute in brackets, while
      an item not in brackets refers to taking all elements of that type (ex: 'img', 'a')
   */
   items: "[title], [class]",
   content: function() {
      // jQuery uses "this" to refer to the element that triggered the event
      var element = $(this);
      if (element.is("[title]")){
         return element.attr("title");
      }
      if (element.is("[class]")){
         if (element.attr("class") == "ui-state-default") {
            var text = element.text(); //in this case, will be the desired color
            return "<div class='color_swatch' style='background:" + text + "'></div>";
         }
      }
   }
});
Refresh the page. You should be able to see tooltips pop up on all desireable elements now. However, the color swatches aren't showing up in the tooltips! This is because our <div> elements do not yet have a size. Add the following line of CSS to make the <div> 50px by 50px:
.color_swatch{
   height: 50px;
   width: 50px;
}
Now, after refreshing the page, your tooltips should all show up on the page. If you are unhappy with the position of your tooltips when they pop up, take a look at the documentation for setting the position of the toolips.
Exercise 4: Canvas Manipulation
For this exercise, open up lab2_ex4.html in your internet browser. You should see the a page that looks something like this:

Try clicking on any of the three buttons on the page. You will notice that none of them do anything currently. This is because our JavaScript and jQuery code has not yet been put in place. For this exercise, we will be using the HTML5 Canvas. If you are interested in further Canvas documentation, take a look at Html5 Canvas Tutorials.
The desired behavior for each of the buttons are:
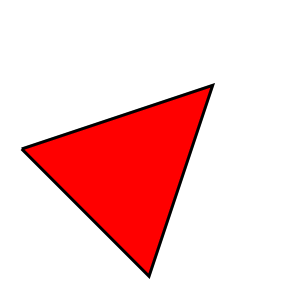
- Draw Triangle: Draw a red triangle with black outline onto the canvas.
- Draw Rotated Triangle: Draws the same triangle as Draw Triangle, but rotated by 45 degrees.
- Clear Canvas: Clears the canvas.
Now, open lab2_ex4.html in your text editor. Take a moment to understand HTML/CSS code that's present. Note that
- The
<canvas>withid="myCanvas"is 300px by 300px. - Button
id="button_draw_triangle"should draw the triangle with the dimensions specified above. - Button
id="button_draw_rotated_triangle"should draw the triangle with the dimensions specified above, but rotated by 45 degrees - Button
id="button_clear_canvas"should clear the canvas
Instructions
You will need to:
- Get the context of the
<canvas>for drawing. - Draw a red triangle with black outline when the Draw Triangle button is clicked.
- Draw a rotated red triangle with black outline when the Draw Rotated Triangle button is clicked.
- Clear the
<canvas>when the Clear Canvas button is clicked.
Step 1: Getting the context for the Canvas
You can think of the <canvas> as a container for graphics--it doesn't have any drawing capabilities on its own. In order to draw to the <canvas>, you need get a context. The context itself is an object that contains methods and properties for drawing to the <canvas>. In this case, we are using the '2d' canvas (there also exists a 'webgl' context for rendering in 3d if it's supported by the browser).
In our code, we will only be manipulating the <canvas> in 'click' event listeners, all of which are initialized in the $(document).ready() function. Therefore, we will get the context of the canvas in this function so we can use it in each of our event listeners. Locate this function in the code and add the following lines to get the context of the canvas:
var canvas = document.getElementById("myCanvas");
var ctxt = canvas.getContext('2d');
Step 2: Drawing a Triangle to the Canvas
Now that you have the context, it's time to start drawing to the <canvas>. We will be putting this code in the click event handler for button_draw_triangle. Before we draw the triangle, we need to define colors in the context: one for the fill and one for the stroke. We can set the fill color by setting fillStyle to the desired hexidecimal color string (ex: "#f00" or "#ff0000" for bright red). We can do the same for the stroke by setting the strokeStyle. To change the width of the stroke, we set the lineWidth to the desired width (in this case, 3).
ctxt.fillStyle   = '#f00';
ctxt.strokeStyle = '#000';
ctxt.lineWidth   = 3;
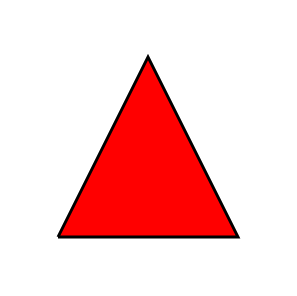
There is no built in function for drawing a triangle--instead, we have to draw a triangle by defining a path and filling it in. Here's the triangle we will be drawing, with <canvas> coordinates attached:
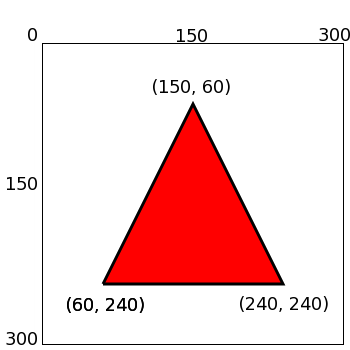
Notice how the origin of the coordinate system is in the upper left corner of the <canvas> and that the y coordinates increase from top to bottom. After we call beginPath, we use moveTo to define the point where we start drawing the triangle. After that, we use lineTo(x,y) to add a line from where we are to the new x and y.
ctxt.beginPath();
ctxt.moveTo(60, 240);
ctxt.lineTo(240, 240);
ctxt.lineTo(150, 60);
To complete the path, we call closePath, which completes the path back to the starting point. Then, we callfill() to fill the shape and stroke() to draw the outline.
ctxt.closePath();
ctxt.fill();
ctxt.stroke();
Step 3: Drawing a Rotated Triangle to the Canvas
Now, we will draw a rotated triangle to the <canvas>. We will be putting this code in the click event handler for button_draw_rotated_triangle. Because rotational math is difficult, we will use provided methods in the context to apply transformations to the context. First, we will set the fill andstroke color as before:
ctxt.fillStyle   = '#f00';
ctxt.strokeStyle = '#000';
ctxt.lineWidth   = 3;
Next we will apply the transformations. We want a triangle rotated by 45 degrees, so we will have to apply a rotational transformation to the context. However, the rotational transformation works around a the origin of the context, which is currently on the upper left side of the canvas. Therefore, we first need to change the origin of the canvas. We will do so by also applying a translation to the canvas. In this case, we will move the origin to the center of the <canvas> and rotate about that.
ctxt.translate(canvas.width / 2, canvas.height / 2);
ctxt.rotate(Math.PI / 4);
Now we will draw the triangle onto this transformed context. However, to draw the triangle into the center of the <canvas>, we will need to slightly adapt the coordinates for this transformation. We will now draw the triangle with respect to the new origin:

After rotation, this will be the desired triangle. We write the code as above, changing the coordinates when necessary:
ctxt.beginPath();
ctxt.moveTo(-90, 90);
ctxt.lineTo(90, 90);
ctxt.lineTo(0, -90);

ctxt.closePath();
ctxt.fill();
ctxt.stroke();
Finally, because we are using the same context for each button, we need to reset the context back to its original origin/rotation. To do this, we will save the context before we transform it and restore the context back to its original state after we have finished drawing in the transformed space.
// add this line of code before you apply transformations
ctxt.save();
// add this line of code after you have drawn the triangle
ctxt.restore();
Step 4: Clearing the Canvas
Finally, we will write the code to clear the <canvas>. We will be putting this code in the click event handler for button_clear_canvas. To do this, we will simply clear all of the pixels in the <canvas>. Note that the method used can also be used to only clear part of the <canvas>.
ctxt.clearRect(0, 0, canvas.width, canvas.height);