2. Swift Deep Dive and Advanced Views
Swift Deep Dive 
We introduced a lot of Swift features to you in lecture 1. We encourage you to mess around in a
Playground and continue to learn more. The better you are at Swift, the quicker it will be to build
iOS apps!
Reading
In class we went through concepts from The Basics all the way to Initialization . Be sure
to go over all 14 sections and familiarize yourself with the concepts and syntax.
No
need to read every detail, but make sure you get the gist of the language.
Protocols
A protocol defines a blueprint of methods, properties, and other requirements that suit a particular task or piece of functionality. The protocol can then be adopted by a class, structure, or enumeration to provide an actual implementation of those requirements. Any type that satisfies the requirements of a protocol is said to conform to that protocol.
Protocols are declared explicitly and hold method and property signatures that implementers must fufill. They are similiar to Java Interfaces. Here we can see an example:
protocol ForceSensitiveBeing {
func useForce()
}
class Jedi: ForceSensitiveBeing {
func useForce() {
print("moving rocks")
}
}
class Sith: ForceSensitiveBeing {
func useForce() {
print("force choke!")
}
}
The force sensitive being protocol declares that classes that conform to it must implement a method
called use force that takes in nothing and returns nothing. We can see clearly that the protocol does not
give a body to the method, instead each of the classes or structures that conform to it must do that themselves. However, we will later see in fact that Swift allows protocols to have default implementations through extensions, allowing Swift to have a sort of multiple inheritance structure in some cases that can be very useful to exploit Furthermore, swift protocols can have properties as long as the protocol explicitly says what operations of the property are allowed (get/set), as in the following example protocol Robot { var name: String { get set } func procreate() -> Robot } class HelperRobot: Robot { init(withName nm: String) { _name = nm } var _name: String var name: String { get { return _name } set { print("No, my name is sam") } } func procreate() -> Robot { return HelperRobot(withName: "\(name) JR") } } We can clearly see the benefit of protocols in staticly typed languages as one can pass around
implementers without knowing their specific types and just interact with them through the protocol
methods We'll be creating UIs as Storyboards with Interface Builder in Xcode. As we saw
in the first class, this
allows us to drag and drop various UI components onto the screen to visually build our UI.
AutoLayout helps us ensure that our UI fits on all iOS devices of varying screen size. We
could do this programmatically - and some of you my prefer that. If you wanna see how that's done,
check out this article.
The UIView class defines a rectangular area on the screen on which it shows content. It handles the
rendering of any content in its area and also any interactions with that content – touches and
gestures. Your code can do some or all of the view’s drawing of itself; it can make the view appear
and disappear, move, resize itself, and display many other physical changes, possibly with animation.
UIView Tips
The view hierarchy is the chief mode of view organization. A view can have subviews; a subview has exactly one immediate superview. Thus there is a tree of views. This hierarchy allows views to come and go together. If a view is removed from the interface, its subviews are removed; if a view is hidden (made invisible), its subviews are hidden; if a view is moved, its subviews move with it; and other changes in a view are likewise shared with its subviews.
Management of the view resides in a view controller, an instance of UIViewController.
Actually, a view controller is most likely to be an instance of a UIViewController subclass. The UIViewController class is designed to be subclassed. You are very unlikely to use a plain vanilla UIViewController object. You might write your own UIViewController subclass; you might use a built-in UIViewController subclass such as UINavigationController or UITabBarController; or you might subclass a built-in UIViewController subclass such as UITableViewController
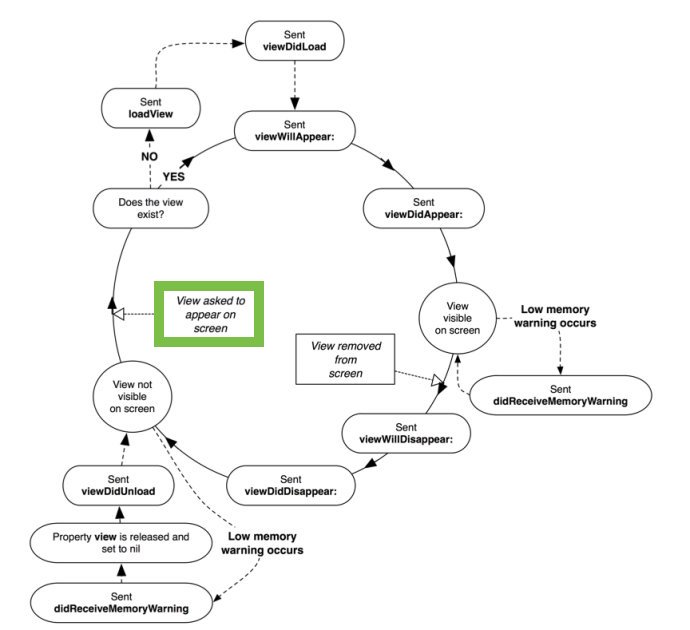
The View has a "Life Cycle" - different moments in time that correspond to certain actions. All
these commands are called automatically at the appropriate times by iOS when you load/present/hide
the view controller. It's important to note that these methods are attached to
UIViewController and
not to UIViews themselves. You won't get any of these
features just using a UIView. You can check out Apple's official documentation here. But here is a brief overview: On iOS, navigation controllers are one of the primary tools for presenting multiple screens of content. All iOS applications share a very uniform approach to navigation throgh UINavigationController that we will overview in class.
Displaying sets of data is a rather common task in building a mobile app. Apple’s SDK provides two
components to help carry out such a task without having to implement everything from scratch: A
table view (UITableView) and a collection view (UICollectionView).Table views and collection views
are both designed to support displaying sets of data that can be scrolled. The delegate and data source are protocols that a UIVIewController with an impeded UITableView must implement to instruct the table view how to layout it's data! We will see these in action during wednesday's class
Views and View Controllers
Building Interfaces
Views
View Controllers
View Controller Life Cycle
-
http://www.apeth.com/iOSBook/ch14.html
-
https://stackoverflow.com/questions/5562938/looking-to-understand-the-ios-uiviewcontroller-lifecycle
Navigation
Table and Collection Views
Delegate and Data Source
Summary