Rocks Cluster Distribution: Users Guide: 
| ||
|---|---|---|
| Prev | Chapter 1. Installing a Rocks Cluster | Next |
The advantage of using Rocks to build and maintain your cluster is simple. Building clusters is straightforward, but managing its software can be complex. This complexity becomes most unmanagable during cluster installation and expansion. Rocks provides mechanisms to control the complexity of the cluster installation and expansion process.
This chapter describes the steps to build your cluster and install its software.
Since Rocks is built on top of RedHat Linux releases, Rocks supports all the hardware components that RedHat supports, but only supports the x86, x86_64 and IA-64 architectures.
Processors
x86 (ia32, AMD Athlon, etc.)
x86_64 (AMD Opteron and EM64T)
IA-64 (Itanium)
Networks
Ethernet (All flavors that RedHat supports, including Intel Gigabit Ethernet)
Myrinet (Lanai 9.x)
Frontend Node
Disk Capacity: 16 GB
Memory Capacity: 512 MB
Ethernet: 2 physical ports (e.g., "eth0" and "eth1")
Compute Node
Disk Capacity: 16 GB
Memory Capacity: 512 MB
Ethernet: 1 physical port (e.g., "eth0")
The first thing to manage is the physical deployment of a cluster. Much research exists on the topic of how to physically construct a cluster. The cluster cookbook can be a good resource. A majority of the O'Reilly Book Building Linux Clusters is devoted to the physical setup of a cluster, how to choose a motherboard, etc. Finally, the book How to Build a Beowulf also has some good tips on physical construction.
We favor rack-mounted equipment (yes, it is more expensive) because of its relative reliability and density. There are Rocks clusters, however, that are built from mini-towers. Choose what makes sense for you.
The physical setup for a Rocks Cluster contains one or more of the following node types:
Frontend
Nodes of this type are exposed to the outside world. Many services (NFS, NIS, DHCP, NTP, MySQL, HTTP, ...) run on these nodes. In general, this requires a competent sysadmin. Frontend nodes are where users login in, submit jobs, compile code, etc. This node can also act as a router for other cluster nodes by using network address translation (NAT).
Frontend nodes generally have the following characteristics:
Two ethernet interfaces - one public, one private.
Lots of disk to store files.
Compute
These are the workhorse nodes. They are also disposable. Our management scheme allows the complete OS to be reinstalled on every compute node in a short amount of time (~10 minutes). These nodes are not seen on the public Internet.
Compute nodes have the following characteristics:
Power Cable
Ethernet Connection for administration
Disk drive for caching the base operating environment (OS and libararies)
Optional high-performance network (e.g., Myrinet)
Ethernet Network
All compute nodes are connected with ethernet on the private network. This network is used for administration, monitoring, and basic file sharing.
Application Message Passing Network
All nodes can be connected with Gigabit-class networks and required switches. These are low-latency, high-bandwidth networks that enable high-performance message passing for parallel programs.
The Rocks cluster architecture dictates these nodes types are connected as such:
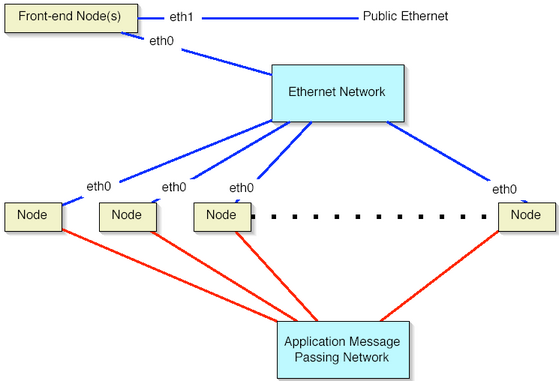
On the compute nodes, the Ethernet interface that Linux maps to eth0 must be connected to the cluster's Ethernet switch. This network is considered private , that is, all traffic on this network is physically separated from the external public network (e.g., the internet).
On the frontend, two ethernet interfaces are required. The interface that Linux maps to eth0 must be connected to the same ethernet network as the compute nodes. The interface that Linux maps to eth1 must be connected to the external network (e.g., the internet or your organization's intranet).
Once you've physically assembled your cluster, each node needs to be set to boot without a keyboard. This procedure requires setting BIOS values and, unfortunately, is different for every motherboard. We've seen some machines where you cannot set them to boot without a keyboard.