6.837 Final Project Written Report - InterArch - by Chris Avrich, Hai Ning, and Henry Wong
InterArch
Abstract
InterArch is a multi-user collaborative design platform. Created with
Java 3D technology, it allows multiple clients to log in to a server
simultaneously, create different types of furniture and place them
inside a common design area. Users can log in to a server on which a
scene is already being modeled and modify or add to the existing
scene. While working with the models, one can lock the model to avoid
concurrency problems. Also, furniture has a basic collision detection
ability so that it will always rest on the floor or on top of other
furniture.
Team Members
Chris Avrich
Hai Ning
Henry Wong
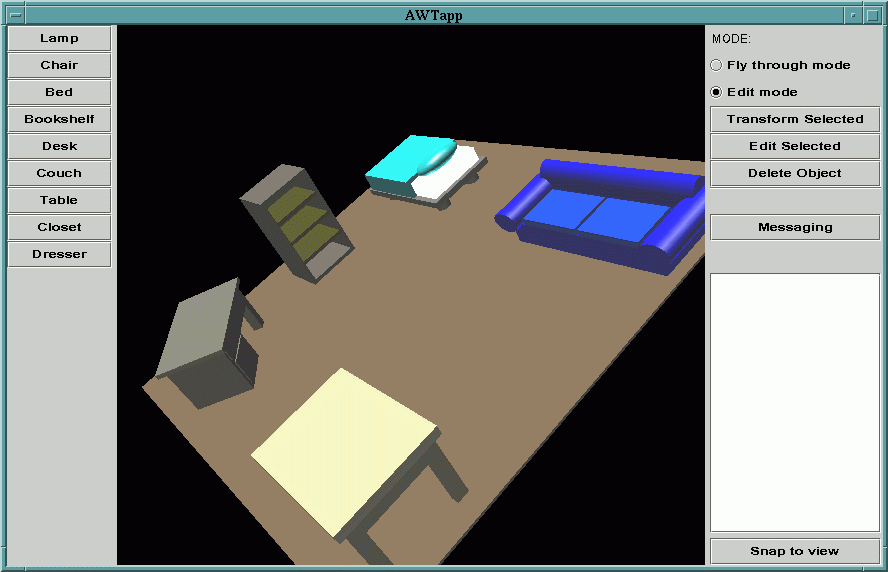
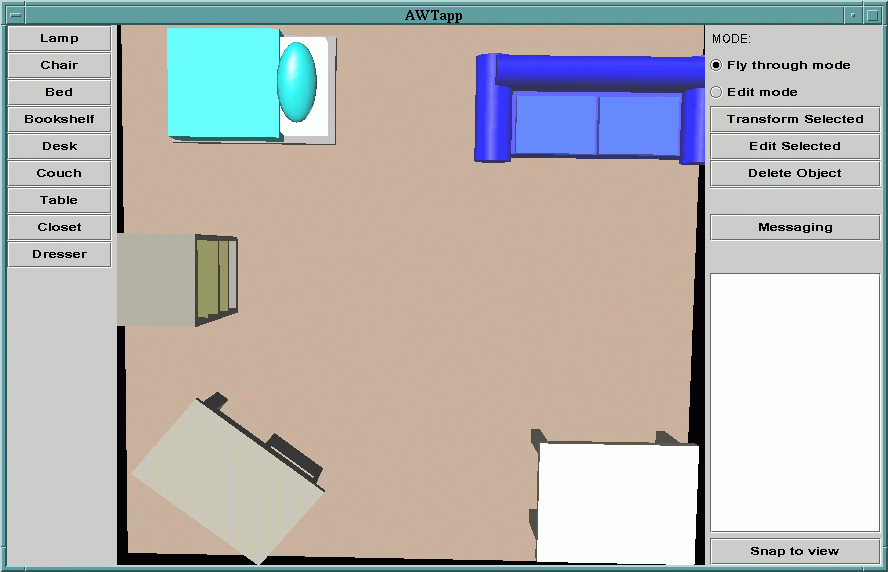
Screen Shots:
Introduction
InterArch is a multi-user tool to aid interior design. The program
displays a three dimensional view of a room or a series of rooms and
allows users to easily and intuitively move and arrange virtual
furniture. The program also allows multiple users to log on to a
server and view or edit the same scene. InterArch provides a simple
chat program so that users can communicate with each other, and a
simple locking mechanism to help prevent concurrency problems. If a
user logs into a server after a scene has been created, they can
still participate in viewing and editing just as any other user can.
InterArch has two distinct view modes. Editing mode allows the scene
to be rotated, zoomed and translated. The interface is similar to that
of Open Inventor, Cosmo World and other three-dimensional modeling
tools. This mode is typically used to view large portions of the scene
at once and allows the user to move the entire scene around and view
each room as a whole. Navigation mode allows the user to simply and
easily move the camera around with six degrees of freedom. This mode
uses both the mouse and the keyboard in a manner similar to Quake or
Descent. It is intended primarily to allow people to view the scene
from the perspective of a person; they can float around the scene and
look in any direction. Although any camera position can be reached by
either view mode, some actions are much easier in one view mode than
in another. For instance, rotating the scene in editing mode is a
simple manner of dragging the mouse, but rotating the scene in
navigation mode requires using several keys and dragging in a slow,
highly controlled manner. "Walking" the camera from one corner of the
room to another is a simple manner of pointing in the right direction
and pressing "forward" in navigation mode, but requires a complex
series of zooms, translations and rotations in edit mode.
Each user actually has two camera positions, one for editing and one
for navigation. Swapping between view modes moves the camera to the
corresponding camera position and moving the camera in one view mode
does not effect the other camera position. This is done primarily
because edit mode is only useful when the camera is pointed roughly in
the direction of the scene and swapping from navigation mode to edit
mode while the camera is pointed in a different direction will make it
difficult to navigate around the scene.
Each InterArch client provides a list of all of the users logged on
to that server; this list is automatically updated every time someone
logs in or out. Additionally, the client allows users to jump to
each other's viewpoints if they wish. InterArch includes models of
most of the furniture needed to furnish a typical bedroom, including a
lamp, dresser, bed, and several others. Each of these pieces of
furniture is customizable; the colors of the furniture can be altered
or the furniture can be stretched or shrunk in any dimension. This
allows users to use the same built in bed to model anything from a
dark blue, king-sized bed for the master bedroom to a small pink twin
bed for a child. The furniture can be edited when it is created, or
users can edit furniture that has already been placed into the
scene. Additionally, users can move or rotate furniture in any
direction.
InterArch provides a very simple collision detection system to check
that none of the furniture present in the scene overlaps the floor,
the walls or other pieces of furniture. This system causes an object
to fall as far as possible until it hits another object or the floor.
If an object is moved or placed in a location where it overlaps with
other pieces of furniture, it is automatically moved upwards until no
further collisions are detected.
This project uses many of the mathematical techniques presented in
6.837 to compute camera positions and to compose models such as a bed
out of graphics primitives like a box, a cone or a sphere.
Every primitive placed into the scene has a corresponding four by
four matrix that controls its position, scale and orientation. Each
model is composed of a set of primitives placed into a local object
space. For example, the closet is a large rectangle with two smaller
rectangles placed in the front for doors. Rotating, translating or
scaling the closet requires multiplying the matrix that controls the
placement of each primitive by a matrix encoding the desired
transformation. Moving the camera around also requires transforming
the camera's local position by multiplying it with the appropriate
matrix.
Additionally, InterArch uses a small bit of ray casting code to
control object selection. When the user clicks on the scene to select
a piece of furniture, the program casts a ray out from the camera
position in the direction that the user clicked on to determine which
object was selected.
Goals
What we originally envisioned was to build an environment where
multiple designers can log on to a system from different places and
work in the same modeling space. They should be provided with an
elegant GUI to interact with the model, but more importantly, when
they add or move building blocks, the scene should be dynamically
updated on each user's screen. When designer A makes a modification
to a model, designer B should see these changes in real time. Each
user should be able to view the model from whatever viewpoint they
choose; facilities should also be provided to look at the model from
other users' viewpoints, in order to help them gain insight into their
partners' ideas.
We wished to implement a plugin chat box and/or whiteboard in the
applet to enhance communication. This would make it a lot easier for
designers to work together and to understand one another.
Our basic networking architecture is broken down into a client part
and a server part. The server part includes the application server,
which receives client requests to update the scene, and broadcasts
this data back to all clients. Each client can store a copy of the
current scene, and when a new client logs in to the system, it will
poll an existing client for this data. The client side also should
include the interface for each individual user to interact with the
modeling space, as well as, of course, the connectivity to the server.
Finally, we also wanted to include a bit of real-world physics in our
modeling system. Objects should not be allowed to intersect; we can
deal with this by using bounding boxes. We can also use bounding boxes
to make sure that objects "stick" to the tops of one another and to
the floor. This will ensure that our modeled world has a reasonable
degree of realism.
Achievements
The bulk of the work for this project (aside from getting Java3D set
up on Athena and learning how to use it) consisted of writing code to
manipulate either the camera or objects within the scene. The
networking infrastructure was fairly simple since Java has built in
routines to open socket connections with other computers. The code
that interfaced the network with each user's copy of the scene was
also fairly complex.
There are two major approaches to this type of networking problem;
either the server can hold the scene and simply transmit output to
the clients, or the clients can each hold copies of the scene and
update each other's copies through the server.
Having the server hold the only copy of the database has several
advantages. It guarantees that all of the clients are viewing the
same scene and allows the scene to persist even after all of the
clients log out. It also means that clients who log in to the server
won't need to download the scene from another client. However, this
method has one big disadvantage; the server has to continuously
download output to each of the clients since the clients don't keep
their own local copy of the scene.
This problem seemed insurmountable to us, so we elected to use a
setup in which the clients maintained their own copies of the
database. We could have used a hybrid approach in which both the
server and the client kept copies of the database, but this effect
can also be achieved by simply leaving a client logged in all the
time.
For objects in scenes, Java 3D implements a scene graph structure
similar to that of Open Inventor. It provides a simple and flexible
mechanism for representing and rendering scenes. The scene graph
contains a complete description of the entire scene, or "virtual
universe." The scene graph has a superstructure consisting of a
VirtualUniverse object and a Locale object, and a set of branch
graphs. Each branch graph is a subgraph that is rooted by a
BranchGroup node, which is attached to the superstructure. Under each
BranchGroup node, a TransformGroup can be added. This consists of a
collection of the actual geometric primitives, and behavior nodes
which select the various behaviors of the TransformGroup. A
Transform3D object is set within each TransformGroup node to define
the 4 by 4 transform matrix which is to be applied to the geometry
collection.
Once an object is created and inserted into the VirtualUniverse, a
mechanism is needed for future manipulation. To do this, we need a way
to select an object. Luckily, this behavior is built in to Java 3D.
By firing a ray from the x and y coordinates of the mouse click point,
it has the ability to return the TransformGroup that is hit by this
ray, thus selecting the appropriate object. To get this selected
object, we have to create a new class, "PickableTransformGroup," to
connect the object with the TransformGroup. When an object is
selected, it becomes half-transparent to differentiate itself from
other objects; this is achieved simply by manipulating the
transparency factor of the object.
When an object is selected, its features (colors, scale, etc.) can be
edited through the same dialog box it was created with. A user may
also use a Transform dialog box to change the object's transform
matrices. When the transform dialog box is invoked, the user
manipulates slider bars, thus creating a new transformation matrix.
This new transformation matrix is then multiplied with the existing
transformation matrix of the selected object.
The "edit" view mode simply involves multiplying the matrix
representing the current camera position by one of twelve predefined
matrices: move right, move left, rotate right, rotate left,
etc. Navigation mode was a little more complicated. The program keeps
track of how far the camera is from the center around which it is
rotating. Rotating the scene involves computing the angle through
which the camera is being rotated and then calculating the x and y
translation. Finally, these translations, as well as the
corresponding rotation, are applied to the local camera space. This
is done by ensuring that the camera position matrix is multiplied by
the transformation and not vice versa. (For example, with camera C
and transform T, the result would be CT, not TC.)
Upon its creation, each object is assigned a UID. This UID allows
clients to update their local copy of the scene based on messages
received from other clients. UIDs are assigned based on the name of
the client that created them.
Each client contains a vector that includes the UIDs of all of the
objects that are currently locked (selected). When a client locks an
object, it sends a message to all of the other clients to place the
UID of the object into the "lock" vector. When an object is unlocked,
it is removed from the lock vector. Obviously, if network delay is
high enough it is possible for two clients to believe they have locked
the same object. A safer approach would be for each client to request
the lock from the other clients, wait for them all to acknowledge the
lock request, then send out another message stating that the lock had
either been obtained or had not been obtained (if some other client
had also requested the lock). However, the network connection on which
we are running our program is fairly quick and we felt that a more
complicated message-passing scheme was unnecessary.
This scheme also means that if a client crashes while it has a
lock, that object will never be unlocked. Correcting this would
required that the "lock" vector associate each lock with the client
that originated it, and remove all the locks of clients who log
out. This wouldn't be that hard to program in, but the client rarely
crashes and as a result, we didn't discover this bug in time.
Since the server is the more crucial than any of the individual
clients, we put in a lot of error checking code. The server handles
all kinds of bad data types, data errors, and unexpected socket
closings. It handles all of these by filtering the bad data and, in
the case of an unexpected socket closing, logging out the associated
client.
We originally planned to allow furniture to be altered instead of
stretched. For example, if a couch was widened the program would add
in more pillows as necessary instead of making the pillows
wider. However, it was too time consuming to code this behavior in to
each of the different pieces of furniture so we settled for simply
stretching each of the furniture models.
Collision detection is our final feature. To make computation more
efficient, we choose to only detect the bounding box of each
object. Java 3D does not have a decent bounding box function for each
primitive, so we had to code it ourselves. Our algorithm creates an
array (when the object is first created) of 8 points, denoting the 8
corners of the bounding box of the object. Then, when the object is
transformed, we apply the transformation to the array of points as
well. When we need to examine the bounding box, we simply select the
largest X, Y, and Z coordinates from the 8 points for our upper
corner, and the smallest X, Y, and Z coordinates for our lower
corner. So, as objects are moved around, they are always checked to
see if their bounding boxes intersect with those of other objects.
Individual Contributions
Henry:
I wrote most of the networking code for this project including the
client/server infrastructure, the message passing scheme by which the
clients communicate and the chat program. This involved writing
multithreaded code to allow the server to handle more than one client
at once, and to allow the client to continuously poll the socket
connection to the server and also handle user requests of various
complexities.
I wrote the locking routines that prevent users from selecting an
object that is currently selected by another user. This helps greatly
when dealing with some concurrency issues.
I also wrote the code that handles the "fly through" view mode, and
revised Hai's code to handle the "edit" view mode. This mostly
consists of calculating the appropriate transform to apply to the
camera position and multiplying the matrix controlling the camera
position by this transform.
I wrote the main GUI that the client sees. This includes the code
that creates all of the buttons, the list of users that are logged
in, the initial scene that the user sees, the blocking dialog boxes
that pop up asking for a log in name and a server and port to connect
to and all of the support code that drives each of these features.
I wrote all of the furniture models and the generic class that all of
the primitives extend. This involved writing code to place primitives
into the correct places and to control which surfaces are colored in
which way. It also involved creating bounding boxes for each of these
objects.
I revised the code Hai wrote that creates the dialog box used to edit
the furniture primitives. In particular, I modified it to allow it to
work on any furniture model and added in some code that keeps track
of the scale that various dimensions have been adjusted to.
I worked with Hai to write the collision detection and gravity
package. This involved checking the bounding box of a furniture
model for collisions with the bounding boxes of the other models and
with the floor plane.
I added the code that allows furniture models to be edited
after they've been added to a scene.
I extended the portion of Hai's code that controls adding
objects to a scene. In particular, I wrote the code that extracts the
direction the camera is pointed from the camera matrix, calculates
the intersection of that line with the XY plane and places the newly
created furniture at that location.
I did most of the integration for our project. This consisted
of taking all of the code written by the team and cutting and pasting
it together, and then debugging it and resolving any differences we
had. This also included a small bit of editing to handle some minor
specification differences between codes written by different authors.
Hai:
I initiated the project, including both the idea and the actual
coding. I created the first round prototype upon which the later
applications were built.
I created the class structures of the client program, including
setting up the scene graph, code to assemble the first piece of
furniture (a simple table), and the ability to change the features and
the transformation matrices of the object. I wrote the first GUI to
interact with the scene's objects.
I coded the selection ability for the scene's objects that toggles
between the transparent and the opaque mode. I also did the dialog box
to manipulate the transformation of a selected object.
I wrote the mouse navigation behavior class. This included rewriting
the mouse behavior from Java 3D: figuring out the camera point, target
point, and the up vector of the view port. The camera is rotated and
translated depending on how you move the mouse. The rotation and
translation are such that the camera is moving around an imaginary
sphere; you are still looking at the same thing and remain the same
distance away from it.
I also wrote part of the collision detection. In particular, I wrote
the bounding box class for generic objects. I added the texture
feature to individual furniture, but it was dropped because of the
expensive computing cost and the heavy load on the network.
Chris:
I helped with the design of the original project concept, discussing
features, methods for accomplishing our goals, and constraints we
would be working under. With text from Henry and Hai, I drafted and
edited the original Design Proposal, and put it up on the Web.
Throughout the project's progress, I provided insight and suggestions
about how to design or implement various features of the software. I
helped brainstorm to think of features we needed and how to best suit
our software for its intended purpose.
I took text from Henry and Hai, edited and proofread it, and drafted
this final Web page with our Final Project Written Report. I took all
the screen shots, and created the "How to Use InterArch" section of
the Appendix.
I will create the demo and be in charge of the presentation. This
includes writing the auxiliary material for the presentation and
putting it up on the Web, designing our demo's world, and placing all
the walls and objects in the world. I will determine and rehearse the
way in which we shall actually show our software in action, through a
multi-user interactive demonstration. I will ensure that our server is
up and operational when the time for our presentation comes, and I
will do the talking for the presentation.
Lessons Learned
None of us had ever written in Java3D before, so this project was a
good chance to learn it. This encompassed much of the project since
the ray casting code and the transformation and matrix code are built
into Java3D, and we had to adapt them to our needs.
Additionally, this project allowed us to practice writing networking
and GUI code. In particular, this project gave us a chance to learn
Swing (a Java GUI API) and to practice writing a large complicated
message-passing scheme.
A large portion of this project involved figuring out and applying
the matrices necessary to encode different kinds of
transformations. This project taught us a lot about the way object
space and world space interact and that you can transform a vector in
either its object space or the world space depending on the order in
which you apply the transformations.
We also learned that there are a few bugs in the beta version of
Java3D that is on Athena. For example, the code to extract the scale
factors in various dimensions from the matrix associated with a
particular object doesn't work correctly; we wound up having to write
the code by hand.
Finally, this project also gave us a chance to practice
working on large scale projects with several other people.
Acknowledgements
Henry:
I'd like to thank our TA, Karianne, and Professor Teller for their
support in providing ideas and suggestions and in setting up Java
3D. I'd also like to thank the people at OLC for answering my
questions concerning the Java 3D installation on Athena, the trustees
of my fraternity for buying the Ultra Sparc 10 on which most of the
development work for InterArch took place, my girlfriend Stef for
putting up with me when I'd rather code than eat dinner and my friend
Tresi, who suggested most of the people listed in the
acknowledgements section.
Hai:
The first person I'd like to thank is Professor Teller for his
insightful comments on our project proposal, without which we would
have lost much of the fun of doing this. TA Karianne was always there
before the meeting time, gave useful comments, and pointed to valuable
resources. A lot of people on the Java 3D mailing list gave me help
when I was stuck in coding. Last but certainly not least, I thank my
girlfriend Bing who always goes through finals together with me.
Chris:
I would like to thank Professor Teller for teaching such an
interesting and fulfilling class. The TA's (and especially Karianne,
our TA) gave us a lot of great help and advice. I would also like to
thank all my fraternity brothers at Zeta Beta Tau for being so great
to live with - in particular my roommate, Tom Cleary, and Henry, of
course, for his excellent coding work. Thanks to Hai, as well, for a
great job on his part of the project. Finally, my thanks go to Donna
Wrublewski and Jen Owens for crash space (and food) on those long
nights I had to stay on campus.
Bibliography
Java 3D documentation: http://coli.lili.uni-bielefeld.de/~milde/java3d/docs/java3d/overview-summary.html
Java Swing documentation: http://java.sun.com/products/jfc/swingdoc-api-1.1/overview-summary.html
Java 3D tutorial: http://java.sun.com/products/java-media/3D/collateral/#tutorial
Appendix - How to Use InterArch
Starting the Server
When Server.java is run, the following dialog box will appear:
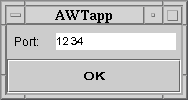
Enter a port number (must be greater than 1000) and click OK.
Starting a Client Session
To start a client session, run ClientGUI.java, and the following dialog
box will appear:
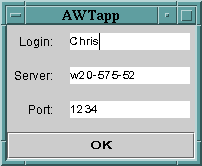
Enter a login name, the hostname of the machine that Server.java was
executed on (or 'localhost'), and the same port number as above, and
then click OK.
Using the Edit Mode
Select 'Edit Mode' on the right side of the window to use the Edit Mode
commands.
Creating an object:
To create a new object, click on the appropriate button on the left hand
side of the main screen. (e.g., Chair, Lamp, etc.) This will pop up a
dialog box that looks like this:
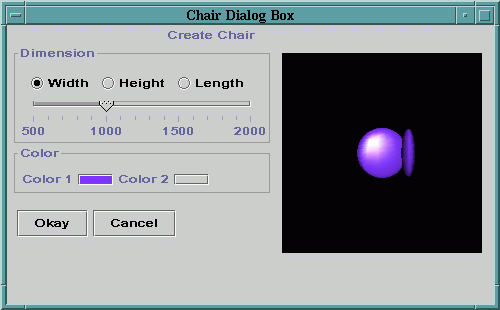
Use the width, height, and length controls to scale the object. Use the
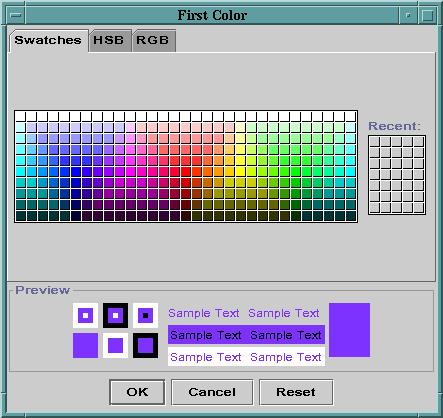
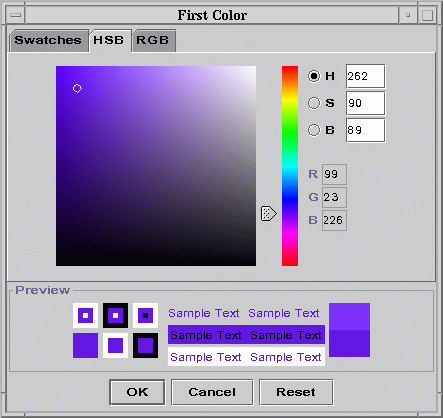
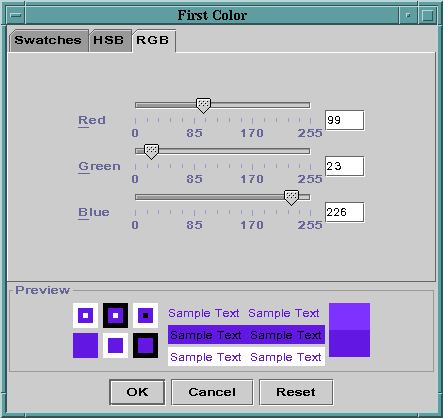
color controls to choose a color. (The following methods are available
for choosing a color):
Swatches Mode:
Hue-Saturation-Brightness Mode:
Red-Green-Blue Mode:
Transforming an object:
Click on an object to select it (it will become slightly transparent
when selected), and then click the 'Transform Selected' button on the
right hand side of the main screen. This will pop up the following
window:

Use the sliders to position the object or to rotate the object in space.
Editing an object:
Select an object and click 'Edit Selected.' This will pop up the same
window as in object creation, and you can use it the same way.
Deleting an object:
Select an object and click 'Delete Object.' The object will be deleted.
Using Messaging:
Click the 'Messaging' button. This pops up the following dialog box:
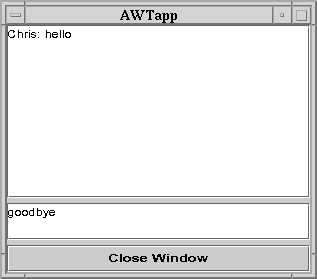
Messages from users appear at the top, and you may type your own messages
in the bottom window.
Using the Fly Through Mode
Select 'Fly Through Mode' on the right side of the window to use the
Fly Through Mode. This mode is used to view a finished scene from
different angles. The controls for this mode are as follows:
z - down
x - left
d - forward
c - back
v - right
space - up
left mouse button and move - change direction
middle mouse button and move - rotate about eye ray
Snap to View
To see the scene from the viewpoint of another user, first make sure you
are in Fly Through Mode. Then select a username from the list on the right
hand side of the main window, and click 'Snap to View.' This will show the
scene from the view of the user you selected.
return