NOTE: to obtain the most up-to-date version of this document, refer to http://web.mit.edu/hst.583/www/lab-manuals/lab4.html
| Diffusion Tensor Imaging Lab |
|
| Copyright David S. Tuch, 2002 | HST-583, MIT |
dtuch@mit.edu
http://www.mit.edu/~dtuch
Contents
Introduction
In recent years, diffusion tensor imaging (DTI) has emerged as a powerful method for investigating white matter architecture in health and disease. Some common applications include measuring the structural integrity of white matter, mapping white matter fiber orientation, and tracking white matter pathways.
While most MRI methods generate univariate (i.e., scalar) images, for example, T1 or T2 maps, DTI produces multivariate (i.e., tensor-valued) images. Hence, DTI poses a number of interesting image reconstruction and visualization challenges. Accordingly, while the specific objective of this lab is to familiarize you with DTI reconstruction and analysis, the more general goal is to acquaint you with multivariate data visualization and analysis.
For background reading for this lab please read
Le Bihan D, Mangin JF, Poupon C, Clark CA, Pappata S, Molko N, Chabriat H.
Diffusion tensor imaging: concepts and applications.
J Magn Reson Imaging. 2001 Apr;13(4):534-46.
Also, please familiarize yourself with three-dimensional graphics navigation in Matlab using the camera toolbar. The following links are helpful: View Control with the Camera Toolbar, Camera Motion Controls
Mathematical background
Recall from class or your reading (Le Bihan, 2001) that, assuming Gaussian diffusion, the the diffusion signal E(q) is related to the diffusion tensor D by the relationship
E(q) = E(0) exp(-qTDq)&tau (1)
where q= &gamma&deltag is the diffusion gradient wavevector, &gamma is the gyromagnetic ratio, &delta is the diffusion gradient duration, g is the diffusion gradient vector, and &tau is the effective diffusion time. The diffusion weighting is given by the b-value b=qTq&tau. The goal is to reconstruct the diffusion tensor D from a set of n diffusion-weighted measurements each with a diffusion wavevector qi.
Through algebraic manipulation Eqn. 1 can be formulated as a matrix equation
s=Bd (2)
where s= - (log E(q1) log E(q2) ... log E(qn))T, d=(D11 D12 D13 D22 D23 D33 -log E(0))T contains the unique elements of D flattened into a tensor with the last term appended to the end, and B is the n x 7 B-matrix. The B-matrix can thought of as an experimental design matrix based on the gradients used for the experiment. The derivation of the B-matrix is left as an exercise.
| Lab question 1: Derive Eqn. 2 from Eqn. 1. In particular, derive the B-matrix for an arbitrary set of diffusion wavevectors {q1, q2, ..., qn}, and a given diffusion time &tau.
|
The diffusion tensor coefficients d can then be estimated by applying the B-matrix pseudo-inverse to s.
d=B+s (3)
(If you're not familiar with the use of the matrix pseudoinverse to solve linear systems of equations you can refer to this link.) The diffusion tensor D can then be reconstructed by repartitioning d.
| Thought question: In order to go from Eqn. 2 to Eqn. 3, what assumption is made on the noise distribution of s? How would you check whether this assumption is valid or not? What are some reasons it might not be valid? What are some reasons for using this assumption even if it's not valid?
|
The eigensystem, i.e., the eigenvectors and associated eigenvalues, of the diffusion tensor D relects the orientational structure of the tissue within a voxel. In particular, the principal eigenvector gives the local fiber direction. The fractional anisotropy metric (FA) gives a measure of the degree of diffusion anisotropy, which is correlated with the orientational coherence of the fibers within a voxel. The FA metric is defined as
FA=&radic 3 &sigma(&lambda)/||&lambda||
where λ is the set of diffusion tensor eigenvalues, σ is the standard deviation, and ||.|| is the norm.
Description of acquired data
- acquisition type: 2D EPI diffusion tensor image (DTI)
- spatial resolution = 2x2x2mm3
- averages = 6
- # directions = 1 unattenuated + 6 attenuated
- gradient directions = {[0 0 0], [1 1 0], [1 -1 0], [0 1 1], [0 -1 1], [1 0 1], [-1 0 1]}
- repetition time (TR) = 15s
- echo time (TE) = 77ms
- b-value = 700s/mm2
- echo type: spin-echo
- image matrix size: 128 x 128 x 40 slices
- static magnetic field = 1.49 Tesla
Data analysis
Scalar visualization
1. Launch Dview and load the raw DTI data file: mg-0-allegra-20006-20011016-121802-4-mri.mnc
2. We first wish to analyze the relationship between the diffusion contrast and the diffusion gradient direction. Begin by binding the +/- keys to the TIME dimesion. To do so, right-click on the big viewport and select 'Bind +/- keys to this view' from the context menu. It should read '+/- keys bound to TIME' in the banner at bottom.
3. Then copy the axial view to the big viewport. Right-click on the axial view at top-left, and select 'Copy this view to big window' from the context menu.
4. Define an ROI in the posterior-right portion of the corpus callosum. The ROI can be drawn by selecting Tools->Region of interest->Create ROI->by drawing a rubberband boundary (big viewport). Then draw the ROI in the big viewport.
5. To obtain the signal statistics for the ROI, right-click on the ROI in the big viewport and select 'ROI stats for this frame' from the context menu. Click OK in the ROI stats menu to dismiss the menu once you have recorded the values.
6. Step through the diffusion gradient orientations by pressing + and -. Note how the diffusion contrast changes as a function of the diffusion gradient orientation. Also note the differing contrast between hemispheres. To confirm the change in diffusion signal, measure the ROI statistics for the 6 other diffusion gradient orientations.
| Lab question 2: For each of the n=7 diffusion gradient orientations, measure the mean (+/SD) diffusion signal for the left and right portions of the posterior corpus callosum at axial slice plane Z=39.9. Explain the relative diffusion signal amplitudes in terms of the experimental diffusion gradient orientations (Description of acquired data).
|
7. We now wish to study the fractional anisotropy (FA) maps. The diffusion tensor and FA maps were calculated before this exercise. Load the FA file: mg-0-allegra-20006-20011016-121802-4-mri-fa.mnc
8. Proceed to axial slice plane Z=39.9 which is approximately at the SI level of the frontal pole. Consider the projection from the anterior corpus callosum to the middle frontal gyrus. Note as we travel along the projection the FA is high in the corpus callosum, low in the divergence to the frontal gyri, and then high again in the gyrus.
| Lab question 3: Measure the FA along a path from the anterior corpus callosum to the middle frontal gyrus. Explain why the FA decreases in going from the callosum to the striations and then increases in the gyrus.
|
Tensor visualization
9. The previous exercises involved scalar visualization. We now wish to visualize the orientational information. Quit Dview by selecting File->Quit Dview from the main menu.
10. At the matlab prompt, type open mg-25-dti-quiver.fig. Wait a few moments for the image to load. The image is a color-coded quiver plot of the diffusion tensor principal eigenvector field for slice 25 (Fig 1).
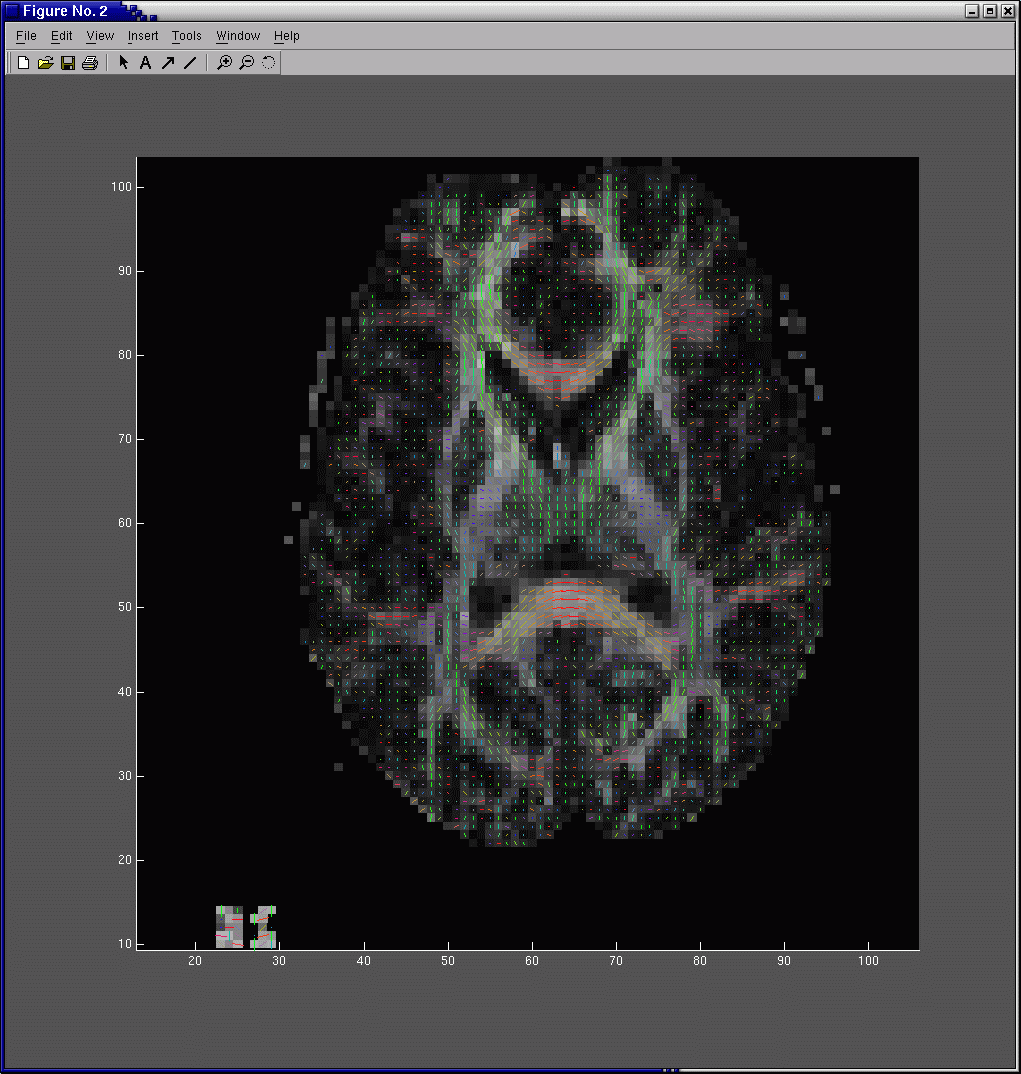
Fig 1. Diffusion tensor principal eigenvector quiver plot. Each line segment is the principal eigenvector for the diffusion tensor in that voxel. In order to emphasize the large white matter bundles, the length of each line segment has been scaled by FA. The color gives the principal eigenvector direction with red denoting mediolateral, green anteroposterior, and blue superoinferior. The background grayscale image is the FA map.
|
11. Active the Camera toolbar by selecting View->Camera toolbar from the main menu. Using the camera toolbar navigate to the right thalamic hemisphere.
| Lab question 4: In the right thalamic hemisphere, and to a lesser extent in the left hemisphere, you can identify three clusters of fiber orientation. Identify these three clusters anatomically. Describe the fiber orientations of these three clusters and explain the fiber orientations in terms of your anatomical knowledge of the thalamocortical/corticothalamic projections.
|
Lab report
| In your report, please answer the 4 lab questions posed above. For question 4 please provide a printout of the image. Do not hesitate to email me at dtuch@mit.edu if you have any questions. |