At the beginning of the part A, we defined our final product to be a model of a network of subthalamic nucleus projection neurons.
In this tutorial, we will explore how to create additional sections, such as dendrites, how to connect them together and finally how to display the data in a new dynamic graph - the space plot.
We recommend that you type the highlighted hoc code to a new file, which you might want to call sthB.hoc. Much of the code is similar to the code in Part A, so you might want to cut and paste from that file.
As was described in the first tutorial, NEURON works with cylindrical sections. So far, we have only created a single section containing a single compartment representing the soma. We are now going to add more sections representing the two dendrites. These can be created just as the soma:
create soma, dend[2]
Each section listed after the create command is separated by a comma. In the case of the dendrites, we use an array to represent the two dendrites. We could have created two different sections named dend1 and dend2, but, as you will see below, representing sections (and objects) as arrays has many benefits. The array indices are numbered from zero, so to access the first element of the array of dendrites, you need to use dend[0], and to access the second element, you need to use dend[1]. If arrays are unfamiliar, you can read about them in most programming books on the C Language.
One small note on programming style: In the future, if we want to re-use this code for another neuron that contain, for example, 4 dendritic trunks, we will have to change all of the 2's to 4's in the code. We can avoid this by using a variable to represent the number of dendrites. We need to create and reference the maximum number of dendrites through this variable throughout the program. For example:
ndend = 2
create soma, dend[ndend]
This will give us the same result as above, but now if we want to re-use this code in the future to represent 4 dendrites, all we have to do is change ndend from 2 to 4.
After creating the soma and dendrite sections, we need to set their properties and add their channels. We have done this already in part A by putting soma at the start of every line. Here we will use curly brackets to group together the statements (see access method 2 in part A):
soma {
    nseg = 1
    diam = 18.8
    L = 18.8
    Ra = 123.0
    insert hh
}
The above code will set the number of segments, the diameter and length of the soma as well as insert Hodgkin-Huxley channels.
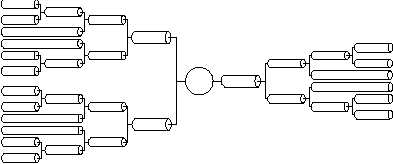
We have a good anatomical description of the subthalamic nucleus projection neuron dendritic tree (obtained from experimental data):
For simplicity and ease of computation, these two dendritic trees can be reduced to single equivalent cylinders (see Rall and Agmon-Snir, 1998, for the requirements and procedure). We will explore methods for constructing full dendritic trees in tutorial part C. Consequently, an electrically equivalent cell can be reduced to:

We could create one of our dendrites using the following hoc code:
dend[0] {
    nseg = 1
    diam = 3.18
    L = 701.9
    Ra = 123
    insert pas
}
Each of the equivalent tree cylinders is very long, so this definition of a dendritic section has the disadvantage of only having one compartment. What this does is make the entire equivalent dendritic tree behave as if it were a single point -- without any spatial differences. Normally we think of electrical potentials travelling down the dendrites to the soma implying that spatial dimensions are important. To increase the spatial resolution of the dendrite, we can simply increase the number of segments in the section. In cable theory terms, this has the effect of increasing the spatial resolution of the cable equation. This is very important for accurate simulations. If the section's number of segments is too small, then the spatial resolution is low and you might not be able to see the fine details in the simulation results. If the section's number of segments is too large, then you might be unnecessarily extending the simulation time. By analysing the effects of spatial resolution on the results (in addition to other analyses), you can achieve efficient and accurate simulation results.
The reason for NEURON's distinction between sections (high level conceptual modelling construct) and segments (low level numerical simulation detail) is to allow you to create models that do not rely on the number of segments (or compartments) in the model. Rather, you can create a model entirely independent of the numerical details. Then, if during the analysis you find you need to increase the spatial resolution in a certain part of the model, you can do so simply by increasing nseg for that section.
For our simulation, we are interested in seeing the potentials travel along the dendrites, so we want to increase the number of segments. So we create two dendrites with five segments each:
dend[0] {
    nseg = 5
    diam = 3.18
    L = 701.9
    Ra = 123
    insert pas
}

dend[1] {
    nseg = 5
    diam = 2.0
    L = 549.1
    Ra = 123
    insert pas
}
Now that we have all of the sections created and their properties set, we need to connect them together.
Since NEURON uses the abstraction of sections (instead of specifying individual compartments), we need a way to refer to specific points along the section. This is handled by using the section name followed by a number between 0 and 1 in parenthesis which represents the distance along the section you want to refer to. For example, dend[0](0) refers to a point at the proximal end of dendrite 0, dend[0](1) refers to a point at the distal end of dendrite 0, and dend[0](0.2) refers to a point 20% down dendrite 0:
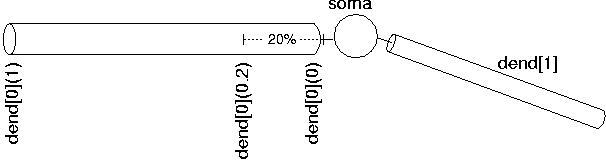
We use this notation when connecting sections to one another since we need to specify what point of one section connects to what point on another section. We also use this notation when we place point processes in a section.
This method of specifying a point on the section is conceptually independent of the number of segments in the section. Thus, when you insert a point process (as in the current stimulus in part A) 20% down the section, it is physically inserted into the segment that contains the point 20% down the section. However, due to the way NEURON works, if you later change the spatial resolution of the section, the point process may no longer be in the segment containing the point 20% down the section. The moral is that it's best to specify nseg before attaching point processes. The box contains a more detailed explanation of this point.
Expert tip 1:Why it's better to specify nseg before attaching point processes
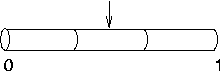
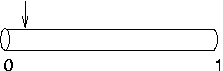 Suppose nseg is 1 and
you try to put an IClamp at 0.1, as in this cartoon.
Suppose nseg is 1 and
you try to put an IClamp at 0.1, as in this cartoon.
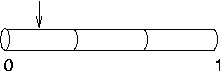
 It will actually end up at 0.5, as
shown here. This is because the segment is one electrical
compartment, so it doesn't make any difference to the
simulation where the electrode is placed. NEURON allocates the position to be the centre of
the segment rather than keeping track of where we wanted it
placed.
It will actually end up at 0.5, as
shown here. This is because the segment is one electrical
compartment, so it doesn't make any difference to the
simulation where the electrode is placed. NEURON allocates the position to be the centre of
the segment rather than keeping track of where we wanted it
placed.
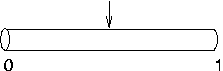
 Later, you decide to
increase nseg to 3. What happens to the IClamp? It
stays put at 0.5, right in the middle of the second segment,
even though the first segment is the one that contains
location 0.1.
Later, you decide to
increase nseg to 3. What happens to the IClamp? It
stays put at 0.5, right in the middle of the second segment,
even though the first segment is the one that contains
location 0.1.
So it's best to specify nseg before attaching point processes.
Expert tip 2: How to move point processes after changing nseg
 If you do
have to increase nseg after placing point processes,
you can re-position the point processes in order to take full
advantage of the improved resolution. For example, if our
current clamp was called stim, we could move
stim to 0.1 with the hoc
statement stim.loc(0.1) and the result
would be as shown here, i.e. much closer to 0.1 than if we
had left it at 0.5.
If you do
have to increase nseg after placing point processes,
you can re-position the point processes in order to take full
advantage of the improved resolution. For example, if our
current clamp was called stim, we could move
stim to 0.1 with the hoc
statement stim.loc(0.1) and the result
would be as shown here, i.e. much closer to 0.1 than if we
had left it at 0.5.
For our simulation, we are going to connect the soma and the dendrites together. We use the connect command to accomplish this:
connect dend[0](0), soma(0)
connect dend[1](0), soma(1)
Our entire full morphology subthalamic neuron code now looks like this:
load_file("nrngui.hoc")

ndend = 2

create soma, dend[ndend]
access soma

soma {
  nseg = 1
  diam = 18.8
  L = 18.8
  Ra = 123.0
  insert hh
}

dend[0] {
    nseg = 5
    diam = 3.18
    L = 701.9
    Ra = 123
    insert pas
}

dend[1] {
    nseg = 5
    diam = 2.0
    L = 549.1
    Ra = 123
    insert pas
}

// Connect things together
connect dend[0](0), soma(0)
connect dend[1](0), soma(1)

// create an electrode in the soma

objectvar stim
stim = new IClamp(0.5)

stim.del = 100
stim.dur = 100
stim.amp = 0.1

tstop = 300
Notice the use of //. Anything after the double forward slash is considered a comment, so it is a useful way of explaining your code.
Note on initialisation.
The initial value of the membrane potential (v_init; as seen in the RunControl window) will be close to the resting potential in each compartment, but not necessarily the same. It will generally take a few milliseconds for the membrane potential v to settle down the the "correct" value in each compartment. This isn't just because v_init isn't "correct"; if a model has significant electrotonic extent and the spatial distribution of channels is nonuniform, the steady state membrane potential will in general be nonuniform.
To avoid this transient phase, it's a good idea to let the simulation run for a while before performing the experimental manipulations. In the example above, we wait 100 ms before injecting current.
(You can see this voltage wobble in a voltage axis. The state variables, in particular the inactivation variable h_hh, also take a while to settle down; we will learn later how to look at them.)
As mentioned in part A, the built-in passive and active channel properties (pas and hh respectively) are not appropriate for subthalamic neurons. We can modify the passive property parameters in the dendrites and soma to reflect correctly the passive membrane properties of rat subthalamic nucleus projection neurons. To modify the active channel properties we will need to build new active channels (see part D) using the model description language (NMODL). For the moment we will simply modify the standard hh channel densities.
As described in part A, we can access the passive and active properties once they are inserted in the section. For example, we can increase the soma sodium channel density by changing the code that specifies the soma properties to:
soma {
  nseg = 1
  diam = 18.8
  L = 18.8
  Ra = 123.0
  insert hh
  gnabar_hh=0.25
}
where the units of gnabar_hh are in S/cm2.
The passive properties in the soma and dendrites must also be changed. Subthalamic nucleus projection neurons in rat have a membrane time constant of 6msec. As we assume all cells have approximately the same membrane capacitance (1 µF/cm2), by using the assumption of an RC circuit we can calculate the subthalamic nucleus projection neuron membrane resistance from:
time constant = Resistance * Capacitance
This yields a membrane resistance of 6000 ohms cm2. Remember, NEURON requires this as a conductance g_pas (which is the reciprocal of the resistance, i.e. 0.0001667 S/cm2). Subthalamic nucleus cells also have a very high resting membrane potential, so our leakage equilibrium potential (e_pas) is set to -60mV. The dendrite definition then becomes (for dendrite 0):
dend[0] {
    nseg = 5
    diam = 3.18
    L = 701.9
    Ra = 123
    insert pas
    g_pas = .0001667
    e_pas = -60.0
}
Note, you must make the same passive changes in the other dendrite.
The hh channels inserted into the soma also contains passive properties, called gl_hh and el_hh. These can be modified in a similar manner, making our soma definition:
soma {
  nseg = 1
  diam = 18.8
  L = 18.8
  Ra = 123.0
  insert hh
  gnabar_hh=0.25
  gl_hh = .0001666
  el_hh = -60.0
}
This is a good time to run the model and explore the full effects of dendritic morphology. For example, try placing the stimulating electrode somewhere along the dendrites, or use more than one electrode and insert inhibitory and excitatory inputs.
In the previous section, you should have inserted passive channels and set there properties for dend[0] and dend[1] individually. This is OK when there are only two dendrites, but what if there were 100 dendrites that we wanted to insert passive conductances into? We'd have to type out 100 times three lines or do lots of cutting and pasting; boring and liable to lead to RSI.
The solution is the for loop. A for loop can step through each element in an array in turn. The format of the for loop is:
for var = lower-bound, upper-bound command
where var is the loop variable, lower-bound is the lower bound of the loop, upper-bound is the upper bound of the for loop and command is the command we want to run through the loop. Thus to inert passive conductances and change their properties in the dendrites we can type into our program:
for i = 0, ndend-1 dend[i] {
    insert pas
    g_pas = .0001667
    e_pas = -60.0
}
Try and play with different graphs from the graph menu. For example, we will plot the voltage of the soma and a distal part of a dendrite on the same graph (in different colours). Once you have opened a voltage axis, you will see the legend "v(.5)". This means we are plotting the voltage halfway down the default section (in our case the soma).
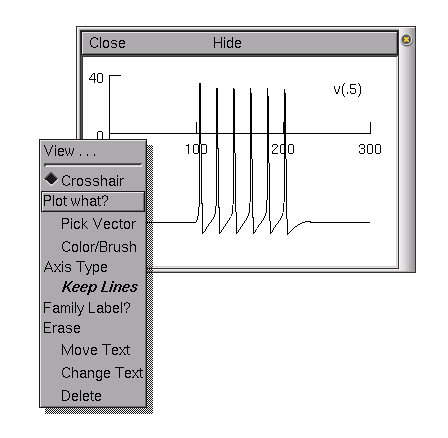 In order to access
the graph properties, including, for example, adding a
dendritic voltage plot to the graph, right
click on the voltage axis. This brings up a Graph
Properties menu. Chose Plot what?. This should
bring up a window from which we can choose a variable to plot.
The variables can be either directly typed in if we know the
exact name of the variable we want to plot, or they can be
selected from the list of variables in the selection boxes.
In order to access
the graph properties, including, for example, adding a
dendritic voltage plot to the graph, right
click on the voltage axis. This brings up a Graph
Properties menu. Chose Plot what?. This should
bring up a window from which we can choose a variable to plot.
The variables can be either directly typed in if we know the
exact name of the variable we want to plot, or they can be
selected from the list of variables in the selection boxes.
We want to plot the voltage from a distal dendrite, so we need to select dend[0] in the first selection box and then select v(0.1) from the second box. We can select a variable by double clicking with the left mouse button on the variable name. We must then edit the text so that it reads dend[0].v(0.9).
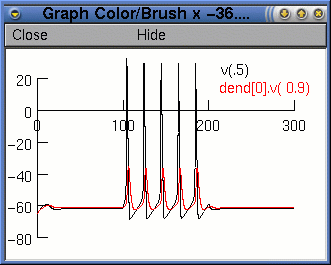 Finally, we press the
Accept button. The legend dend[0].v(0.9) will
appear on the voltage axis. Now when we run the simulation, we
will see two traces. However, it would be nice if they were
different colours. To change the colour and thickness of the
lines we can select Colour/brush from the Graph
Properties menu (after right clicking on the graph). This
brings up a palette of colours and lines.
Finally, we press the
Accept button. The legend dend[0].v(0.9) will
appear on the voltage axis. Now when we run the simulation, we
will see two traces. However, it would be nice if they were
different colours. To change the colour and thickness of the
lines we can select Colour/brush from the Graph
Properties menu (after right clicking on the graph). This
brings up a palette of colours and lines.
We select colours and/or line types by clicking the button next to the colour or line type and then clicking on the relevant legend. After we have run the simulation again, we should see something like this:
Besides voltage axes, there are several different axes available when plotting variables vs. time (Voltage axis, Current axis and State axis). Each of these require their own graph since the method used to solve the cable equations, developed by Mike Hines, calculates each of these variables at different times. For example, voltages are calculated at each time step, but currents are calculated at the half time step before voltage and the state variables are calculated at the half time step after the voltage. For more information on the numerical method used to solve these equations see Hines (1984).
The principles of using the other types of axis are the same as using the voltage axis. To confirm this, try using current and state axes to display currents and the state variables at different points on the neuron.
Suppose we would like to simulate the effects of blocking sodium channels in the soma. We could simply type:
soma gnabar_hh = 0
to effectively block the sodium channels. To unblock the channels, we could type:
soma gnabar_hh = 0.25
However, it would be nice if we could say something like "block sodium" or "unblock sodium". Procedures allow us to do this. A procedure is a block of code that we will probably want to use more than once. The syntax for defining a procedure is:
proc procedure_name() {
code...
}
Once we have defined a procedure, we can execute it using procedure_name().
For the example of blocking sodium channels, we can define a procedure called block_sodium() like this:
proc block_sodium() {
    soma gnabar_hh = 0
}
Then we can use
block_sodium()
to block the sodium channels. Check that this works by rerunning the simulation after blocking sodium and looking at the same graphs as in the previous section.
Similarly, we can define unblock_sodium():
proc unblock_sodium() {
    soma gnabar_hh = 0.25
}
Suppose we would like to see the effect of a partial block on sodium. (For example, TTX blocks sodium channels to varying degrees of their normal strength.) Giving arguments to procedures is a convenient way to change the level of blocking. To do this we modify block_sodium() as follows:
proc block_sodium() {
    soma gnabar_hh = $1 * 0.25
}
The $1 refers to the first argument of the procedure. We pass argument to the the procedure as follows:
block_sodium(0.15)
This will block the sodium channels to 15% of their normal value.
We can pass more than one argument to the procedure by using $2, $3 etc. (i.e. $1 is the first parameter, $2 is the second if there is one, $3 the third, if there is one, etc.). For example:
proc block_sodium_potassium() {
    soma gnabar_hh = $1 * 0.25
    soma gkbar_hh = $2 * 0.036
}
will block sodium potassium channels to varying degrees when called with
block_sodium_potassium(0.15, 0.25)
We can make long procedures clearer by assigning $1 etc. to meaningful variable names at the start of the procedure. For example:
proc block_sodium() {
    block_fraction = $1
    soma gnabar_hh = block_fraction * 0.25
}
is clearer than the previous version. However, the disadvantage with this is that the variable block_fraction is left hanging around after we've finished executing the procedure. This is messy and takes up memory. Instead we can use the local statement so that the variable block_fraction as used in the procedure is only defined and available in this procedure:
proc block_sodium() { local block_fraction
    block_fraction = $1
    soma gnabar_hh = block_fraction * 0.25
}
It is good programming practice to use local variables
Time plots allow you to see exactly what happens to a variable vs. time at a single point in the neuron. To see what happens at all points in a section (or a group of sections), you can use a space plot. Unfortunately, to generate a static graph of a variable vs. both time and space you need to produce a 3-D graph, NEURON gives you the next best thing: a movie-like graph called a space plot. This dynamic graph will plot a variable (e.g., voltage) vs. space for each time step in the simulation.
 To
create a space plot, select Shape plot from the
Graph menu in the NEURON Main Menu. This will
open a shape plot window in which a schematic representation of
the neuron will appear.
To
create a space plot, select Shape plot from the
Graph menu in the NEURON Main Menu. This will
open a shape plot window in which a schematic representation of
the neuron will appear.
You can rotate the axes by selecting 3D Rotate from the Graph Properties menu. The middle mouse button is used to move the whole representation.
From this window, you can select from the menu (with the right mouse button) a Space Plot. By default, voltage is the variable to plot, but you can change this with the Plot What? menu item (e.g., to ina or m_hh). To create the space plot graph, you need to select a section of the neuron to include in the space plot by clicking the left mouse button at the beginning of the section (in the schematic picture), dragging the mouse across the section you want to plot (while holding the mouse button down), and releasing the mouse button when you have covered the sections you want to plot. A line will appear from where you first clicked the mouse button to the current location of the pointer. When you release the mouse button, the sections you selected will be highlighted in colour, and a new window with the space plot will be opened. Press the Init & Run button in the RunControl window to see the space plot in action.
To open the Print & File Window Manager, select Print & File Window Manager from the Window menu on the Main menu. The Print & File Window Manager window contains several different buttons, menus and two rectangles.
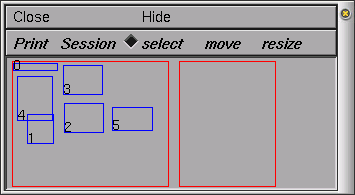
The left most of the two red rectangles in the window represents the entire NEURON display--we will call this the Manager rectangle. Each smaller blue rectangle (with a number in it) represents one of NEURON's windows. The second red rectangle represents a sheet of paper--we will call this the Selection rectangle. It is used to print selected windows to a file or printer and to save selected windows in a session file. To select one of the windows to print or save, click with right mouse button in one of the smaller blue rectangles in the Manager rectangle, and you will see it appear in the Selection rectangle. To remove the window from the Selection rectangle, simply click with the right mouse button in the small numbered rectangle that you wish to remove. You may also want to move (left mouse button) or resize (middle mouse button) the windows in the Selection rectangle.
The Print menu gives various options for printing the currently selected windows (i.e., the ones in the Selection rectangle) including a PostScript[TM] printer or a file. To change the printer that you will print to, UNIX users can select the Select Printer option in the Print menu. This will pop up a window in which you can enter the command to print your file to the new printer. Users of MSWin or MacOS should leave Select Printer alone; instead, you should use your operating system's tools to select the printer. If you would like to print the PostScript output to a file, then you can select the PostScript option under the Print menu.
After creating several graphs, you may want to save the windows you have created (i.e., graphs and panels) to a file so that you can recall them at a later time. NEURON allows you to save either all or selected windows to a session by selecting the Save selected or Save all option of the Session menu in the Print & File Window Manager. Save all will save the position and contents of all NEURON's windows. Save selected will save only those windows that are currently selected in the Selection rectangle in Print & File Window Manager. Either of these options will pop up a window in which you can enter the filename of your save session.
Try to save all the windows into a session file called sthB.ses
If we save our session to a file, we can either load the session each time we load our program by selecting the Retrieve option of the Session menu in the Print & File Window Manager, or we can have our program automatically load our session for us. To do this, we need to add the following at the end of our program:
xopen("sthB.ses")
where sthB.ses is the name of the session we saved (Note: the name must be in quotes). The next time we start our program, the session with our graphs and menus will automatically be loaded into NEURON.
Next: part C of the tutorial.Rall, W. and Agmon-Snir, H. (1998) "Cable theory for dendritic neurons" in Koch, C. and Segev, I., editors (1998). Methods in Neuronal Modelling: From Ions to Networks. MIT Press, Cambridge, Massachusetts, second edition.
Hines, M. (1984) Efficient computation of branched nerve equations. Intl. J. Bio-Med. Comput. 15:69-76