
Location: Treasure Chest
Depth: 210
Depth: 210
This puzzle involves the locks surrounding the treasure chest. Opening any one lock will allow access to the other puzzles in the chest, but it may be easier to cut the chain or unscrew the lid hinge.
First, open the locks. Each lock is a different type and can be opened in any of several ways (listed roughly easiest to hardest for each lock):
Red lock (generic A389):
Gray lock (Master 22):
Combo lock (Master 1533TRI):
Word lock (Master 1534D):
It may also be possible to extract the “clue” sticker with a thin shim without actually opening the lock (except on the Word lock). The soda can shim method may also unintentionally damage the clue if the shimmer does not know to expect a clue there.
|
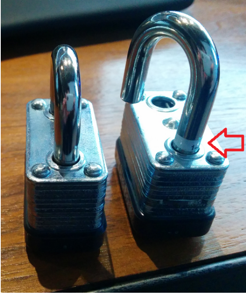
After opening the locks, each reveals a “clue.” For the Word lock, the clue is the combination itself. For the other locks, the clue is a 5-character string printed on a white sticker on the previously hidden portion of the shackle. (See red arrow in picture at right.) The combination from the Combo lock is not used, nor is the specific keying of the Red or Grey locks. The 4 clues are: |
 |
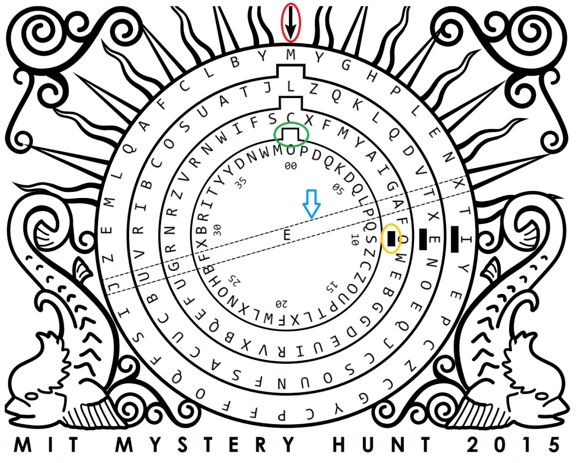
These clues indicate the combination to a safe: “Left 36, Right 05, Left 20, Right 09”. The art on the chest lid is a stylized drawing of the dials inside the safe. This safe works a lot like a combination lock: each “tab” [GREEN] interacts with the “bump” [YELLOW] on the next dial.
An animation of the general principle is at HSW (except in our safe, the dials stack up inside-to-outside instead of back-to-front).
In this safe, you enter the combination by manipulating the innermost dial; the numbers rotate with the letters. By turning it multiple revolutions, the tabs pick up the bumps and the outer dials can be moved. We enter the combination by turning the innermost dial until the numbers line up at the arrow [RED] at top. Finally, take the letters in the extraction rectangle [BLUE] to find the answer.
Entering the combination: start by turning the inner dial 3+ turns to the left and then stopping with 36 towards the arrow at the top. This sets the position of the outermost dial, putting an L and G in the “extraction rectangle”.
Turn the inner dial 2 turns right and then turn to 05. This sets the second-outer dial to have an I and N in the extraction dial.
Next, turn one turn left and then go to 20. The second dial is now showing S and I. Finally turn right to 09. The inner dial now has Q at the top and T E N in the rectangle, including the central E.
Reading roughly down-left, the extraction rectangle says LISTENING, which is the puzzle answer, and relates to one classic method of cracking safes.
It is possible to figure out the answer having only solved 2 or 3 of the clues. Each clue independently sets the final position of one dial, revealing 2 of the letters in the answer.