C. Posting Discussion Messages
1 – Open XMAS by double-clicking on the shortcut for XMAS on your computer desktop. Log in using your username and password. Be patient and allow it to open completely.
2 – Put DVD in your player. If it begins to open in a window outside of XMAS, close that program immediately!
3 – Click “DVD Resources” button to view list of titles. Double-click appropriate title of the DVD you have in your player. A DVD Viewer window will then open up within XMAS.
4 – Once the DVD window appears, BE PATIENT. Click the PLAY button and wait for the main menu to appear.
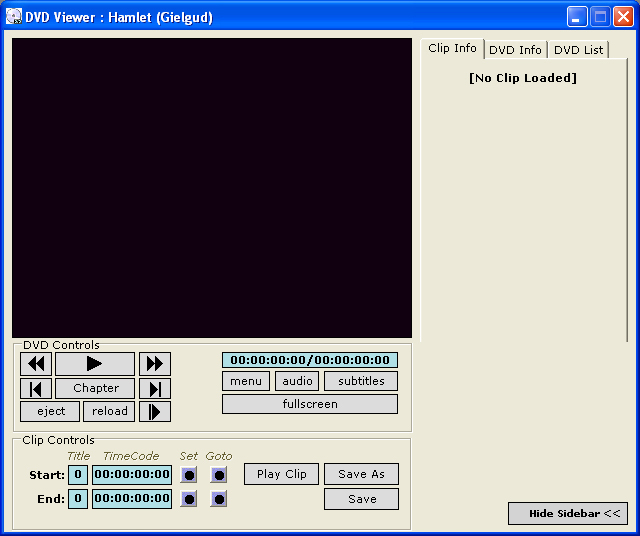
5 – Once the DVD begins to play, our controls enable you to move around in the DVD in various ways: Rewind, Play/Pause, Fast Forward (you can change rewind and fast forward speed by right-clicking on the corresponding button), Previous Chapter, Next Chapter, (right-click on Chapter button to access full list of chapters), and Step Forward (by frame only). The Menu, Audio, and Subtitles may not work with some DVD titles. You can resize the DVD Viewer or press Alt+Enter to go Fullscreen.
6 – You can set the “Start/End” points of any clip you desire to capture by clicking the “Set Button” to the right of the Start/End times. (The “Go To” Button here will take you to that point in the Time Code Area.)
7 – You can test any clip by clicking on “Play Clip.”
8 – Once you have designated the clip you intended, click “Save As.” (If you already have a saved clip loaded in the DVD Viewer, and you've made changes to the Start/End times or want to change your comments for that clip, click on "Save" to update the already saved clip.)
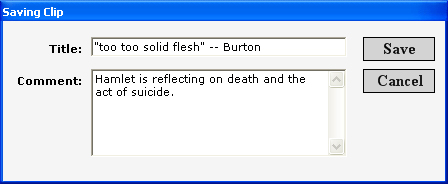
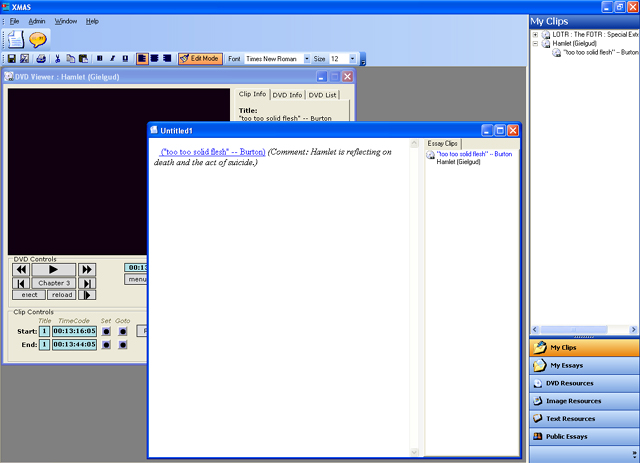
9 – A dialogue box will appear. Title your clip in the “Title” box and add your comments to the "Comment" text field. When you are done, click “Save.” (Clips that you save can be found in the Sidebar when you click on the "My Clips" button.) After a clip is saved, it is immediately loaded into the viewer along with the comments you added.
10 – Open a discussion forum by clicking on the Discussion icon. After you select the desired forum, click on the "Open" button. You can post a new message or reply to an existing message.
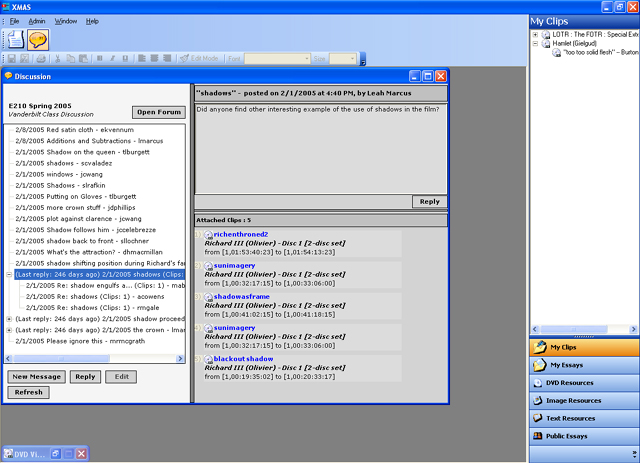
11 – Click on the "New Message" button to post a new message. When new window opens, you may fill in the subject and message fields. You may also add clips you have saved to your message. Simply, click and drag clips one at a time from "My Clips" in the sidebar into the clips area of your new message window. When you are done, click "Save."
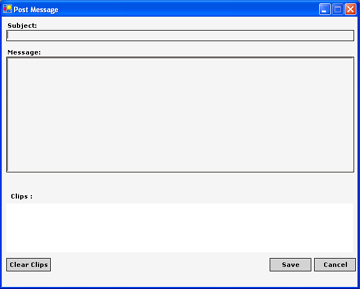
12 – Click a message in the tree view and then click on the "Reply" button to reply to that message or you can right-click directly on a message and select "Reply" from the popup menu. (You can also edit messages you have posted to correct typos or add missing clips in a similar manner.)
13 – To view any clip attached to a message, just click on the link for the clip. (However, for DVD clips, be sure you have the correct disc loaded in your computer.)
14 – Open a new essay by clicking on the Essay icon. If opening an existing essay, click the “My Essays” button in the sidebar and then double-click on the title of an essay. Again, be patient. Sometimes the “Essay” window takes a minute to open.
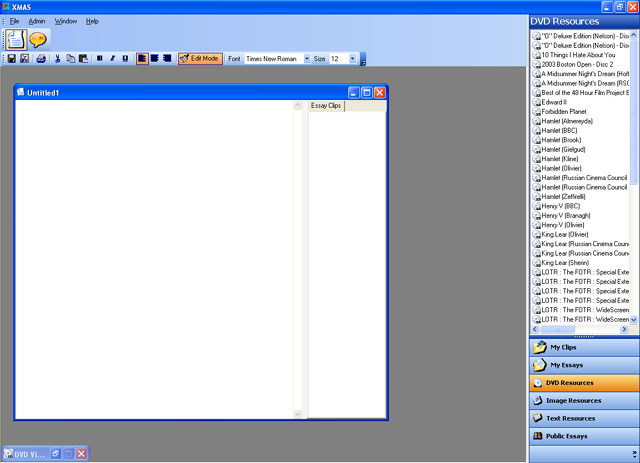
15 – Save your essay (click on Floppy Disc icon) and name appropriately.
16 – You may add clips to your essay just like in Discussion messages. Just click and drag clips them from "My Clips" into your essay window.
17 – You can add your own prose to your Essay describing the significance of the clip you have inserted and developing an argument about the film in question. Your prose can be formatted using the editing tools available in the Essay toolbar.
18 – Clips can be deleted from your essay just as prose can. Even if you erase clips from your Essay, they will stay in “My Clips” so they can be used another time. (If you delete clips, which have been added to an essay, from "My Clips", the essay will not be affected.)
To playback clips from the Essay, you have 2 options:
option 1) Click on the "Edit Mode" button to deselect it, which switches you out of edit mode, and click on clip link. (Remember to click on the "Edit Mode" button again to modify essay text or add more clips.)
option 2) Right-click on the desired clip in the "Essay Clips" list on the right-hand side of the essay window and choose "Play" from the popup menu that appears.
19 – Remember to save your essay often. You should make a habit of printing a hard copy of your essay work as backup. Close the XMAS program then remove the DVD from your player when you are done.
- Image resources, accessed via URL, can be manipulated and saved as clips; cropping, zooming, drawing colored boxes over a region, inserting text overlays, etc.
- Text resources, uploaded plain text files stored in database, can be highlighted and saved as clips; click and drag to highlight passages of text to be saved (originally designed for providing electronic text version of Shakespeare's plays)
- Any user can make an essay public
(and undo by making an essay private); right-click on an essay in the My Essays
panel of the sidebar and choose "Make Public" (or "Make Private"
to undo) - a public essay then is viewable by all users in the group that user
belongs to under the "Public Essays" panel by group, under the user's
name