Day One Exercise: Building a Webpage
Intro to Web Programming
MIT - AITI
February 2002
Introduction
In this exercise, you will create a polished webpage about movies. The webpage will provide descriptions of movies as well as a form for purchasing the movies. Using the information learned from the lectures this morning, you will format the text of the webpage, add tables, forms, images and links.
The exercise is separated into six steps. At the end of each step, your webpage should look like the printouts in this handout. If you need help at any time, please ask us!
Step 1: Download Files to Disk
Download the following files to your computer by clicking on the links below with the right mouse button and choosing the "Download Link to Disk" option. Save the files to a directory of your choice. Be sure to save the files into the same directory.
- movie.html: Raw Text that you'll Transform into a Webpage
- camera.jpg: A small Image that you'll Include in the Webpage.
Step 2: Basic HTML Page
Now that you have downloaded the two files to the disk, you should start editing "movie.html." Open "movie.html" in NotePad. NotePad is a simple text-editor that you'll be using to create the webpages in this class. After you open "movie.html", you'll notice that the file contains some raw text that over the course of the exercise you'll be changing into a webpage. Each time you edit "movie.html", be sure to save your changes. Then open (or reload) the file movie.html within Internet Explorer to see the results of your changes.
Change movie.html into a simple HTML page as follows:
- Enclose file in <HTML> tags.
- Create a <HEAD> region.
- Give the Page this title: Buy a Movie Online!
- Create a <BODY> region containing all of the raw Text.
- Give the Body a white background color.
If you do these steps correctly, your webpage should look like this:
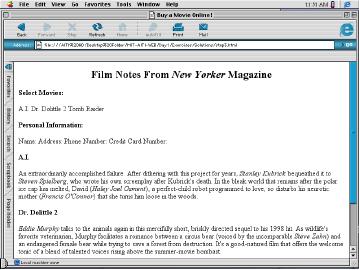
Step 3: Text Formatting
Modify your basic HTML page so that all of the text is formatted as follows:
- "Film Notes from New Yorker Magazine" is a centered, size two headline with "New Yorker" italicized.
- "Select Movies" and "Personal Information" are size four headlines. The movie headings "A.I.", "Dr. Dolittle 2", and "Tomb Raider" are also size four headlines.
- All names of people are italicized when first mentioned.
- <BR> and <P> tags are inserted as appropriate.
Now you're webpage should look like this:
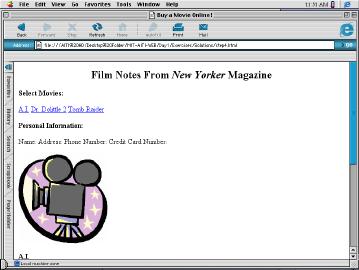
Step 4: Insert Image and Links
- Insert the image file "camera.jpg" after the "Personal Information" section. Give the image a width of 200 pixels and a height of 200 pixels. Be sure to give the image an ALT description of your choice.
- Insert links for the words "love", "bear", and "Lara Croft" to any URL of your choice.
- Create Anchors for each Movie Description Paragraph. Then Link each title in the "Select Movie" menu to the appropriate Anchor.
After this step, your webpage looks like this:
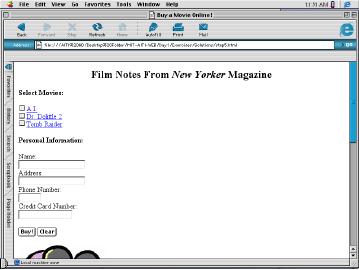
Step 5: Creating a Form
Create a Purchase Form in the "Select Movie" Menu:
- Insert Checkboxes for each Movie Title. Give them values of your choice.
- In the "Personal Information" section, insert textfields after "Name", "Address", "Phone Number", and "Credit Card Number."
- The "Name" and "Address" fields should be 20 characters long
- The "Phone Number" field should be exactly 6 characters long
- The "Credit Card Number" field should be exactly 16 characters long
- Insert a submit button and a reset button. Name the submit button "Buy!" and the reset button "Clear"
Step 6: Movie Price Table
Create a table with a size one border that changes the "Select Movies" menu to list the movie titles and prices:
- The table has two columns
- The first row has a gray background color and contains the text "Title" centered in the first column and "Price" centered in the second column.
- The second row has the "A.I." title and price of 1500 Ksh.
- The next row has the "Dr. Dolittle 2" title and price of 1200 Ksh.
- The last row has the "Tomb Raider" title and price of 900 Ksh.
Step 7: Master Table
Create a master table with a size one border that organizes the overall layout of the page:
- First row of the table has a single column containing the headline "Film Notes...."
- The second row of the table has two columns:
- The first column contains the "Select Movie" and "Personal Information" menus. It is vertically aligned to the top of the table.
- The second column contains the camera image and the movie descriptions.
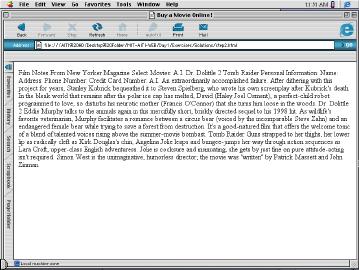
Step 8: Nested Table
Create a nested table with a size one border that organizes the layout of the image and movie descriptions:
The nested table has only one row and two columns:
- The first column contains the camera image and the description of "A.I."
- The second column contains the descriptions of "Dr. Dolittle 2" and "Tomb Raider"
- Both colums are vertically aligned to the top of the table
Step 9: Cleaning up the Tables
To clean up the page, change the border size of all the tables to zero. Now you're done!