StarGenetics User Manual
For a downloadable PDF version of the user manual,
click
here.
Contents
General Information
StarGenetics
Visualizers
StarGenetics User
Interface
A. Punnett Square
Tool
B. Strains Box
C. Properties
Box
D. Active Experiment
Window
E. Saved Experiments
Window
Performing an Experiment in
StarGenetics
Visualizer-Specific
features:
Working With Yeast
General Information
StarGenetics is a customizable genetics experiment
simulator that allows students to study how traits
are inherited. StarGenetics simulates mating
experiments between organisms that are genetically
different across a range of traits. In StarGenetics,
students can design, perform and analyze the results
of genetics experiments involving model organisms
such as fruit flies, yeast and Mendel’s pea plants,
and non-model organisms such as cows, fish, and
“smiley faces”, the latter of which was designed for
a younger audience. StarGenetics runs on standard
Linux, Windows and Mac computers.
Opening StarGenetics
-
To get to
StarGenetics, navigate to: http://star.mit.edu/genetics/.
-
Click on
the Start
button to
download the application.
-
Open the file you
have downloaded. Depending on your browser,
click Trust, Run, or Allow
when a prompt
appears asking if you trust the signature or
certificate, or if you allow StarGenetics to access
your computer.
Back
to top
Opening
Files
There are two ways to open a file in StarGenetics:
- To open a file that comes bundled with
StarGenetics: click File-->New
in the toolbar, and select the exercise of choice.
- To open a file that does not come bundled with
StarGenetics: click File
-->Open in the
toolbar, and navigate to the location where the
exercise of choice is saved on your computer.
Back to top
Saving
StarGenetics Files
- To save your entire set of experiments that can
be reopened at a later time, click File
-->Save.
- Enter a name for the file and choose a location
in which to save the file, then click Save. Your
experiments will be saved as a StarGenetics file
(.sg1).
- When the file is re-opened, all of your saved
experiments will appear in the Saved
experiments window and you can
continue to create new experiments.
Back to top
Resources and
Help
- Click on Help
-->Send
Suggestions to provide feedback,
suggestions, or report software bugs. Enter the
information then click
Send Report to submit your
comments.
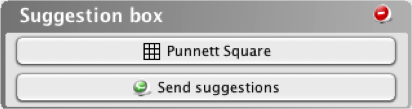
- You can also send suggestions by clicking in the
Suggestion
Box at the top left of the page once
an experiment is open.
- Click Help
-->Getting
Started to access a basic “Quick
Start” guide with instructions for how to mate
organisms and save experiments.
Back to top
StarGenetics Visualizers
Available Organisms In StarGenetics
The different StarGenetics visualizers allow you to
perform experiments with a variety of model and
non-model organisms such as:
- Yeast (S. cereviseae)
- Fruit Flies (D. melanogaster)
- Mendel’s Peas (P. sativum)
- Cows
- Fish
- ‘Smiley faces’
To perform
experiments with all organisms, EXLUDING
YEAST, you
can follow the same basic steps and the user
interfaces look very similar. To perform experiments
with yeast, see the Working With Yeast
section of this
User Guide.
The following instructions use screenshots of the
program in the Fruit
Fly visualizer, but the same icons
can be found in the same places in the Peas, Cows,
Fish and Smiley Face visualizers.
Back to top
StarGenetics User Interface

|
A. Suggestion
box: Punnett Square tool
B. Strains
box
C. Properties
box
D. Active
Experiment window
E. Saved
experiments window
|
Back to top
A.
Punnett Square Tool
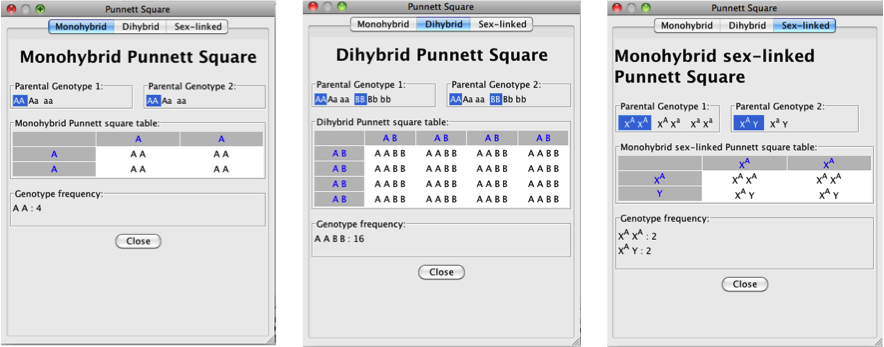
The Punnett
Square tool helps you determine the
genotype of a particular organism after performing a
genetic cross. The Punnett Square tool allows you to
determine the expected genotypic distribution of the
progeny given the genotypes of the parents.
- Click on the Punnett Square
button in the
Suggestion box.
-
Select a genotype
for each parent:
-
-
AA:
homozygous dominant
-
Aa:
heterozygous
-
aa:
homozygous recessive
- The genotypic frequencies for the cross are
summarized at the bottom of the tool.
- You can view a monohybrid cross, a dihybrid
cross, or a cross with a sex-linked (X-linked) trait:
Back to top
B. Strains
Box
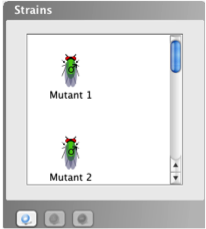
The Strains
box contains all of
the strains provided to you for the exercise.
- You can click on any strain in the Strains box
and examine its phenotypes and other properties in
the Properties
box.
- To add progeny generated from a cross to the
Strains box
for easy access, simply drag an organism into the
Strains box
or click on an organism and select the Add to
strains icon
 .
.
- To remove a strain from the Strains
box, click on the strain and then click on the
Remove
icon
 at the bottom right of the
Strains
box.
at the bottom right of the
Strains
box.
-
Note: you can only remove strains
that YOU have added to the Strains
box, and not
strains provided to you by the instructor.
Back to top
C.
Properties Box
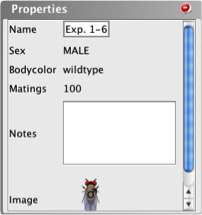
The
Properties
box contains a
written description of a strain’s phenotype.
- To examine the properties of an organism, click
on any organism in the
Strains box,
Active
Experiment, or Saved
Experiments windows.
- The Properties
box contains: the name of the organism, its phenotype
with respect to a variety of properties or features,
the TOTAL number of times this
organism can be used in a mating (listed as matings),
a place for you to enter your own notes about the
organism, and a small picture of the organism.
- You can rename a strain by clicking on the
existing organism name in the Properties
box, typing in the new name, and clicking OK to
confirm the name.
- To minimize the Properties
box and increase the size of the Strains
box, click the
minimize icon in the top right corner of the
Properties box.
Back to top
D. Active Experiment
Window
The
Active
Experiment window shows the current
experiment in progress. It contains two parts: the
Mating
site and the experimental results.
The experimental results are divided into three
viewing modes: Individual, Sorted, or Summary modes.
See Tab Views for more information.
Back to top
E. Saved
Experiments Window

The
Saved
experiments window displays the results of
previously saved experiments.
- The saved experiments can be accessed in the
Saved
experiments window, by selecting the
desired experiment from the dropdown menu.
- The saved experiment can be viewed in a separate
window by clicking Open in new
window.
- Once an experiment is saved to the Saved
experiments window, you cannot change
the experiment. You can only view results that have
been previously generated when the experiment was in
the Active
Experiment window and cannot add more
progeny to the experiment.
- You can use the progeny generated from a saved
experiment by dragging the desired organism from the
Individual
or Sorted tab
in the Saved experiments window
to the Mating
site in the Active
Experiment window.
- Alternatively, you can select an organism in the
Saved
experiments window and click
the Add to
strains icon at the bottom of the
Strains box
or drag the organism from the Saved
experiments window to the
Strains
box.
Back to top
Performing an Experiment in
StarGenetics

|
Active
Experiment Window
|
Saved
Experiments Window
|
A. Experiment name (text box)
B. Mate or Add more matings
button
C. New experiment button
D. Discard active experiment
button
E. Tab views: currently shown in Summary
view
F. Show or Hide phenotype
description
G. Mating site
|
H. Saved experiments drop-down selection
menu
I. Rename saved experiment
button
J. Discard saved experiment
button
K. Open saved experiment in a new window
button
|
Back to top
Crossing Two
Strains: Mate
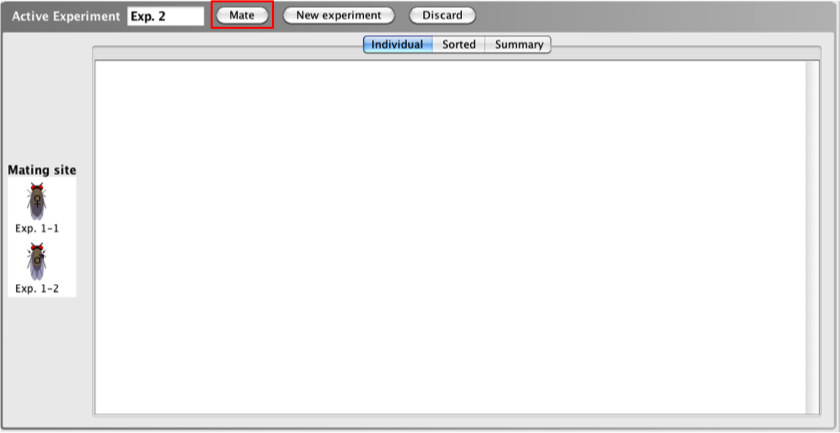
The first
step in crossing two organisms or strains together is
moving the strains you wish to cross to the
Mating
site.
-
Drag the
strains one at a time to the Mating site
-
Select a strain
and click the Set as
parent icon
 , found at the bottom of the
Strains
box
, found at the bottom of the
Strains
box
-
Double click on
a strain to add it to the Mating site
- Once you have selected the two organisms you
would like to cross, click the Mate button
(B) at the top of the
Active
Experiment window.
Back to top
Adding
Additional Matings To A Cross

A certain number of progeny are generated from a
cross after first hitting the
Mate
button, but you can add additional progeny to the
cross to increase the total progeny generated.
- To add additional matings, click Add more
matings (B) at the
top of the Active
Experiment window and select the
number of matings you would like to perform. The
Mate button
is replaced by the Add more
matings button after a mating is
performed.
- The number of additional progeny generated in
EACH mating is equal to the number of progeny
generated in the initial mating.
- These additional progeny will be displayed along
with the previous progeny in the
Active
Experiment window.
-
-
For example,
if you generated 20 flies after initially
hitting the Mate
button, and
you perform an additional 5 matings, you will
generate an additional 5x20=100 flies for a
total of 120 flies.
-
You can continue
to add additional progeny by clicking the
Add more
matings. Each time, you will have
the option of choosing the number of additional
matings to perform.
Note:
You will not be able to generate additional progeny
in a cross once a parent’s maximum number of matings
is exhausted. The number of matings remaining for any
organism can be seen in the Properties
box of that
organism under the 'Matings'heading (see the Properties Box above for more
information).
Back to top
Saving
Experiments And Creating A New Experiment
- Your individual mating experiments will be
automatically saved for you when you start a new
mating experiment by clicking New Experiment (C).
- The saved experiments can be accessed in the
Saved
experiments window, by selecting the
desired experiment from the dropdown menu
(H).
- The saved experiment can be viewed in a separate
window by clicking Open in new window
(K).
- The Active
Experiment window is now ready to
perform another cross.
Back to top
Renaming Experiments
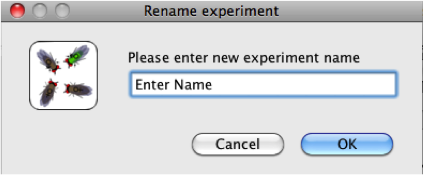
- To rename an active mating experiment, click on
the box containing the name of the active experiment
(A) at the top left corner of the
Active
Experiment window. Type a new name
for the experiment, then click OK.
- To rename a mating experiment that has already
been saved in the Saved
experiments window, select the
experiment you wish to rename from the dropdown menu
(H), then click Rename
(I) in the Saved
experiments window. Type a new name
for the experiment, then click OK.
Back to top
Renaming
Organisms
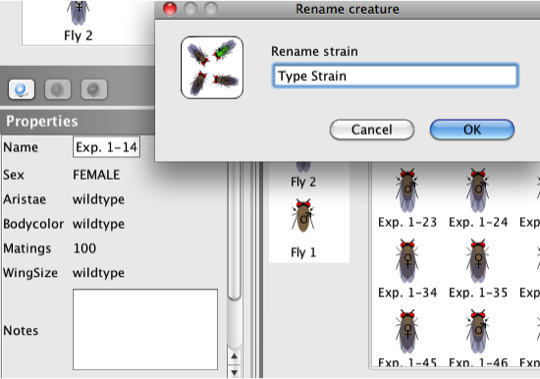
- To rename an organism (for example, an individual
plant or fly for use in later crosses), click on the
organism in the Strains box
or the Individual
or Sorted view
in either the
Active Experiment window or
Saved
experiments window.
- Click on the existing name of the organism in the
Properties
box (Exp. 1-14, in the example below).
- Type the new name in the pop-up window and click
OK.
Back
to top
Discarding Experiments
- To discard an active experiment, click
Discard
(D) at the top right of the
Active
Experiment window.
- When asked to confirm that you would like to
discard the experiment, click OK.
- Your experiment will be discarded and a new
experiment will open automatically.
- To discard a saved experiment, select the desired
saved experiment from the drop down menu in the
Saved
experiments window, and click
Discard
(J) at the top of the Saved
experiments window. Click
OK
when prompted to confirm that you would like to
discard the experiment.
Back to top
Tab Views

After generating
progeny by performing a mating experiment in
StarGenetics, you can analyze the phenotypes of the
resulting progeny in one of 3 tab views in the
Active
Experiment or Saved
experiments windows: the
Individual
tab, the
Sorted
tab, and the
Summary
tab
(E).
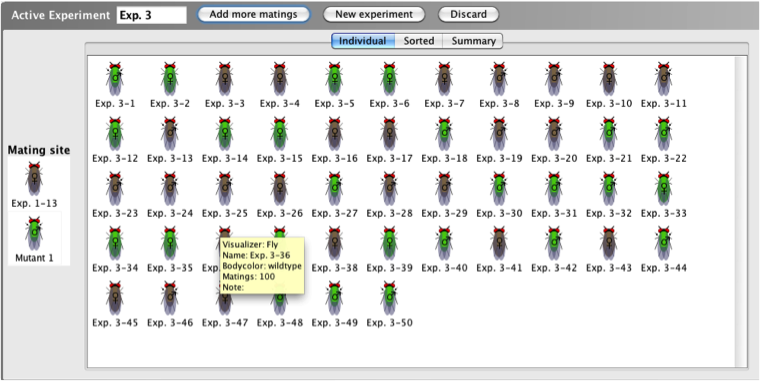
1.
Individual View
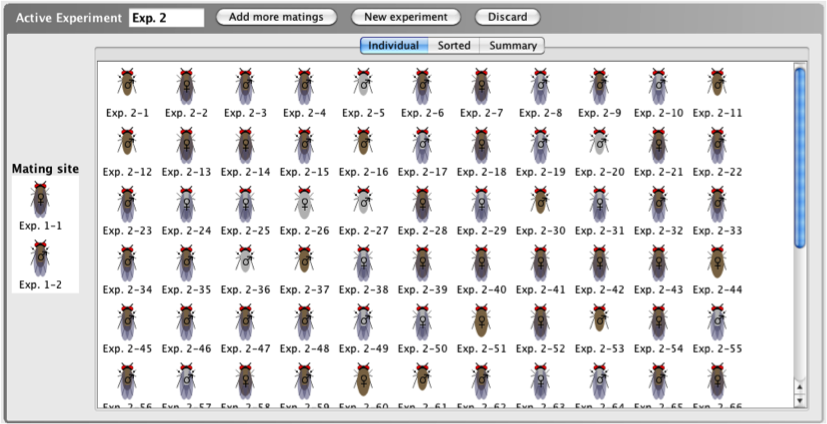
When viewing progeny in the Individual
view, all individual resulting progeny of a cross are
listed in the order they were generated. There is no
grouping with respect to gender or phenotype.
- The Individual
tab includes the name of each organism generated in a
cross and a thumbnail image of each organism.
- For a written description of each organism and
its phenotype, click on the organism and refer to the
Properties
box.
Back
to top
2. Sorted View
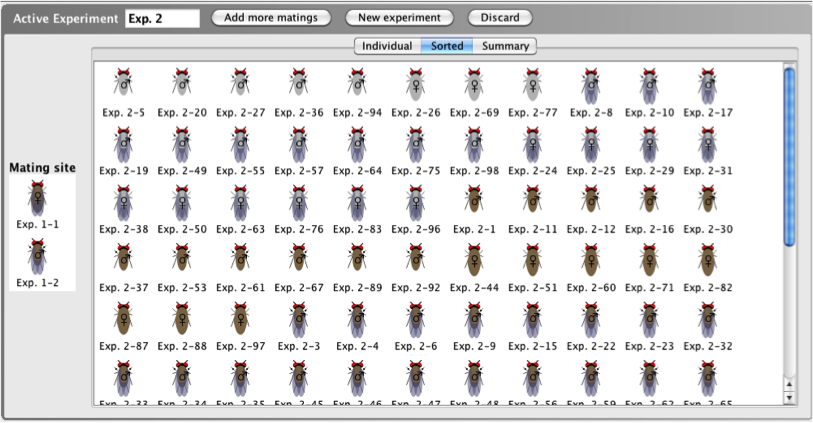
When viewing progeny in the Sorted tab,
the individual resulting progeny are sorted by gender
and phenotype (for example aristae length and body
color), so that all of the progeny that have the same
phenotype are clustered together.
- The Sorted tab
includes the name of each organism generated in the
cross and a thumbnail image of each.
- For a written description of each organism and
its phenotype, click on the organism and refer to the
Properties
box.
Back to top
3. Summary View
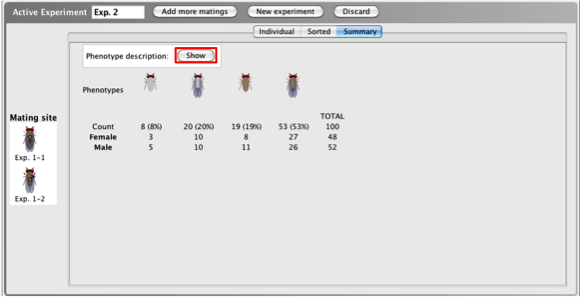
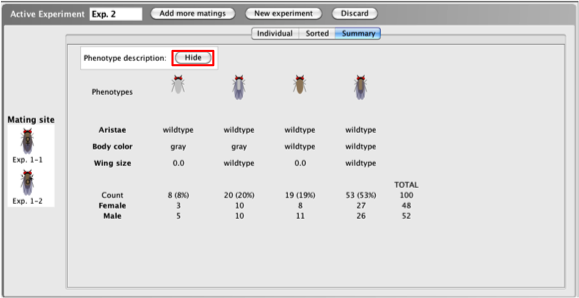
When viewing
progeny of a cross in the Summary
tab, a summary of
the results of the mating is provided. The
Summary
tab tallies the
number of progeny in each phenotypic class, giving
you the frequency (percent) of progeny within each
phenotypic class, a numeric breakdown of males and
females within each phenotypic class, and the total
number of progeny produced.
- Click the
Show button beside Phenotype
description to view a written
description of the phenotype(s) of each class.
- Click the
Hide button beside Phenotype
description to hide the written
phenotypic descriptions.
Back to top
Visualizer-Specific features:
Peas:
Self-Crossing Pea Plant Strains
In the Mendel’s Peas visualizer, users are able to
self-cross a strain of pea plants in addition to
crossing two different plants together. In pea
plants, each plant produces flowers with both male
and female reproductive organs. This means that a
single plant can act as both the sperm and ovum
donor.
- To perform a self-cross with pea plants, simply
drag the same plant to the Mating site
TWICE to act as both the sperm and
ovum donor.
-
Note:
you are not able to perform self-crosses with the
other StarGenetics organisms (flies, fish, cows).
Back to top
Flies and Fish: RFLP
Analysis
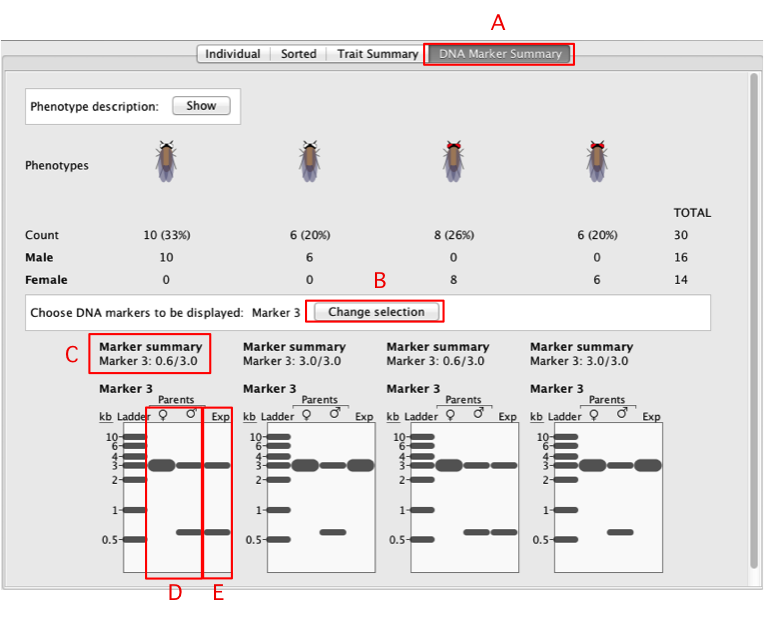
A. DNA
Marker Summary Tab
B.
Change Selection Button
C.
Marker Summary
D.
Parental RFLPs
E. RFLP
for progeny phenotypic class
|
A unique feature of the Fruit Fly and Fish
visualizers is the ability to look at hereditary
transmission of RFLPs (Restriction Fragment Length
Polymorphisms) in the form of virtual electrophoresis
gels. In RFLP analysis, DNA is digested by one or
more restriction enzymes, and the resulting fragments
are separated through the process of electrophoresis
on an agarose gel. If two DNA samples have different
sequences, they may exhibit different patterns of DNA
fragements on the gel if their sequences differ
within the restriction site or in the distance
between restriction enzyme sites. If different
alleles of a gene produce different RFLPs, then RFLP
analysis can be used to deduce the alleles of a gene
in a given individual.
By examining the RFLPs of different phenotypic
classes, students have the ability to correlate
genetic information with the phenotypic information
of the progeny flies as well as associate phenotypic
traits with physical locations (markers) on
chromosomes.
When an experiment has RFLP data compatibility, the
tabs will be labeled: Individual, Sorted, Trait
Summary, and DNA Marker
Summary (the Summary
tab is divided into trait and DNA summaries) within
the Active and Saved experiment windows.
- To show the RFLP analysis, click on the
DNA Marker
Summary (A) tab.
-
Choose DNA
marker(s) to be displayed – each
marker is a different RFLP site. You can select
multiple markers at once, or Display
None to display no markers. Click
Apply.
- You will see an electrophoresis gel underneath
each phenotypic class. On the gel, you will see a
ladder with reference markers of varying sizes, the
RFLP pattern of the female and male parents
(D), and the representative RFLP pattern
for each phenotypic class (E).
- In each lane, each distinct band represents an
RFLP allele.
-
-
Homozygous
individuals have only one visible band (one
allele)
-
Heterozygous
individuals have two distinct bands (two
alleles)
- For each phenotypic class, the size of the RFLPs
in kilobases (kb) is summarized under the
Marker
summary section
(C). The sizes of the RFLPs of the
alleles are separated by a "/’".
- To change the RFLP markers included on the gel,
click the Change selection
(B) button and select other DNA markers as
explained above.
Back to top
Working With Yeast
Some aspects of the user interface in the yeast
visualizer are the same as described above. This
includes the basic layout of the yeast visualizer:
the Strains box, Properties box, and some features
of the Active and Saved experiments windows
(excluding tab views). The same procedures can be
used to open a new
experiment, save
experiments, rename experiments or organisms, and discard experiments, as
described above.
After opening a file in the yeast visualizer, you
must choose whether to perform a tetrad experiment or
a non-tetrad experiment by clicking on the
appropriate buttons. The layout of the active
experiments window is different depending on the type
of experiment, either tetrad or non-tetrad, chosen in
the yeast visualizer. In this section of the user
guide, the layout of each type of yeast experiment
will be explored and examples of each will be
provided.
Non-Tetrad Experiment:
- Click Non-tetrad experiment to
begin a non-tetrad experiment
- Use a non-tetrad experiment to test individual
yeast strains or a group of multiple yeast strains
for growth in various selective media conditions
(different amino acid components of the media or
temperatures) without the analysis of tetrads.
- Non-tetrad experiments may also involve mating
yeast strains together by replica plating one strain
on a lawn of a different strain to create diploids,
but these diploids cannot
sporulate into tetrads in non-tetrad
experiments.
Tetrad Experiment:
- Click Tetrad experiment to begin
a tetrad experiment
- Tetrad experiments involve mating two strains of
yeast together and sporulation the resulting diploid
for tetrad analysis. The resulting tetrads are then
replica plated onto lawn and/or selective media
conditions to deduce information about each tetrad’s
genotype and mating type.
- Use a tetrad experiment to study recombination in
yeast as each tetrad shows each of the 4 meiotic
haploid products.
Back to top
Non-Tetrad
Experiments
Selecting
Strains: Drop Strains Here and Add All Strains
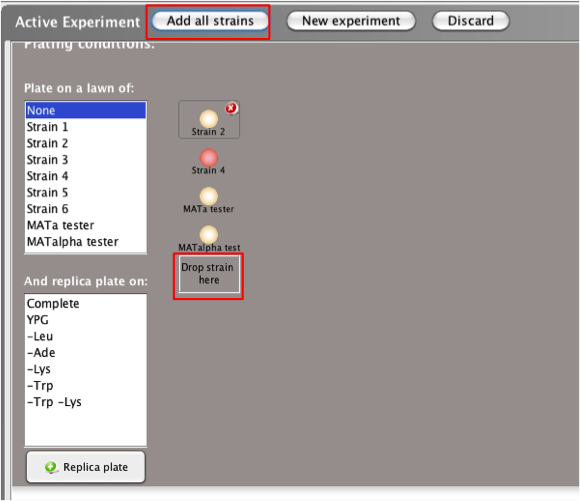
The first step in a
non-tetrad experiment is selecting the strain(s) you
wish to study by moving them to
theActive
Experimentwindow.
-
Drag and drop
the yeast strain from the Strains
box to the box
labeled 'Drop Strain
Here'in the Active
Experiment window
-
Double click on
the yeast strain in the Strains
box
-
Select the
yeast strain and click on the Set as
parent icon
-
To add all
strains in the Strains
box to
the Active
Experiment window, select the
Add all
strains button
-
To remove a
strain from the Active Experiment
window, click on
 in the upper right corner of the image of
the strain.
in the upper right corner of the image of
the strain.
Back to top
Plating
Conditions: Plate on a Lawn
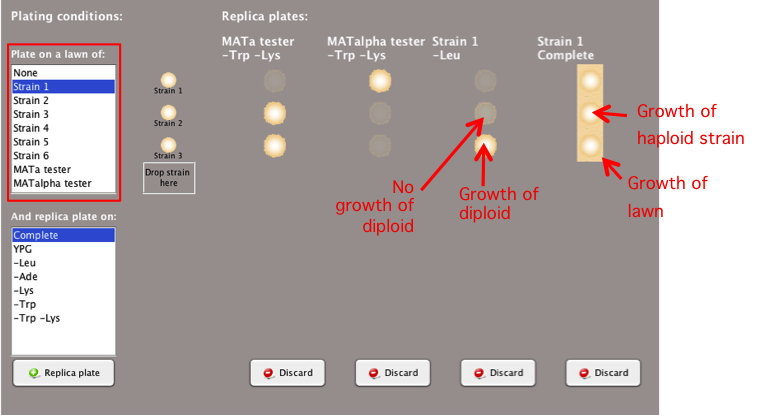
To determine if a
strain can mate and form diploids with another yeast
strain, replica plate one strain onto a lawn of a
different yeast strain.
- Select the strain you wish to use as a lawn in
the 'Plate on a
lawn of:'box.
- You can select multiple lawns at the same time by
holding the Control key (or command key on an Apple
computer) and selecting different strains to use as a
lawn.
-
Note:
To produce accurate experimental results, you must
make sure to choose appropriate media conditions to
ensure that only the resulting diploid, and not the
parent haploid strains, can grow.
- Using lawns can be especially useful to determine
the mating type (MATa or MATalpha) of each strain and
whether mutant yeast strains can complement each
other (whether they have mutations in the same gene
or different genes).
Back to top
Plating Conditions: Replica Plate
on Selective Media
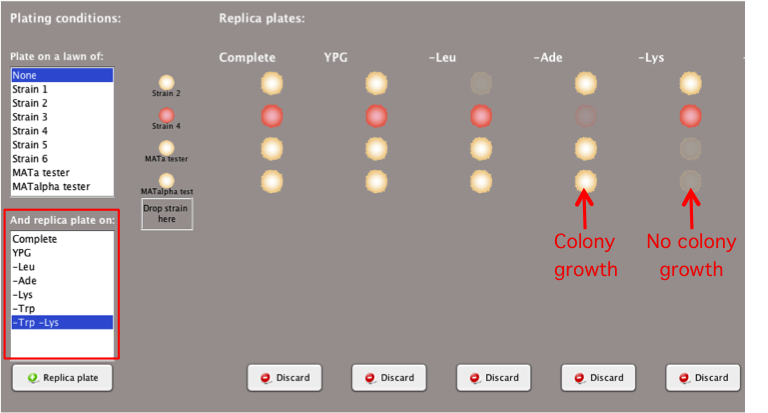
Replica plating yeast strains on different selective
media can provide information about their genotypes,
such as which amino acids cannot be synthesized by
certain strains.
- Select the desired conditions in the
'And replica plate
on:'box.
- You can select multiple media conditions at the
same time by holding the Control key (or the command
key ( on an Apple computer) and selecting different
media conditions.
- Types of media available may include:
-
-
Complete
media contains all the essential
nutrients
-
Media lacking
an essential amino acid or multiple amino acids
necessary for colony growth
- Different temperature conditions may also be
available in this box for various media.
- If a strain cannot grow in a media condition
lacking an amino acid, then it will be represented by
a shadow of the replica-plated colony.
Back to top
Replica Plate

Replica plating involves inoculating a secondary
plate containing selective growth media with yeast
colonies from a primary, or master, plate. This
reproduces the pattern of colonies on the plate, so
growth of a yeast strain can compared between
multiple conditions.
- Click the
Replica plate button to observe the
experimental results of growing the yeast strain(s)
on the selected media and lawn conditions.
- You can continue to add new media conditions by
selecting additional media and/or lawn conditions and
clicking the Replica
Plate button.
- You can continue to add additional replica plates
even after you have saved your experiment by clicking
the Replica
plate button in the Saved
experiments window.
Back to top
Discarding Replica Plates

- To discard a particular replica plate within your
Active
Experiment window, click the
Discard
button below the relevant column(s).
- To discard the entire experiment, click the
Discard
button in the tool bar of the Active
Experiment window (see Discarding Experiments)
Back to top
Tetrad Experiments
Mating Site
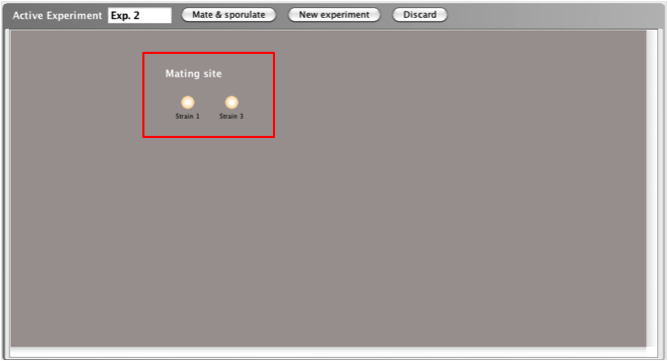
The first step in a tetrad experiment is adding the
strains you wish to mate to the Mating
site.
- You can add a strain to the Mating site
in 3 different ways:
-
-
Drag and drop
the yeast strain from the Strains
box to
the Active
Experiment window to the box labeled
"Drop here to
mate"
-
Double click
on the yeast strain
-
Select the
yeast strain and click on the
Set as
parent icon
Back to top
Crossing two strains: Mate and
Sporulate

When you mate two haploid yeast strains in a tetrad
experiment, first a diploid yeast cell is created and
then the diploid cell undergoes meiosis, producing a
tetrad with 4 spores.
- Once you have selected the two strains you would
like to mate, click the Mate &
sporulate button at the top of the
Active
Experiment window.
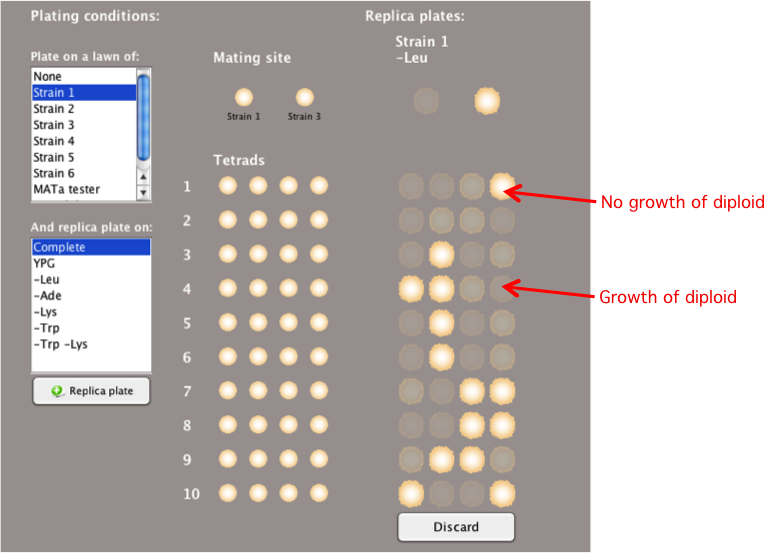
- A number of tetrads will be generated. Each
tetrad contains 4 spores; each spore is one of the
resulting meiotic products.
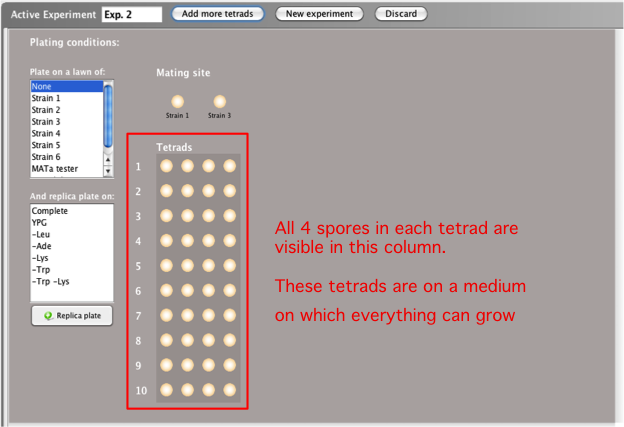
- The images of the tetrads that appear on the left
side of the Active
Experiment window after clicking the
Mate &
sporulate button represent growth of
each spore on complete, non-selective media, as in
the picture below. Each tetrad, comprised of its four
spores, is a row. You can then replica plate the
spores onto selective media and/or lawns.
Back to top
Adding More Tetrads to a Mating

You can increase the number of tetrads you wish to
analyze by adding more tetrads to a mating.
- To add more tetrads once the Mate &
Sporulate button has been selected,
click the Add
more tetrads button, at the top of
the Active
Experiment window (this button takes
the place of the Mate &
sporulate button).
- Select the number of tetrads you would like to
add and click
OK.
-
Note:
Once you have saved your experiment to the
Saved
experiments window, you will no
longer be able to add more tetrads to the
experiment.
Back to top
Plating
Conditions: Plate on a Lawn
To determine if a spore from a tetrad can mate and
form diploids with another yeast strain, you can
replica plate one strain onto a lawn of a different
yeast strain.
- Select the strain you wish to use as a lawn in
the 'Plate on a
lawn of:'box.
- You can select multiple lawns at the same time by
holding the Control key (or command key on an Apple
computer) and selecting different strains to use as a
lawn.
-
Note:
To produce accurate experimental results, you must
make sure to choose appropriate media conditions to
ensure that only the resulting diploid, and not the
parent haploid strains, can grow.
- Using lawns can be especially useful to determine
the mating type (MATa or MATalpha) of each spore and
whether mutant spores can complement each other
(whether they have mutations in the same gene or
different genes).
- The tetrad type (NPD, PD, TT) classifications are
not applicable when the tetrads are replica plated on
lawns. In this case, a summary of the tetrad types is
not provided.
Back to top
Plating Conditions: Plate on
Selective Media
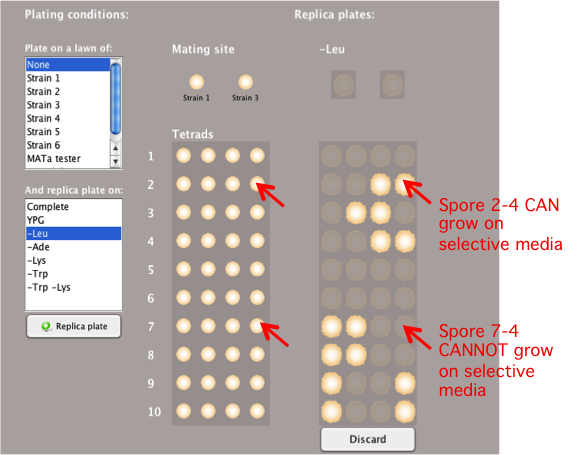
Replica plating the spores of a tetrad on different
selective media can provide information about the
spores’ genotypes. You can use this to infer meiotic
recombination rates (see Analyzing Tetrads).
- Select the desired conditions in the
'And replica
plate on:'box.
- You can select multiple media conditions at the
same time by holding the Control key (or the command
key on an Apple computer) and selecting different
media conditions.
- Types of media available may include:
-
-
Complete
media contains all the essential
nutrients
-
Media lacking
an essential amino acid or multiple amino acids
necessary for colony growth
- Different temperature conditions may also be
available in this box for various media.
- If a spore cannot grow in a particular media
condition, then it will be represented by a shadow of
the replica-plated spore.
Back to top
Replica
Plate
Replica plating involves inoculating a secondary
plate containing selective growth media with yeast
colonies from a primary, or master, plate. This
reproduces the pattern of colonies on the plate, so
growth of a yeast strain can compared between
multiple conditions.
- Click the
Replica plate button to observe the
experimental results of growing the yeast strain(s)
on the selected media and lawn conditions.
- You can continue to add new media conditions by
selecting additional media and/or lawn conditions and
clicking the Replica
Plate button.
- You can continue to add additional replica plates
even after you have saved your experiment by clicking
the Replica
plate button in the
Saved
experiments window.
Back to top
Discarding Replica
Plates

- To discard a particular replica plate within your
Active
Experiment window, click the
Discard
button below the relevant column(s).
-
To discard the
entire experiment, click the Discard
button in the
tool bar of the Active
Experiment window (see information about
discarding
experiments in the fruit fly
visualizer).
Back to top
Analyzing Tetrads
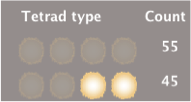
Based on the numbers of spores that grow within a
tetrad, tetrads can be classified as parental ditypes
(PD), non-parental ditypes (NPD), or tetratypes (TT).
The numbers and ratios of each of these tetrad types
can be used to infer recombination rates and map
distance between genes.
- There is a summary at the bottom of the column of
tetrads that counts the different 'tetrad types' –
the number of tetrads in which zero, one, two, three,
and four spores grow are tallied individually. Only
the types of tetrads resulting from your experiment
are included in the summary.
- It will be up to you to classify each 'tetrad
type' as a parental ditype, non-parental ditype and
tetratype.
- After StarGenetics generates more than 100
tetrads, it resorts to a summary-only mode, in which
the number of each tetrad type is listed and the
individual tetrads are not visible, by default. To
display the images of the individual tetrads, click
on the Display
Individual Tetrads button.
- The location of the spores that grow when replica
plated on selective media may be different in
different tetrads. This is because StarGenetics
accurately models the variation that exists in
experiments.
Back to top
Using
Spores in New Experiments
- To use a spore from a mating as a strain in
another experiment, start a new experiment by
clicking New
Experiment, and drag the desired
spore from the
Saved experiments window to the
mating site.
- You can add a particular spore from a tetrad to
the Strains box
for future use by dragging that spore to the
Strains box
or by selecting the spore and clicking the
Add to
strains icon .
-
Note:
you must drag the spore from the
original
tetrad (in the left most column
under the Tetrads heading), not the spore from a
replica plate experiment, to use it as a parent or
add it to the Strains
box.
Back to top