Problem Set 0: Turtle Graphics
This course is about three essential properties of software:
The purpose of this problem set is to:
- introduce the tools we will use in 6.031, including Java, Eclipse, JUnit, and Git;
- introduce the process for 6.031 problem sets;
- and practice basic Java and start using tools from the Java standard library.
You should focus in this problem set on writing code that is safe from bugs and easy to understand using the techniques we discuss in class.
You must install the required tools and complete Part I (problems 0 through 4) before class on Friday, February 8.
Part I
Problem 0: Install and set up
Read and complete the Getting Started guide. The guide will step through:
You need to complete all the steps in the guide before you start working on this problem set.
Problem 1: Clone and import
This process will be identical for each problem set.
Create your remote repository with the starting code for the problem set by visiting didit.csail.mit.edu/6.031/sp19. Go to
psets/ps0and click the button to create your repository. You will only be able to create a repo after the course signup forms are processed and the problem set is announced.If you can’t create a repo after the announcement, you are not registered for 6.031. Contact the staff (how?) to check your status.
If you are a listener or not taking 6.031 for credit, you can’t create a repo. See instructions below to clone from a read-only remote.
Open the terminal (Git Bash on Windows) and go to the directory (using
cd) where you would like to store your code; for example, that might be a directory namedSourcein your home directory.Getting Started step 5 introduces the command line.
Clone your repo. You will access the remote repository over SSH from your laptop.
Note: Getting Started step 6 has setup you must perform before using Git.
Find your clone URL at the top of your
psets/ps0page on Didit. It will look like this, with your username filled in:ssh://git@github.mit.edu/6031-sp19/ps0-«username».git
In the terminal, run this command, filling in the URL:
git clone «URL»
The result should be a directory named
ps0-«username»with the starting code for the problem set. Keep the terminal open — you will also use it to commit your code.If
git clonesays “does not appear to be a git repository” or “could not read from remote repository”, check your repository URL for typos. Make sure your repository is listed on Didit.Check that you can authenticate to
github.mit.eduin the last part of Getting Started step 6.If you are a listener or not taking 6.031 for credit, you can clone problem set repositories using a modified URL: after
ps0, omit the dash-username. You will not be able to push to this repository, it’s a read-only remote.
After cloning your repository, add the project to Eclipse so you can work on it.
Note: Getting Started step 4 has setup you must perform before using Eclipse in 6.031.
- In Eclipse, go to File → Import… → General → Existing Projects into Workspace.
- Select the root directory of your clone by clicking “Browse…” and navigating to it.
- Make sure the project is checked, make sure “Copy projects into workspace” is not checked, and click Finish.
Problem 2: Collaboration policy
Follow the link on the General Information page to read the course policy on collaboration and public sharing.
To check your understanding of the policy, answer these questions:
reading exercises
I can write my solution while sitting near another person writing theirs.
(missing explanation)
I can write some part of my solution in lab or office hours.
(missing explanation)
I can get help from someone else while their own solution is visible to me or them.
(missing explanation)
I can talk about ways to solve the problem set with another student in the class.
(missing explanation)
I can write my solution while sitting near another person writing theirs, reading code aloud to each other to make sure we both got it.
(missing explanation)
I can show or send my solution to another student in the class.
(missing explanation)
I can look at someone else’s solution to get help writing part of my solution.
(missing explanation)
I can use someone else’s solution to check my own solution, for example by running their tests on my code.
(missing explanation)
My solution can include code that I wrote while taking this class in a previous semester.
(missing explanation)
At the end of every problem set, you will answer a few questions similar to these about how you collaborated on the assignment.
Problem 3: Turtle graphics and drawSquare
Logo is a programming language created at MIT that originally was used to move a robot around in space. Turtle graphics, added to the Logo language, allows programmers to issue a series of commands to an on-screen “turtle” that moves, drawing a line as it goes. Turtle graphics have also been added to many different programming languages, including Python, where it is part of the standard library.
In this problem set, we will be playing with a simple version of turtle graphics for Java that contains a restricted subset of the Logo language:
forward(units)
Moves the turtle in the current direction by units pixels, where units is an integer. Following the original Logo convention, the turtle starts out facing up.turn(degrees)
Rotates the turtle by angle degrees to the right (clockwise), where degrees is a double precision floating point number.
You can see the definitions of these commands in Turtle.java.
Now look at the source code in TurtleSoup.java, in the src folder in package turtle.
Your first task is to implement
drawSquare(Turtle turtle, int sideLength), using the two methods introduced above:forwardandturn.Once you’ve implemented the method, run the
mainmethod inTurtleSoup.java. To runmain, right-click on the file
TurtleSoup.javain the Package Explorer on the left side of Eclipse, go to Run As, and select Java Application.
This
mainmethod creates a new turtle, calls yourdrawSquaremethod, and instructs the turtle to draw on screen. A window will pop up, and, once you click the “Run!” button, you should see a square drawn on the canvas.
Problem 4: Commit and push your work so far
After you’ve finished implementing the drawSquare function, let’s do a first commit.
First, in the terminal, change directory (
cd) to your clone, and take a look around withgit statuswhich shows you files that have been created, deleted, and modified in the project directory. You should see
TurtleSoup.javalisted under “Changes not staged for commit.” This means Git sees the change, but you have not (yet) asked Git to include the change as part of your next commit.-
git diffto see your changes. (Note: when the diff is more than one page long, use the arrow keys. Press
qto quit the diff.) Before committing, files must be staged for commit. Staging a file is as simple as
to stage the file. You should also stage the test file if you’ve added more tests.
In addition, it’s always a good idea to review your commits before committing to them. Run
git statusagain to see that your changes are now listed under “Changes to be committed.” If you run
git diffthose changes are no longer shown! Use
-
will actually commit the changes locally, after opening your default editor to allow you to write a commit message. Your message should be formatted according to the Git standard: a short summary that fits on one line, followed by a blank line and a longer description if necessary.
If Git warns you about configuring your default identity or you can’t edit your commit message, you did not follow the instructions in the Getting Started guide. Getting Started step 6 has setup you must perform before using Git.
git status -
to see the history of commits in your project. Right now, you should see three of them: an initial commit with the starting code, a commit when you created your problem set repo, and the commit you made just now.
Important: only the local history has the new commit at this point; it is not stored in your remote repository. This is one important aspect where Git is different from centralized systems such as Subversion and CVS.
-
At this point, the remote repository on GitHub.mit now has the same history as your local repository. It is important to remember that we will be grading the history in the repository on GitHub.mit; if you forget to push, we won’t see your commits.
Didit: when you push your commit, the Didit system will run a subset of the autograder on your code. Didit clones its own copy of your code from what you’ve pushed to GitHub.mit, compiles it, and runs some tests.
Visit Didit after you push to see the report. Right now, almost all tests will fail since you’ve only implemented one method. But as the deadline approaches, it is your responsibility to check Didit’s build report and ensure that we can compile and run your code.
GitHub.mit: you can browse the contents of your remote repository by visiting github.mit.edu/6031-sp19 or following links from Didit to GitHub.mit.
Part II
Problem 5: Drawing polygons
For detailed requirements, read the specifications of each function to be implemented above its declaration in TurtleSoup.java.
Hint: be careful when dealing with mixed integer and floating point calculations.
In this problem set, you should only need to edit TurtleSoup.java.
You should not change any of the method signatures (what’s a method signature?) in that file, or you risk receiving zero points on the problem set.
You are free to add new helper methods inside TurtleSoup if you want, and you can add tests to TurtleSoupTest if you want, but this isn’t required.
Don’t change any other Java files or add new Java files to this problem set.
Implement
calculateRegularPolygonAngle.There’s a simple formula for what the inside angles of a regular polygon should be; try to derive it before googling/binging/duckduckgoing.
Run the public tests that we provided. In 6.031, we use JUnit, a widely-adopted Java testing library. We’ll see more about JUnit, and about testing in general, in an upcoming class. For now, let’s focus on running the provided tests against your implementation. By convention, JUnit tests are in a class whose name ends with
Test, so the public tests for this problem set are inTurtleSoupTest.java.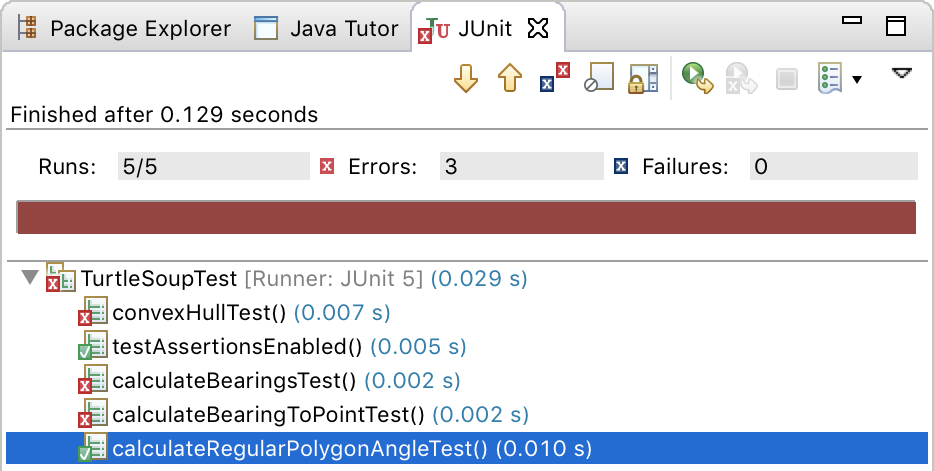
To run the JUnit tests in
TurtleSoupTest, findTurtleSoupTest.javaunder thetestfolder in the Package Explorer, right-click it, and go to the Run As option. Click on JUnit Test, and you should see the JUnit view appear.
If your implementation of
calculateRegularPolygonAngleis correct, you should see a green check mark next to
 calculateRegularPolygonAngleTestin the list of results.The big red bar indicates that at least one test has failed. That shouldn’t surprise us, since the other tests are exercising methods we haven’t implemented yet. When all the tests pass, the bar will turn green!
If
testAssertionsEnabledfails, you did not follow the instructions in the Getting Started guide. Getting Started step 4 has setup you must perform before using Eclipse.Try breaking your implementation and running
TurtleSoupTestagain.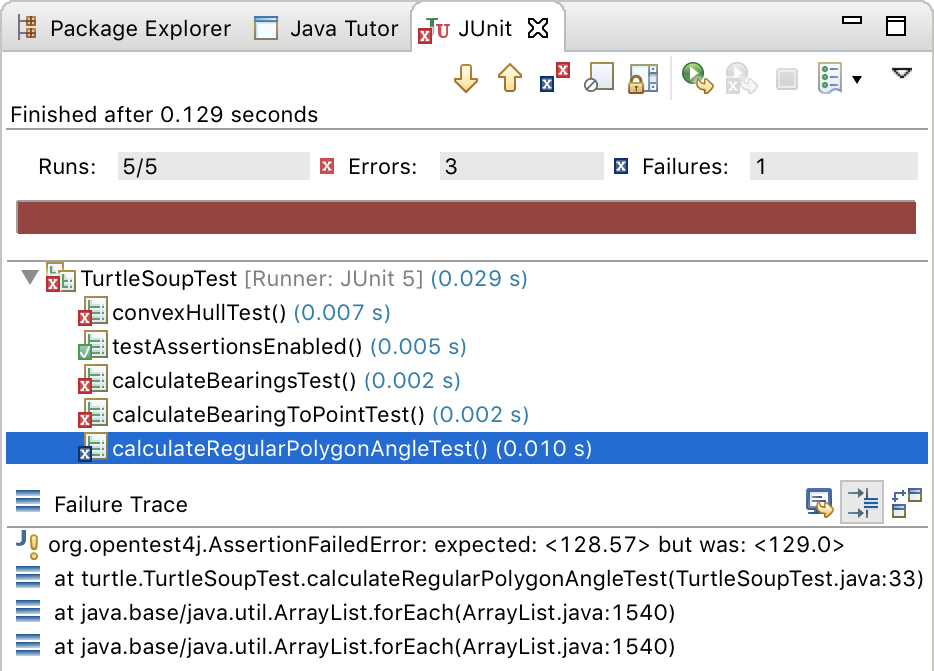
You should see a red X
 or blue X
  next to
 calculateRegularPolygonAngleTestin the JUnit view, and if you click oncalculateRegularPolygonAngleTest, you will see a stack trace in the bottom box, which provides a brief explanation of what went wrong. Double-clicking on a line in the failure stack trace will bring up the code for that frame in the trace. This is most useful for lines that correspond to your code; this stack trace will also contain lines for Java libraries or JUnit itself.Try double-clicking on the line in the stack trace for

calculateRegularPolygonAngleTest(), and look at the code for the test. On that line, you should see a call to yourcalculateRegularPolygonAngleimplementation with particular values for its arguments, within a call toassertEquals()that checks whether your implementation’s return value was correct. A JUnit test generally has this form: it calls your implementation, then makes one or more assertions about the value that your implementation returned.Enough breaking: fix your implementation so it’s correct again. Make sure the test passes with a green check
.Passing the public JUnit tests we provide does not necessarily mean that your code is perfect. You need to review the function specifications carefully. In future problem sets, we’ll also expect you to write your own JUnit tests to verify your code.
-
Use your implementation of
calculateRegularPolygonAngle. To test this function, change themainmethod to calldrawRegularPolygonand verify that you see what you expect.
Commit to Git. Once you’re happy with your implementations of these functions, commit and push! Committing frequently – whenever you’ve fixed a bug or added a working and tested feature – is a good way to use version control, and will be a good habit to have for your team projects.
Problem 6: Calculating bearings
Implement
calculateBearingToPoint.This function calculates the parameter to
turnrequired to get from a current point to a target point, with the current direction as an additional parameter. For example, if the turtle is at (0,1) facing 30 degrees, and must get to (0,0), it must turn an additional 150 degrees, socalculateBearingToPoint(30, 0, 1, 0, 0)would return150.0.-
Make sure to use your
calculateBearingToPointimplementation here. For information on how to use Java’sListinterface and classes implementing it, look upjava.util.Listin the Java library documentation. Note that for a list of n points, you will return n-1 heading adjustments; this list of adjustments could be used to guide the turtle to each point in the list. For example, if the input lists consisted ofxCoords=[0,0,1,1]andyCoords=[1,0,0,1](representing points (0,1), (0,0), (1,0), and (1,1)), the returned list would consist of[180.0, 270.0, 270.0]. At this point, JUnit should now show a green check
for both calculateBearingToPointTestandcalculateBearingsTest.
Commit to Git. Once you’re happy with your solutions for this problem, commit and push!
Problem 7: Convex hulls
Implement convexHull, which computes the convex hull, the smallest convex set that contains all the points in a set of input points.
The gift-wrapping algorithm is one simple approach to this problem, and there are other algorithms too.
Remember that 6.031 focuses on SFB/ETU/RFC, so your code will not be judged by its performance.
The specification comment above convexHull requires you to return the “minimal subset of the input points that form the vertices of the perimeter of the convex hull.”
This statement is well-defined on any set of input points.
What should you do for a set of 2 points? 1 point? 0 points?
What should you do for a point that lies on an edge of the convex hull, but is not a vertex of that edge?
For information on how to use Java’s Set interface and classes implementing it, look up java.util.Set in the Java library documentation.
JUnit checkpoint.
At this point, you should have a green check ![]() for every test when you run JUnit, and a satisfying big green bar .
for every test when you run JUnit, and a satisfying big green bar .
Commit to Git. Once you’re happy with your solution for this problem, commit and push!
Problem 8: Personal art
In this function, you have the freedom to draw any piece of art you wish. Your work will be judged both on aesthetics and on the code used to draw it. Your art doesn’t need to be complex, but it should be more than a few lines. Use helper methods, loops, etc. rather than simply listing forward and turn commands.
For drawPersonalArt only, you may also use the color method of Turtle to change the pen color.
You may only use the provided colors.
Here are some examples of the kinds of images you can generate procedurally with turtle graphics, though note that many of them use more commands than what we’ve provided here.
Modify the main method to see the results of your function.
Submitting
Make sure you commit AND push your work to your repository on GitHub.mit.
We will use the state of your repository on GitHub.mit as of 10:00pm on the deadline date.
When you git push, the continuous build system attempts to compile your code and run a subset of the autograder tests.
You can always review your build results on Didit.
Didit feedback is provided on a best-effort basis:
- There is no guarantee that Didit tests will run within any particular timeframe, or at all. If you push code close to the deadline, the large number of submissions will slow the turnaround time before your code is examined.
- If you commit and push right before the deadline, the Didit build does not have to complete in order for that commit to be graded.
- Passing some or all of the public tests on Didit is no guarantee that you will pass the full battery of autograding tests — but failing them is almost sure to mean lost points on the problem set.
Grading
Your overall ps0 grade will be computed as approximately:
40% alpha autograde + 5% alpha manual grade + 45% beta autograde + 10% beta manual grade
The autograder tests will not change from alpha to beta.
Manual grading of the alpha may examine any part of the problem set. Manual grading of the beta may also examine any part, including how you addressed code review feedback.