PS3: Output
Due at 11:59pm, Thursday, March 15, 2018
by uploading submission to Gradebook.
You must complete the self-assessment form before you hand in the assignment.
You should make sure that your problem set renders correctly on
Chrome (which we'll be using for evaluating your projects) and in
either Firefox or Safari.
The problem set instructions are not meant to encompass everything that you should
and should not do. When working on these problem sets, think of the
future and what problems or user needs may come up and whether your
code is ready for change (RFC).
We will be grading on the proactiveness of your code.
This assignment explores the topics related to GUI output, such as the object approach and animations.
In this third problem set, you will improve the Candy Crush UI by adding responsiveness, hints, and animations.
Useful References
If you want to review HTML/CSS/Javascript, check out the links from the web development lab resources.
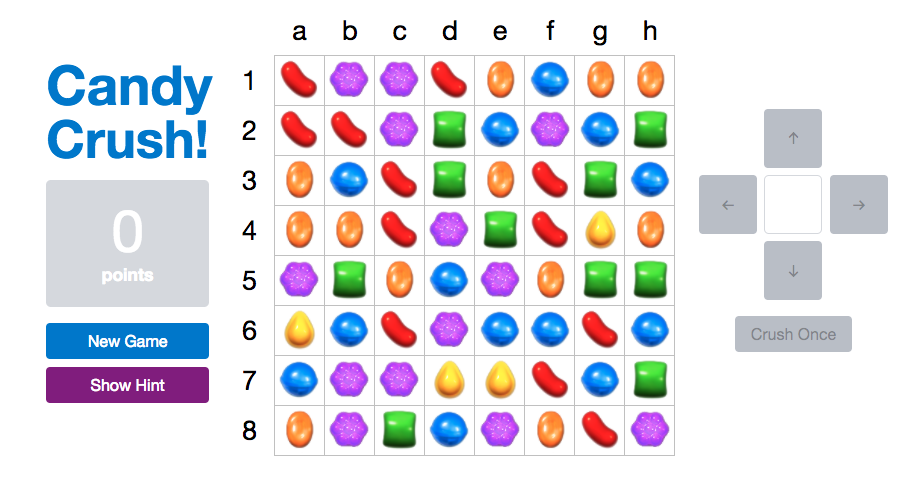
The UI
In this pset, you will update your UI to appear as in Figure 1.
Problem 1: Resizing the Board (20%)
You already created a 400x400 pixel candy board in pset 2. You will now add dynamic resizing to the board. The board size should now be determined by the BOARD_SIZE variable in the code. This size defaults to 8x8, but you can change it to any value n by adding ?size=n to
the end of the URL, e.g. index.html?size=16. The size
n is constrained to be at minimum 3 and at maximum 10. No matter
how many squares are in the candy-board, it should never be larger than 400x400 pixels.
Candies should scale with board sizes, such that small boards have larger candies to fill the cells, and larger boards have smaller candies. They should also be centered on their respective squares regardless of board size. The candies should be aligned correctly inside the board even when you resize the page.
Candies should be able to be moved using the text box, similar to how you moved candy squares in pset 2. Ensure your move text field is large enough to see all characters of the candy coordinates (i.e. when board size is 10, the text field displays coordinates c10)
Ensure that all pset 2 functionality continues to function as expected regardless of the size of the board. You may need to modify your text input verification, to enable j3, d10, etc. to all be valid input, provided the board size is large enough. If the user gives an erroneous input (e.g. z9), there should be a visual distinction between that input and a valid input with no valid move. Ensure the New Game button generates a random board (most if not all candies are changed) for all valid board sizes.
Problem 2: Keeping Track of Score (20%)
Add a score label to your interface to display the player's score.
Score is updated in board.js, which issues a "scoreUpdate"
event whenever it is updated. Implement the "scoreUpdate" listener in
game.js to update the UI appropriately.
Ensure that a new game begins with a score of 0 (players do not get points for crushes that happen by luck initially). This is handled correctly in rules.prepareNewGame, so your implementation might be incorrect if a new game does not reset the score to zero.
Change the background color of the player's score to the color of candies that was successfully crushed last. You'll find the candy info embedded in the "scoreUpdate" event useful.
Ensure the font color of the score label is easily readable on the background color (you may need to change the font color based on the background color, such as black text on yellow but white text on green).
Reset the score background to default when a new game is generated.
Please use the --color-* CSS variables provided for the background color.
Problem 3: Show Suggested Move (20%)
Add a Show Move button to the left column of your interface. When the player gets stuck and doesn't find a valid move, the user may press this button to receive a visual indication of a random move.
Indicate visually to the user the candy which the user should move by
animating the candies to pulsate and brighten through the use of
saturation. You may find the CSS
animations guide helpful when working on pulses and
CSS
filters for saturation.
You will likely find the rules.getRandomValidMove()
function useful. Your hint animation should look somewhat similar to the
video below.
If a hint is currently being displayed on the board, you should be able to press the "Show Move" button and a new animation should display.
The hint should disappear when the user presses any of the arrow buttons to move a candy.
Remove the hint once the user clicks any of the buttons (New Game, Show Move, or the arrow buttons). At any given time, a maximum of one hint should appear on the board.
If no valid move exists or if a crush is available, disable the "Show Move" button.
Note: We strongly recommend using CSS animations for the pulsating/brightening effect, instead of JavaScript-based methods. Not only are they easier, since they are declarative, they are also smoother because the browser knows you are animating and can optimize performance, and there are developer tools built-into the browser for debugging them. You can look at the web development resources page for resources about CSS animations. You are allowed to use third-party JavaScript libraries if you want to, but we cannot provide support for helping you debug these libraries.
Problem 4: Flipping & Crushing Animation (20%)
In pset 2, you implemented a simple "animation" (based on a timeout) to visually indicate candy crushing with the "Crush Once" button. In this problem, you will create a smooth animation to provide visual feedback of candies being moved and crushed.
In this problem, you will implement three smooth animations:
- Candy Flipping: When two candies are moved (by the click of an arrow button), the two candies should be animated such that they smoothly swap locations.
- Candy Crushing: After two candies have swapped, the candies to be crushed should be removed by fading out.
- Candy Moving: After the candies have been removed, the candies from above should fall down smoothly to fill the holes. Note: The speed (candies/cell) that the candies move should be constant, not the duration of the animation. A candy moving down three cells should take three times as long as a candy moving down one cell.
Shown below is an example of these three kinds of animations.
To accomplish this animation, you'll need to update your "move" event
listener to smoothly flip candies and animate the candies falling down.
You'll also need to update your "add" event for adding new candies to the
board from above, in which case you'll want to drop them in smoothly. To
do this, if info.fromRow and info.fromCol are
not null, then you'll want to perform a smooth animation to drop the
candies in. You may wish to update your "remove" event to fade out
candies.
A few tips:
- Use the duration CSS variables
--duration-moveand--duration-fadeso you can change them in one place to slow down all animations for debugging. - You can use the
Util.afterAnimation()helper to run code after the animation has ended. It returns a promise that resolves when theanimationendevent is fired for the animation name you provide on one or more elements. - We strongly recommend using CSS animations and/or CSS transitions for this, instead of JavaScript-based methods. Not only are they easier, since they are declarative, they are also smoother because the browser knows you are animating and can optimize performance, and there are developer tools built-into the browser for debugging them. You can look at the web development resources page for resources about CSS animations.
- You will likely find transforms and/or position: relative useful for displaying candies outside their place in the grid.
Problem 5: Responsiveness (20%)
Your UI must be able to handle various devices and window or screen sizes. Users may not always use browsers at full screen size so your UI should adapt to the user resizing the window. Think of clever ways to wrap your text and buttons to efficiently use the smaller screen real estate available.
- The board should now scale down to fit in the window with 400x400px being the maximum width (a huge board would be impractical).
- Note that once your board sizes down, you will
also need to make sure that your label font size also adjusts accordingly.
Do keep in mind that
font-sizesets the character height. - Your page layout needs to adapt to different viewport sizes as well. A three column layout is not practical for smaller windows. However, do not switch to a top-to-bottom layout immediately when there is not enough space to fit 3 columns, as it is wasteful in terms of vertical space. A top-to-bottom layout is appropriate for very small screens, but for intermediate sizes, you should use a hybrid. An example is shown in the video below, but you are free to choose a different one, as long as it satisfies the requirements of this problem.
- You do not need to handle situations in which the window is smaller than 200px wide.
- You are not responsible for adapting to viewport height, only viewport width.
- There should be no horizontal scrollbar at any viewport width above 200px.
- Do not use JavaScript resize handlers for this. Do not use Bootstrap to make your UI responsive. You must use CSS to handle responsiveness (it is okay to use JavaScript to set CSS variables).
The video below shows an example of an implementation that follows these requirements:
A few tips:
-
We recommend using the CSS variables provided for responsiveness, instead of overriding a lot of CSS properties on each
media query, which is not DRY.
By using CSS variables well to define relationships between
measurements and to pass data from JavaScript to CSS, it is possible to make the
board size flexible (including its labels) by just changing
--board-sizein a media query. - Use media queries as a last resort, when you need to make significant changes at certain points (e.g. to change layout from right-to-left to top-to-bottom). Prefer to use flexible layout modes, percentages, viewport-relative units to make things flexible across a range of viewport sizes. Viewport-relative units are especially useful in combination with other units, via calc().
- Do not choose your media query breakpoints based on specific devices. Not only is this not maintainable because new devices come out every day, but it also falsely assumes that everyone is browsing full-screen, which is not the case. We will be grading your pset by resizing the window across all widths down to 200px, as shown in the video above.
Here are some links you may find helpful for CSS responsiveness and CSS variables (aka CSS custom properties).
- Media Queries
- Using Media Queries
- A Complete Guide to Flexbox
- Using CSS Variables
- CSS Variables Why You Should Care
To debug responsiveness, you may find it helpful to dock the developer tools to the left or right of the viewport and resize the divider, as shown in the video. Chrome dev tools also show you the size of the viewport in the top right corner when you resize.

Once again, ensure that all pset 2 functionality continues to function as expected.
Going Further
In pset 4, you will add drag and drop functionality and make crushing automatic. If you'd like to learn more and go further now, here are some ideas for improvements:
- Improve the look & feel of the UI (i.e. buttons should darken upon mouseover).
- Shuffle the board when there are no moves left.
- Communicate which candy the user has selected better. You may change the arrow button to match the color of the candy, highlight the cell, etc.
- Add high score tracking - you can use
localStorageto remember the best score across multiple games.
What to Hand In
You must complete the self-assessment form before you hand in the assignment. We will be deducting points if you don't submit the self-assessment form.
We will be grading you based on your code as well as the functionality so your code should be well structured, formatted, and commented. Do not minify your files as it makes it impossible to grade for code style.
Package your completed assignment as a zip file that contains all of your files. Don't forget to pull any changes from the skeleton repo! Failure to include all necessary files for running your program will result in a loss of points from your final grade. (Please test by unzipping your zip file into, say, your /tmp directory, and then opening your page to see if it still works.)
We will be grading your pset on our local machines under the file:// protocol. If you worked on your pset through a local server, please make sure it also loads successfully under file://. For example, avoid root-relative URLs (/graphics/blue-candy.png). Plain relative URLs should work fine (e.g. graphics/blue-candy.png)
Here's a checklist of things you should confirm before you hand in:
- Complete the self assessment.
- Make sure that the page renders correctly on Chrome (which we'll be using for evaluating your projects) and in either Firefox or Safari.
- Make a fresh folder and unpack your zip file into it.
- Make sure necessary assets (images, JS files, CSS files, etc.) used by your code are found in the fresh folder and load successfully.
Submit your zip file on Stellar.