16.400 Human Factors Engineering
CDIO Lab#3: Manual Control Lab
Introduction
The MCL2.EXE tracking software is used to present the basic principles
of human control and tracking. Using a mouse as a form of input,
various factors in tracking-control will be examined in this
experiment.
This lab will introduce three of the more common control elements:
proportional (0th order), integral (1st Order), and a double integral
(2nd order) control. You should all be somewhat familiar with these
controls from your controls course. If not, don't worry, hopefully by
the end of the lab you will have a good idea of what is going on!
You are welcome to work with others, so long as you each do every part
of the lab.
The Actual Lab
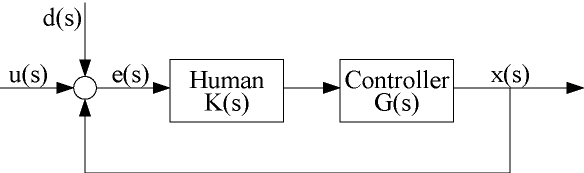
The general system you will be looking at is:
Part 1: The Step Response
NOTE: Instructions on installing and running the software
follow after the lab description. PLEASE look at them before starting
the lab. When you start up the MCL2.EXE
program, you will be asked for a configuration file, choose either
HIGH.CFG or LOW.CFG. Configuration file does not affect the step
response.
We will use the unit step response to familiarize ourselves with the
program and how to control the cursor. In the unit step exercise we
will be trying to move the cursor into the target. I recommend that
you play with the program and unit step response section a little bit
before starting to actually perform the lab.
When you feel comfortable with the program you can perform the
following cases. For each of the cases, note the movement time. The
following investigations can be performed and documented:
- Perform a general run for each of the controllers (0th, 1st, and
2nd order response) -- set the open loop gain to 2 for each of the
initial cases. For 1st order response, start with a damping factor of
1.
- Note the qualitative workload for each (i.e. On a scale of 1-10,
what is the perceived workload?). Do this with all options set to the
default (except for time out=45 sec).
- Get a screen capture for your report for each of your basic
controller responses, if possible. What effect does each of the
controllers have on the system dynamics & output (overshoot etc.)? Why?
Note the response of each control type. How is each controller
different? Maybe a sketch of the response to a unit step input could
be beneficial in convincing yourself. Did you notice any unexpected
results from your trial runs? Why do you think they may have
occurred?
- Briefly investigate the effects of increasing and
decreasing the gain. Try several different gains. What effect does
this have?
- Experiment with various time delays (from 0.1 sec - 3.0 sec). Give a
qualitative rating (out of 10) of the workload as time delay
increases. Provide some sense of the
critical time delay for each of the controllers (where does system
instability prevail). In what applications would time delay be a
concern -- give some examples where time delay is inevitable, and we have
to work around it. Suggest a way of getting around time delay
problems.
- Investigate briefly the effects of adding damping in the
first and second order systems. Briefly describe what is
theoretically happening as we introduce these features? Did you find
a significant difference?
- If you are doing this as a group, you can also do a
secondary task assessment (such as turning a flashlight on while your
friend is on the control, and seeing how long it takes them to tap the
light or asking them to read the time from a nearby clock (and seeing
how accurately and efficiently they do it).
For each of the cases, how does the movement time for each of the
cases relate to the perceived workload? Plot a quick graph to see if
your scale has any relationship to the movement time in the unit step
case.
Part 2: Low & High frequency Random Disturbance
You will perform a High and low frequency disturbance control for each
of the controls. Here we will look at tracking a low frequency random
disturbance, and a high frequency random disturbance. The low
frequency disturbance is set up in LOW.CFG, and the high frequency
disturbance is in HIGH.CFG. You will have to load the case you are
working on before the frequency is changed (so once you are done the
low frequency cases, load up the high frequency ones by restarting the
program).
To start this part, you will have to go back to the main menu, and
select compensatory tracking (try a run with pursuit tracking, note
the differences between pursuit and compensatory, and perform the rest
of the lab for just the COMPENSATORY TRACKING case).
NOTE ABOUT SETTINGS: Change the sample time in the general
configuration to 120secs (1st menu level after main screen, on the way
into tracking). If you get a memory error, try a lower time.
You will need to run a case for each of the base controllers at each
of the frequencies. Here you will be looking at:
- The error in tracking (RMS). Here you will want to compare the
error value for each of the controls, for each of the
frequencies. From the errors, what can be concluded? Also what
percentage of time on target do you get? Is this expected?
- What effect does the frequency of the disturbance have? How well
can you control/compensate for higher frequency oscillations? From
your results what do you feel is the highest frequency you can
compensate for?
- The human transfer function & the plant transfer function in terms
of Bode plots (A print out of the bode plots will be useful). Discuss
to what degree the human counteracts the effects of the plant control
function. How does the human transfer function change for the different
cases? Why does it act like this?
-
Workload assessment: for each of the cases, what is the perceived
mental workload. Once again if you are able, do a secondary task
measurement (only for groups).
-
Try running your system with a time delay for each of the
controls. Put in half the critical value, note results, and
workload. Is your system stable for each of the controllers? If it is
try 3/4 the critical value, if not try 1/4 the value for each of the
cases. What conclusions can you draw from this?
-
The second order system is virtually impossible to control. From
part 1, what do you think may help 'stabilize the system'? Try to
implement it if possible.
-
If you have some extra time and you have had fun chasing your
cursor across your screen, and you
found the lab was easy, try to investigate the effects of
prediction/quickening on a second order system. Set your position gain
to 1 and vary the velocity gain. Try several cases where you are
trying to determine what range of K values make the plant more stable.
I will provide more information on this if you want to give it a
try. Just let me know by email, or in class.
Reporting Requirements
Due date for the report is Novebmer 15th.
Some comments should be made on the three different types of
controls. These should be based on observations from the unit step
response and the frequency response. A brief summary of the
applicability and the suitability of each of these controls should be
made. List down some places where we see everyday application of each
of these controllers.
Use the guides in the lab requirements to determine what should be
included in the report. Be concise with your conclusions and
results (unlike this document). This lab is to help you gain an
appreciation of the different types of controllers, and the various
functions associated with them, so please do not write an essay about
why your dog has poor tracking performance with a mouse,
etc. Graphical results with a brief explanation will be adequate for
the majority of the results -- relevant, short and sweet.
If you have any questions or comments, feel free to email me at
tatsuki@mit.edu. I would like to hear back from you if you thought
this lab was too long, short, easy, hard, if you thought it was
useful, what you think could be improved, etc. It will benefit myself
as well as future students in the course!! The comments will be useful
in evaluating this lab, and how I should modify the other labs, so
that you can get what you want out of them!!!
Installing the Software
Before you start installing the software:
- Make sure you are using a machine that will run DOS programs.
- Remember that this software is for your use only. Please do not
distribute this software to other people outside the class.
- If you do not have access to a DOS machine please contact
tatsuki@mit.edu for more information on how you can gain access to a
computer. The computers in the lobby in front of the Aero/Astro library
run Windows98.
- Clean your mouse. Take out the ball and clean the wheels that
pick up the ball's motion.
Downloading the Software:
- Create a directory for the MCL software (short name without space is
recommended e.g. C:\MCL).
- Go to the Lab#3 web page (
http://web.mit.edu/16.400/www/mcl/), and right-click on the files
to download.
- Navigate to the downloaded files, and doble-click on MCL2.EXE. This
should bring up a DOS window. If this doesn't work start a DOS
window from the start menu, change to the directory, and run
MCL2.EXE.
- Hitting [Alt]+[Enter] toggles the full-screen mode.
Program Familiarization
Now that the software is running the hard part is over. The fun is now
beginning. There will be several tasks that you will perform while
using this software. As you perform the various parts keep notes and
screen captures (this is described later) so that the report will be
easy. You may work in groups or alone, however, everybody must perform
the control exercises!!
- Start the software, by the method above. You should come to a
screen that looks like:
- You will want to use the down arrow key to highlight the case you
wish to test. We will look at the file LOW.CFG first. Highlight the
file and press [enter]. The main screen as follows should appear:
- This is the main screen. It is where the initial selection of cases
is given. We will look at Step response to begin with. In Part 2
of the lab we will look at the Compensatory and Pursuit tracking. By
pressing [1] we go to the next screen (step response menu).
- Here we have the option to change the configuration, or to run the
case. We will take the opportunity to change the configuration at
this time, by selecting <1>. Now it should bring up a new
screen. Change the trial timeout option to 45sec. When you have done
this return to the previous screen.
- We are now ready to run the trials! By pressing [2] at the step
response menu we come to a screen that looks like:
- This is the screen that sets the parameters. Press [2] to change the
dynamics of the system, when required.
- Various changes will be made as we go along, but this is the
general way to set up for the first part of the lab.
NOTE: IF THE COMPUTER CRASHES, OR YOU MESSED SOMETHING UP, JUST CLOSE
THE SOFTWARE, AND TRY AGAIN. IF THE HIGH.CFG & LOW.CFG FILES GET
MESSED UP, DOWNLOAD A NEW SET!!
SCREEN CAPTURES -- for output of results
For those using windows, and want to get output similar to what is
shown above follow the following steps:
- Run the program in a window in windows.
- Press [PrtSc] or [printscreen] button (top RHS of keyboard) when you
have a screen you want to copy.
- Open paint or a similar program and press [ctrl]-[v], to paste
it.
REMEMBER to invert the colors before printing or copying to MS-word.