

Sometimes you'll want to thread a piece. For this you'll need a tap. A person using a tap looks like a person using a corkscrew: each turn of the handle causes the tap (or corkscrew) to cut a little deeper, and causes the handle to lower.
|
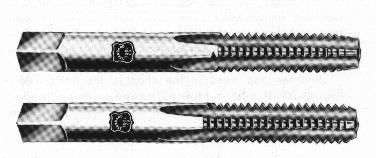
| A tapered tap (above) and a bottoming tap |
There are two taps above. One of then has a tapered end; that's so each turn of the tap will remove only a small part of material and the threads will be cut gradually. This reduces the stress on the tap, which is important because taps are brittle and it's not uncommon to break one while tapping.
The other tap is a bottoming tap. When you have a hole that goes all the way through a piece, you'll continue tapping with the tapered tap until the end of the tap comes out through the other side of the piece. But if the hole doesn't go all the way through the part, then you'll also need a bottoming tap. Start tapping the hole with the tapered tap and go until the tip of the tap hits the bottom of the whole. But at this point, the threads at the bottom of the hole won't be full threads because the threads at the end of the tap are incomplete. Using the bottoming tap will let you complete these threads.
Keeping the tap straight
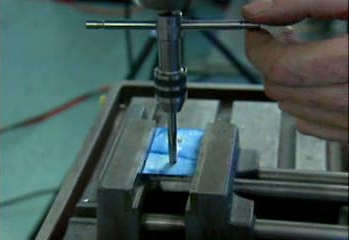
When tapping by hand it's difficult to keep the tap straight. Very often the tap hole will not end up being perpendicular to the part. The drill press comes in handy for avoiding this problem. We know the spindle is perpendicular to the table, so if we can use the spindle to guide the tap, we'll get a perpendicular tap.
If you look at the back of the tap handle, you'll find that most have a small hole in them. And there will be another small piece, a cylinder with a point on the end, which you should put into the chuck so that the point is showing, and then put the point into the hole on the tap.
|
| Using a drill press to keep the tap straight |
Then you can use the spindle to keep the tap straight. With one hand, apply a slight amount of pressure with the hand feed to maintain contact between the guide and the tap handle. Turn the tap handle with the other hand.
LubricationUsing cutting fluid when tapping is often a good idea, particularly for materials such as the softer alloys of aluminum or steel. But try to minimize use of cutting fluids because they're toxic. You'll find that many materials, such as most plastics, machine and tap well dry.
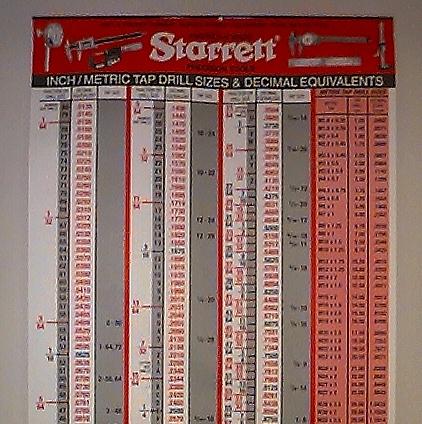
Tap sizesImagine that you have two plates that you want to screw together with a bolt. This means that one piece will have a hole for the bolt to pass through, and the other piece will have threads to hold the bolt. For this operation you'll need to know three sizes: First, you'll need to know the size of the hole that will let the body of the bolt clear. Second, for the piece of aluminum with the threads, you'll need to know what size to drill the hole before you tap it. This will need to be smaller than the body drill because you'll need material to make the threads from. And the third size is the tap size.
|
| A drill table |
On the wall of most shops you'll find a table with this information. If you know what size bolt you want to use, this table will tell you the other two sizes you need to know.

|
The compliment to the tap is the die. While a tap will let you make something that acts like a nut, the die will let you made something that acts like a bolt. So if you wanted to take a bar and put threads on it, you'd put the die on and turn it until you have the threads you want.