One day I was looking for some cool new project to work on by sifting through articles on Instructables when I stumbled upon an ad for an EL Wire contest. I had no idea what EL Wire was, so I did some research. Basically what I found was that EL Wire (Electroluminescent wire ) contains a phosphor that lights up when a high frequency (2000-4000 Hz) AC current is applied to it.
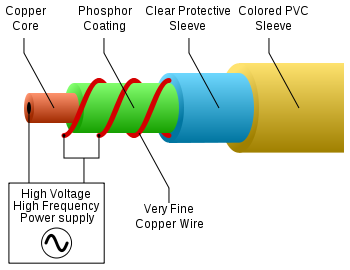 It contains a copper wire (the ground wire) coated in the phosphor, surrounded by hair-thin angel wire (the hot wire) that is wrapped around in a double-helix fashion, all of which is wrapped in a transparent PVC coating of a color of your choice.
I looked around on http://thatscoolwire.com/ and I saw that people have completed a lot of cool projects with EL Wire, including costumes (including a Tron suit), shelf lighting, bike mods, artistic drawings, and someone decorated the entire room with EL Wire. Looking around the website some more led me to this video. Then, thinking about the decorated room led me to the awesome idea of having my room decorated with EL Wire that flashes in beat with the music.
Since I didn’t know if I wanted to invest a lot of time and money into the EL Wire, I decided to order a Grab Bag of EL Wire. It’s a deal that thatscoolwire.com has where they offer a total of 20 feet of wire, but it’s all basically scrap wire: wire that comes from the end of a spool, wire that was the wrong color for a certain application, etc. Some wires have connections soldered on already, but most of them don’t. They don’t even guarantee that all of the wire will work. I got the bag, and after ordering it I realized that I ordered an inverter, but I forgot to order a transformer. The transformer takes a the 120V low frequency AC (50-60Hz) from the wall and converts it to 12V DC. The inverter takes the 12V DC and makes it 12V high frequency AC (2000-4000Hz) that powers the EL Wire. After waiting another week for the transformer to come, I soldered some connections and got it to work. I thought it was pretty cool. I thought it was a worthy investment and I wanted to pursue it further.
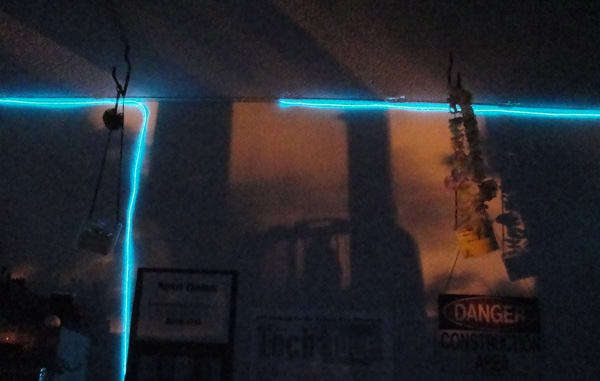
I decided to line the perimeter of my ceiling with EL Wire, then have some other smaller decorations of different shapes. Then, I took measurements of the room to see how much EL wire I needed. I needed about 41 feet. to line the perimeter of my room (I didn’t realize just how small my room was.) I ordered 45 feet just in case I made mistakes (and I would have more EL Wire to play with.) I thought that I would get 45 feet of wire and I would cut it to the length I want, solder it to a connector on one end (another reason I got a bunch extra, soldering EL Wire is a real pain), then put an end cap on the other end. The whole sound inverter kit cost $60. When it came in the mail, I was pleasantly surprised to find that the connector was already soldered on and the end cap was placed on as well. Now all I had to do was put it up on the ceiling.
I was so excited to have the wire that, rather than brainstorm ideas of how to put it on the ceiling and then choose the best idea, I just put up the wire with the first idea that came to me: packaging tape. I started to put it up with packaging tape, but it didn’t adhere to the ceiling very well, so I reinforced it with Gorilla Tape. However, the Gorilla Tape is black and the ceiling is white, so it looked pretty ugly having strips of black tape all over the ceiling. Then, I decided to cover up the black tape with white duct tape to make it blend in with the ceiling a bit more. However, you could still see the black tape under the white tape, so I took off the black tape and put up the white tape. The Gorilla Tape is pretty strong, so when I took it off the ceiling, the tape would take some of the ceiling with it, leaving small patches of the ceiling missing. Hopefully no one will notice once I move out. As a countermeasure, I should probably paint over the patches with white paint to make it less noticeable. Anyway, the white duct tape looked much better; it produced the desired effect. It’s been up on the ceiling for about a week now though, and I can see it starting to sag. Since I don’t want it to fall down, I’m going to have to think of a more robust mechanical solution. A friend of mine suggested hot glue, which I think is a decent idea. We’ll see how that goes... I’ll think about that later when I have time and I’ll keep you posted on that. For now, just know that it’s on the ceiling.
Now that the room was decorated with the wire, it needed to light up in beat with the music. I ordered a sound-activated kit which includes the wire and a sound activated inverter rated for that length of wire. It works by having the inverter driven by a microphone. The microphone just responds to noise; it is driven by amplitude, not frequency. You can adjust the sensitivity using a slider on the side. First I put the microphone next to the speaker and it just flickered a lot. It was responding to the noise of the song, but it didn’t produce desirable results. Then I put the microphone right over my subwoofer and reduced the sensitivity. Then it responded to the bass really well. The microphone setup could have some cool applications like having a costume that lights up when you talk, but for a room that responds to music, it doesn’t work that well. It only responds to intensity, so when the volume is really low, nothing happens, and when the volume is really high, the EL Wire is always on. Also, if the bass of the song is not distinct from the rest of the song, it flickers a lot; it doesn’t have a good rhythm.
I would rather have the wire directly driven by hooking it up to the computer’s audio jack. I’m probably going work with some people to program an Arduino that will filter frequencies of the song and drive different colored wire based on frequency. It will be a viable replacement for the microphone. A friend of mine, Steve Levine, was working on a similar project with LEDs. He had a setup where he had a string of red LEDs that respond to the bass and RGB LEDs that respond to the frequency. Another friend, Frank Yaul, made a breadboard circuit (an analog version of Steve’s setup) that had two really bright LEDs that respond to the frequency also. Together, we all collaborate in a group called Next Make, which I’ll write about in a later entry...