Contents

- Intro
- Lab time is lab time!
- Collaboration
- Use sketches to convey ideas
- Make sure it should work
- Analysis
- Bench Level Experiments
- Make CAD models and part drawings
- Manufacturing
- Assembly
- Debugging
- Testing
- Competition
- Bonus: iPhone apps
Intro
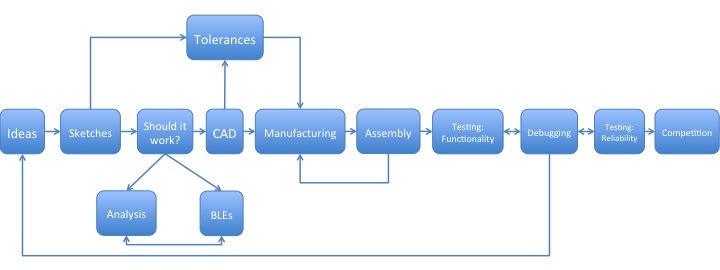
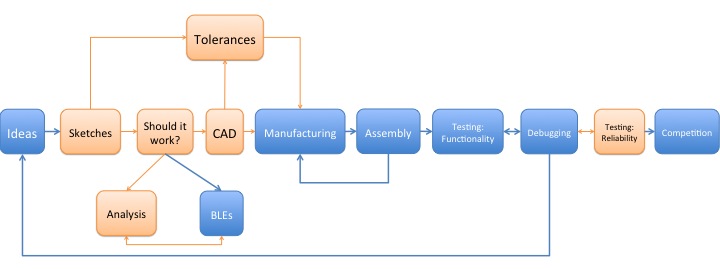
The purpose of this article is to teach 2.007 students about good engineering practices. Although the article is geared towards the mainstream competition, the engineering practices also apply to the special sections and indeed will carry on beyond 2.007. I've taken Engineering Design in MITES, I've taken 2.007, I was an Engineering Design TA for MITES, I was a UA for RoboCon, and I was a UA for 2.007. I've essentially taken 2.007 five times. I've noticed some common student failure modes as well as successful techniques. Also, students who learn improper technique in 2.007 have a disadvantage in other engineering classes like 2.008, 2.009, 2.72, 2.75 etc. I'll start by dispelling some common misconceptions about the class, then I'll talk about some tips and tricks to save time and increase quality.
This isn't a magic formula for winning 2.007. With over 100 students in the class, you have a >1% chance of winning anyway. As you will see in the article, you can make a well-engineered robot without winning, and you can win without making a well-engineered robot. Winning isn't what's important; being a good engineer is what's important. If you follow the advice in this article, you will make a well-engineered robot.
Not all of the images are mine; click on the image to view the source.
Lab time is lab time!
The first lesson to learn is how to make the most from 2.007 lab time, because many people don't utilize it wisely. In lab, students are often encouraged to build parts and perform experiments. This leads to some students developing the wrong idea that building and experimenting are always viable substitutes for detailed design and analysis. Students are meant to do sketches, CAD, and analysis, but they are meant to do that at home! Lab time is lab time. Lab time is not time to sit around and think about your designs; it’s time to use valuable people and resources. It’s time to showcase your ideas to lab instructors, mentors and shop staff. They can give you good suggestions on how to make your design easier to manufacture and assemble, and perhaps more reliable. You only have a finite amount of time to talk to these people and use lab equipment, so you have to make the most out of it (literally.) In order to maximize productivity, you have to start by being prepared. You have to come up with designs at home and test them in lab.
Collaboration

In 2.007, many people focus so much on the competition, that they don't want to collaborate with their peers. Their pride prevents them from success through collaboration. To be successful at MIT, you have to work alone, work with peers, and work with experts. You have to do all three in that order. You should work alone to come up with your own ideas, but if you're stuck on a mechanism design, it's more efficient to ask friends for help than beat your head against a wall. Every year people make dumb robots, but there are always some students that do an amazing job. Some students have loads of knowledge, experience, passion, and dedication. Often other students try to justify making a substandard robot by saying, "Well, I would have made a cool robot if did FIRST robotics in high school, but I didn't have any experience." If you notice a person that has some ingenious mechanisms and is well-versed in machining, you should make friends with that person, then ask for advice. It's a win-win. The inexperienced gains valuable engineering knowledge from the experienced (learning their hard-learned lessons the easy way.) Also, often the experienced students usually try to make something unnecessarily complicated in an effort to show off. By making friends with someone with less experience, they get a friendly reminder to keep it simple.
Whenever possible, try to implement PREP. The Peer Review Evaluation Process (PREP) works well in design for 2.007 and beyond. The details of PREP are outlined in FUNdaMENTALS, but I'll give a brief summary here.
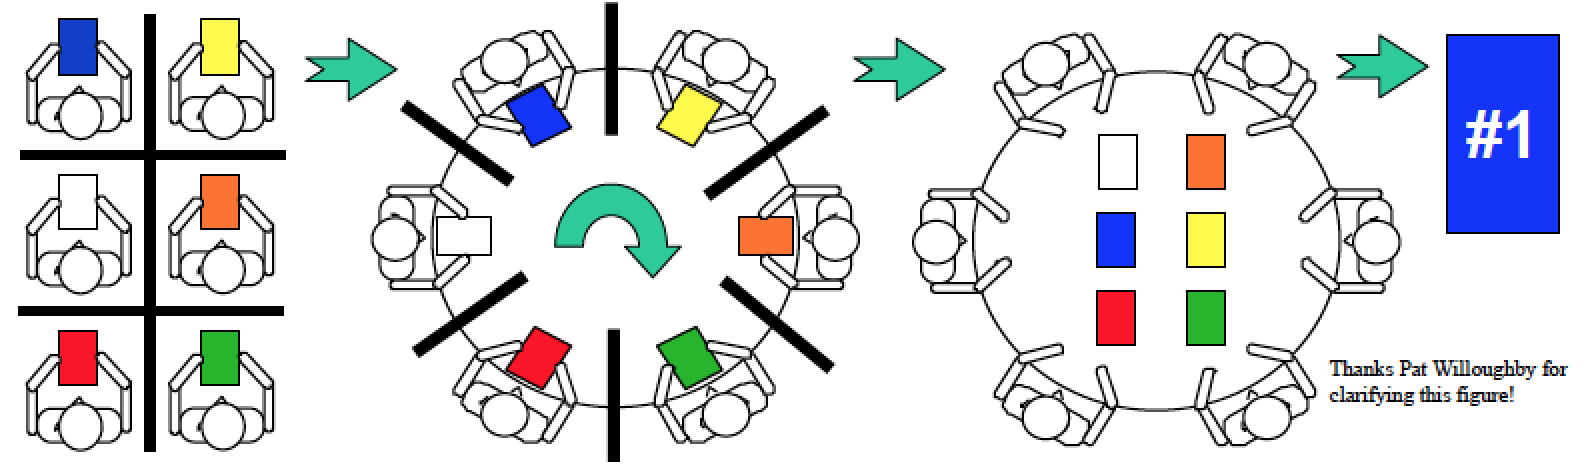
First you come up with ideas on your own. Then you share and critique the ideas in a group without verbal discussion. Then you discuss as a group. In group work people often skip the first two steps. This leads to the discussion of underdeveloped ideas that can make a meeting take twice as long as it needs to take. The first step forces everyone to contribute, even the shy ones. The second step forces people to thoroughly develop an idea for discussion. The idea should be documented well enough in a design notebook that it should speak for itself. There should be clear, annotated sketches with section views or detail views where appropriate. There should also be brief descriptions where appropriate. The critique shouldn't be, "I don't know what this is, or what view I'm looking at, or how these parts interface with each other, etc." Efficient discussions can only happen with clearly developed ideas.
After you've put in significant effort on your own and you've consulted with your friends, then you talk to the experts: the UAs, lab instructors and shop guys (usually in that order). Keep in mind that you have limited time with these experts; not only are you limited to lab hours, but you are also just one of dozens of students. You have to make the most of your time with them. Come prepared with sketches, calculations, CAD models, and thoughtful questions. Don't just show up to lab and expect them to figure everything out for you just because this is your first engineering project.
Use sketches to convey ideas
Sketching is a learned skill
Many people think that they aren’t good at sketching, so they aren’t willing to try. Some students think that they don’t have the “artist’s gene;” they aren’t meant to draw pictures, only to solve equations. If you don’t know how to draw, you better learn, because it’s how engineers communicate. The clarity of a sketch is indicative of the clarity of the idea. If you can't sketch the idea, the implication is that the idea isn't well-formed in your mind. The 2.009 website has sketching tutorials.
Faster than a description
A picture says 1000 words, so a clear (perhaps annotated) sketch can be much more easily and quickly understood than a description. I've talked to dozens of people about designs through personal projects and mentorship. The people that are least prepared are usually the ones who describe their project with their hands, i.e. without an sketches or CAD models. It's especially frustrating as a UA, because the student has an idea in his head and the UA has a different idea based on the description, so the UA has to play 20 questions until they're both on the same page.
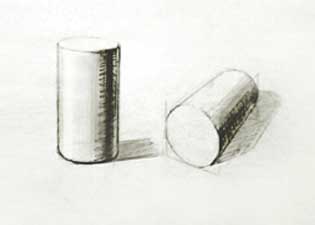
Not asking for renderings, just basic shapes
When lab instructors ask for sketches, we just need something that clearly illustrates the idea. Often this is something like a 3D isometric sketch, but a 2D view (or several 2D views) can suffice. They don’t need artistic renderings with shadows, shadings, and perspectives, just enough to convey the idea.
 |
 |
Sketch sheets and rods
For 2.007 in particular, the sketching shouldn’t be that hard. Most of what you’re given is prismatic: sheets and rods. Just practice drawing rectangular prisms and rods. The robot that you come up with will be some combination of these elements. You can even practice with isometric graph paper (that you can print for free.)

Isometric graph paper example
Make sure it should work
Perhaps the most common scenario I encountered as a UA went something like this:
Me: So, does that motor have enough torque to move your robot arm and perform the desired task?
Student: Nah, I didn't crunch the numbers or anything. I thought that would take too long, so I'm just going to try it and see what happens. I mean, it should work, right? This motor's pretty beefy don't you think?
Me: So you have no idea if this is going to work. What are you going to do if it doesn't?
Student: I'll just use the VS-11 (the biggest motor available.) That should do it.
Me: But without any analysis, you don't know if that will work either. What are you going to do if that doesn't work?
Student: I'll just use gears to multiply the torque.
Me: But what transmission ratio would you need…
Student: I don't know. Go away.
Doing experiments is fine, as long as they are controlled. Don't just slap your robot together and hope that it works. To make sure that a module works, you either need to perform analysis or a bench-level experiment (BLE). There is no magic formula for which one to use when, that depends on the situation. In the example above, the student could have performed a simple calculation, $$\vec{\tau} = \vec{r} \times \vec{F}.$$ You know the stall torque from the motor spec sheet, you know how long your robot arm is, you know how much force you need to apply, so just do the math! This is something you could do at home and save a day wasted in lab building robot parts with your fingers crossed. Analysis is important because it gives you what I like to call a " guidance vector:" it tells you which direction you should move in and by how much. Say you're worried about the deflection of your robot arm due to bending. In this case, you want to maximize the bending stiffness. For a simple cantilevered beam:
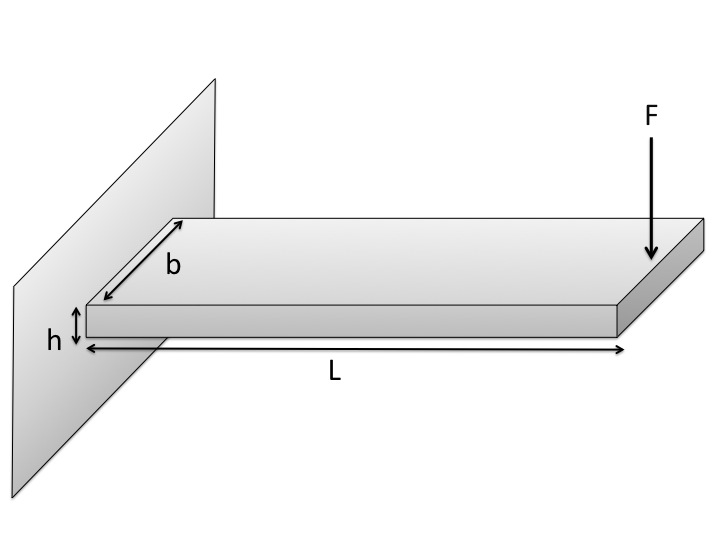
Notice the bending stiffness depends on the thickness ($h$) cubed, while it only depends on width ($b$) to the first power. This equation tells you that the thickness has a huge effect, which means that you should change that first (that's what I mean by equations giving you a direction.) The equation also tells you how much you should change the variables to reach your desired performance. I would recommend putting these equations into MATLAB or Excel to rapidly change variables and check that the performance level is reached.
Then again, maybe you don't know how much force you need to apply. You may have to take measurements in lab to figure that out. Also, the analysis for your robot module may not be that simple, which means that you could either make approximations or solving it numerically with MATLAB, Excel, or Finite Element Analysis (FEA.) Deciding between those options usually depends on a trade-off between speed and accuracy. Double-check with friends, UAs and lab instructors (in that order) if you get stuck on your analysis (or if you should even do it!) Ultimately with either method there are two things to watch out for: analysis paralysis and experiments without direction.
Analysis
Finding out if the motor has enough torque is a common problem in 2.007, but it is certainly not the only one. FUNdaMENTALS lays out relevant 2.007 analysis pretty well. FUNdaMENTALS is broken up into topics that are useful for 2.007 students, with everything from creating ideas to power transmission elements. There are 10 topics that are each around 60 pages. Each topic has text on one page and a summary PowerPoint slide on the next page (it stimulates your left and right brain.) It may seem like a lot to read (~600 pages), but I would suggest reading each topic this way: read the slides first. By only reading the slides, you quickly get an idea of what is contained in each topic. Once you know what and where the contained information is, you can read the text if you need further details.
You can also use CAD to perform analysis. Remember to "apply material" to easily see properties like strength and weight. Also, with the materials added, Solidworks can calculate the center of mass (Mass Properties,) which can be used for the " $\vec{r}$ " in torque calculations for example.
Bench-Level Experiments
Experimentation is crucial to success. Analysis will tell you if something should work; experiments will tell you if something will work. Analysis is often quick and cheap, but if you're inexperienced or uncertain, you can succumb to analysis paralysis (the quicksand of the design process.) If you perform experiments, make sure that they have a goal. What are you testing? Force? Friction? Speed?Make CAD models and part drawings
If it doesn’t work in CAD, it won’t work in real life.
With CAD, you can easily see where parts interfere, and you can manipulate them with a few clicks. If it doesn’t work in CAD, it won’t work in real life, so getting it to work in CAD is important. Note that the statement doesn't work the other way: If it does work in CAD, it won't necessarily work in real life. In real life, there are things like friction or imperfections that are difficult or impossible to account for in CAD.
1 hour in CAD can save 4 hours in lab

CAD model from Ben Potash, a student that I helped in my section
Often students don’t work on CAD because they think that it takes too long; they think that it would be faster to just make something and see if it works. Sometimes that’s true, but in 2.007 it often isn’t.
Part drawings make manufacturing and assembly easier
Having all of the features listed and dimensioned on one part is very convenient. It is useful for machining. You can download CAD files for screws and various other parts from McMaster.
Manufacturing
Outsource manufacturing when you can
The waterjet is an amazing machine that can be used for your 2.007 robot. You could even take advantage of industrial origami to fold sheet metal. Also, the waterjet is outsourced machining: you just give one of the shop staff the dxf file and they make the parts for you. That being said, they only will do it if that is the most efficient way to make that part. If you just want a rectangle with a couple of holes in it, there are faster, easier ways to do that.
Use the CNC Mill to save time
Hole tables can be used for drilling. It can also be used for arcs and simple shapes. It gives a nice consistent surface finish. These parts are high quality.
Tolerances
What are tolerances?
No machine will ever make a part perfectly. Let's say you design a shaft that has a 3 inch diameter. Whatever machine you use will produce a part with a diameter that is not 3 inches. The diameter could be 3.1 inches, it could be 3.000001 inches, it could be 2.7 inches, it could be 2.99995 inches, but it will never ever be 3 inches. Even when you measure the diameter and the measurement device says, "3.0000 in," it could be 3.00001 inches. Knowing that a part can't be perfect, you have to think about how imperfect it can be while still being able to function. The amount of acceptable variation is called a tolerance. A "tight" tolerance refers to having a small amount of acceptable variation, while a "loose" tolerance refers to a large amount of acceptable variation. Some features (e.g. press fits) require tight tolerances and some features (e.g. cutting a large piece of stock roughly to size) require loose tolerances. Some machines are great for loose tolerances (e.g. bandsaws and drill presses), while some machines are great for tight tolerances (e.g. CNC Mills and Lathes). Use the right machine for the job. A big problem in 2.007 is students don’t know which machine to use. Some people try to do everything with a drill press and a bandsaw, while others try to do everything on a mill and lathe.
Why do tolerances matter?
Tolerances matter because they determine how much parts cost. When choosing machines, there is often a trade-off between speed and accuracy. Making a rough cut on a bandsaw is fast, but not very accurate. Similarly, the mill is much more accurate, but it requires a longer setup and machining time. If you make a part drawing to give to a machinist, you have to specify the tolerances. If the tolerances are too loose, then the machinist could give you parts that don't work (e.g. parts that don't fit together). If the tolerances are too tight, then making the parts will cost more. Parts with tight tolerances will take more time to make and require more expensive machines and measuring equipment. Choosing the right tolerances is a balance between speed and accuracy.
How do you choose these tolerances?
In general, there isn't a closed-form method for choosing tolerances, but there are some guidelines. First, think about which features are critical. For certain features (e.g. press-fits), you could look in Machinery's Handbook
Assembly
Design for disassembly.
Don't put your whole robot on a machine. Students often want to make modifications to their robot after they've assembled it. They get too lazy to take it apart (or it's glued together in a way that it can't be taken apart), so they put the whole robot on a machine. When I was a UA for RoboCon,
Debugging
You're going to put your robot together and it's not going to work as planned. Something's going to go wrong. Accept it. Make time to fixing it. Also, keep in mind the lesson learned earlier: work alone, work with your friends, then work with an expert.
Testing
Be sure to allow ample time for testing. You will have to test it for functionality (does it work?) and repeatability (does it work well?)
Competition
Although you are not required to compete, I would recommend it. I've seen several 2.007 students not compete simply because they were punking out. They didn't finish in time, their robot doesn't work, they don't think they're going to win, so they just give up and say that they're not competing. You don't have anything to lose by competing and you have everything to gain. What's the worst that could happen if you compete? You don't win? So what? There are over 100 students that compete in 2.007; you had a less than 1% chance that you would win anyway. Also, competing pushes you to finish what you started. Don't stop cold on a project simply because it doesn't work properly. Part of being a good engineer is being able to diagnose and correct machine problems. There are legitimate reasons for not competing (feeling ill, scheduling conflict, etc.) but being a punk is not one of them.Make a checklist
Make a checklist of all of the things that you need to do on competition night.
Trust Yourself
Trust yourself. There is no need to be nervous. If you've followed my advice up to this point, you should be in good shape.
Bonus: iPhone apps
- Mechanical Reference ($0.99): Especially useful for fastener references
- Carpenter ($1.99): Useful leveling features, especially the surface level
- eDrawings Pro ($9.99): View CAD models on your phone
- Design Data ($0.99): Contains all kind of material data info
- GD&T ($0.99): Quick GD&T reference guide