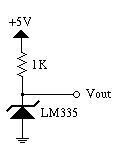
Since the sensor is a zener diode, a bias current must be established in order to use the device. The spec sheet states that the diode should be biased between 400 uA and 5 mA; we'll bias it at 2 mA. It is important to note that self-heating can be a significant factor, which is why I'm not choosing a higher bias current. The bias circuit is as follows:
The temperature sensor's voltage output is related to absolute temperature by the following equation: Vout = VoutT0 * T / T0, where T0 is the known reference temperature where VoutT0 was measured. The nominal VoutT0 is equal to T0 * 10 mV/K. So, at 25 C, VoutT0 is nominally 298 K * 10 mV/K = 2.98 V (to be really accurate, we'd need a reference temperature and a voltmeter, but nominal values are OK for our purposes). Thus, the voltage dropped between +5 and the diode is 5V - 2.98V = 2.02V. In order to get 2 mA bias current, we need a 1 K resistor for R1.
A pinout of the sensor is provided below:
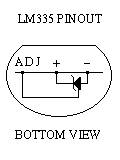
Note that the adj pin is unconnected. The adj pin is used to trim the diode to be more accurate.
Here are the steps you need to take to assemble the temperature sensor:
1. Cut the leads of the temperature sensor to about 5mm length.
2. Cut the leads of the 1K resistor to about 2.5 mm length.
3. Using a third hand and a good clean soldering iron, tin the leads of the sensor and the resistor.
4. Attach one end of the 1K resistor to the "+" pin of the temperature sensor.
5. Cut a length of three-conductor cable (such as ribbon cable). I would suggest a length of at least two or three feet, seeing as how you would like to place the sensor at an arbitrary location in your room. I'd suggest a max length of fifteen feet.
6. Split and strip one end of the ribbon cable, and tin the leads.
7. Solder two conductors of the ribbon cable to the free end of the resistor and the "-" pin of the temperatures sensor.
8. Now here's the tough part. Solder the remaining conductor of the ribbon cable to the junction of the 1K resistor and the "+" lead of the temperature sensor. You'll want to make sure that the conductor is just the right length to "fall" in place, because if you have to bend it about, the tension in the cable will make soldering very difficult.
9. Encase the exposed wiring in hot glue. Make sure you don't gob the glue over the sensor; you want to leave as much of the sensor uncovered as possible. Too much glue may interfere with the sensor's response time.
10. Connect Vout to one of the HC11's analog inputs.
11. You're done!