SIP.edu and Configuring Avaya Converged Communications
Servera Proxy Server (draft)
Candace Holman
<holman@post.harvard.edu> (March 2005, November 2004(November 2004)
Overview
Avaya
[name
Bruce Mazza and/or his department?] agagreed to help expand the Internet 2 SIP.edu
project by constructing an LDAP plugin, known as the Handle-Based Dialing feature, that performsed a similar
function to one that described in Columbia University’s SIP.edu deployment with
SER. The Handle-Based Dialing feature is expected to
become a feature of Avaya’s Converged Communications Server version 3.0 in
Spring 2005.
In order to map email
addresses to PBX extensions, a call that comes in to the Avaya SIP proxy will
first attempt to deliver it to one of its own provisioned stations. If there is no provisioned station, the call is eventually handed off to
the Avaya gateway connected by PRI to various other PBXs (traditional and IP-based).
In detail, when an inbound
SIP call is made to an unprovisioned SIP extension, the Avaya Converged
Communications Server (CCS), Avaya’s SIP proxy, passes control to the new LDAP plugin. The plugin converts the URI into an email address, looks it up in the LDAP directory, and returns
a directory number
that is converted
to a number-based SIP URI. (http://www.columbia.edu/acis/networks/advanced/sip.edu.html) and
explained in detail in the Directory Considerations section (url).
As the last step, the
number-based URI is routed
through an Avaya Communication Manager (CM) IP-PBX gateway over an ISDN
connection to either
an IP PBX or a
legacy PBX. The abstract architecture of the system is shown below.
In order to map email addresses to PBX extensions,
a call that comes in to the Avaya SIP proxy will first attempt to deliver it to
a registered station (check- is
it trying to deliver it to a registered or a recorded (but offline) station?). If the call cannot be delivered via the
Avaya proxy it is handed off to the Avaya gateway connected by PRI to our legacy 5ESS
PBX.
Challenges
(may not be necessary to include all of this)
Some of the Avaya user
documentation is out of date and use of
this cookbook as a guide is recommended.
The hardest part was getting
console access and an administrative interface. There were several required passwords missing or wrong.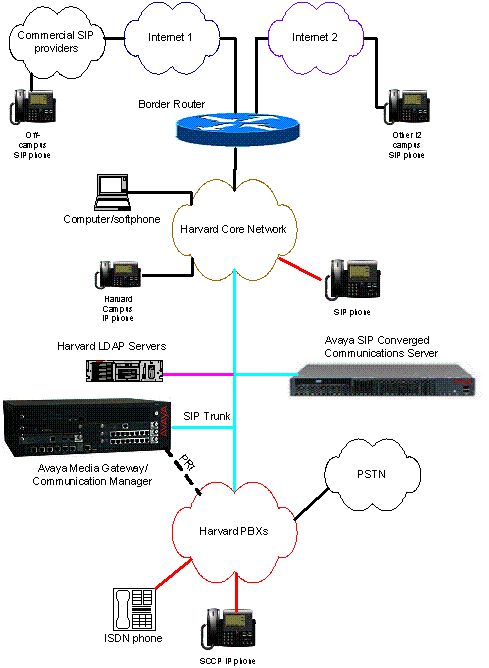
This documents covers the CCS
SIP implementation and assumes that an Avaya IP-PBX is already installed.
Traditionally, Avaya has
delivered a technician-assisted customer solution and guards configuration
options with special access passwords for their technicians or authorized resellers. The Avaya user documentation is only
beginning to come up to speed for self-maintaining customers, so use of this
cookbook as a guide is recommended. The
hardest part of the installation and configuration is getting console access
and an administrative interface. There
were also several required passwords missing from the documentation or listed incorrectly.
Contents
·
Configuring Avaya Converged Communications ServerReferences
from the Avaya web site include
·
Avaya SIP.edu LDAP Plugin
·
Configuring Avaya Communication Manager 2.1.1
·
Miscellaneous References for Harvard/Avaya SIP.edu
CCS Setup
and Configuration, August 2004, Avaya CCS
2.1 Quick Setup, September
2004, and Avaya CCS
2.0 Quick Setup, June 2004Contributors
Special thanks to the
following people:
Harvard University
David Laporte, Patrick McEvilly – linux and network concepts
Jane Hill – directory concepts
Avaya
Bruce Mazza – project institution, project liaison
Michael West – developer, development liaison
Len Mahoney – technician, technical liaison
MIT
Dennis Baron – SIP.edu concepts,
directory concepts
Configuring Avaya Converged Communications Server
I Architecture
The Avaya Converged
Communications Server (CCS) performs SIP proxy, registration, and redirection
functions. In this configuration guide,
CCS runs with the S8300 Media Server (a module in the gateway with Avaya Communication
Manager (CM) 2.0+ call processing
software) to provide features that are not standardized for SIP, such as SIP
and non-SIP endpoint interoperability and SIP and non-SIP gateway
interoperability. (true?) The Media Server is also known as a Primary Management Interface (PMI), a Communication Manager or a Media Gateway
Controller. The G350 gateway is known
as a Media Gateway and is a chassis that houses Avaya S8300 Media Server (the processor) and digital and analog
circuit boards.
This configuration guide
may be applicable
in other architectures that include CM s8500/s8700 or G650/G700 Media Gateways.
Both CCS and S8300 run on a
modified version of Red Hat Linux 8.0-8.
Updates to Red Hat Enterprise are scheduled for the CCS 3.1 release,
which is expected late 2005.
Although not
discussed in this write-up, some campuses may have other Avaya
hardware platforms running Communication Manager such as the S8500 or S8700 Media Servers with G650 or G700 Media Gateways that work in a similar fashion with CCS.
The CCS serves as a Home/Edge hybrid server and will process requests from both the internal domain as well as forward requests to external domains.
Avaya is expecting to release CCS 3.0 in Spring 2005 which will support the Handle-Based Dialing LDAP
plug-in as an optional feature, plus will add presence server capability, a personal user profile
manager via web access, support for the network-asserted identity header to help reduce voice spam, and new
SIP endpoints. Both CCS
and S8300 run on Red Hat Linux 8.0-8year
The CCS serves as a
Home/Edge hybrid server and will process requests from both the internal domain
as well as forward requests to external domains.
II Requirements
The hardware for the CCS proxy
server is an Avaya S8500
Media Server, which is based on an IBM x305IBM x305, as re-sold by Avaya. Since we are self-maintainers, and due to internal remote
access policies, we
chose to iIgnore any user manual comments about
adding an IBM RSA module or USB modem [todo - check]. In order for Avaya Services to provide remote support, a modem or secure IP access is necessary.
1. License and password files issued by Avaya representative and copied to the laptop to be used for installation/configuration. The file extensions are .lic and .pwd
2.
CDs
or files issued by Avaya representative: Avaya-packaged Linux, CCS 2.1-35 or higher, CM 2.1.1 with patch, or higher version of CM, and CM
2.1 Installer, or equivalent to arrive at CM version 2.1.1 or higher.
3.
DB9-connector
null modem cable
4. Laptop PC for console access, set with IP Address 192.11.13.5, Subnet Mask 255.255.255.252. Also need monitor, keyboard, mouse during installation.
5. Server needs: IP address, netmask, default gateway, hostname, domain, DNS server info
III Installation
1. Configure Console (example is for Windows Hyperterminal)
a. Use serial cable/DB9 (aka null modem, or cross-connect C5 cable) connected from a laptop PC to the Avaya Services Port
b.
Configure serial port for 9600 (?) bits per
second, 8 data bits, no parity, 1 stop bit, hardware(?) flow control
, vt100 emulation, and telnet terminal id vt100 (if necessary).
c.
If the configuration in step b doesn’t work, use F1 to enter
BIOS configuration on the server and set console redirect to 9600 baud ( or
adjust Hyperterminal to match the BIOS
baud)
2. Install Red Hat Linux packaged by Avaya
a. Boot from the provided Linux CD. See step 1c if this doesn’t appear on screen. It takes at most 3 minutes for the Services Port to be ready..
b. Use TAB and ENTER keys to navigate and select options during the installation, but most often just select the default
c. After the installation is finished, the Avaya Services Port will go out of service. Disconnect, change the console baud rate to 115200 and reconnect the terminal session.
d. Wait for the server to eject the CD and reboot on its own
3. Install CCS software
a.
At this point the Services Port no longer works. Plug into a keyboard/mouse/monitor *
b.
Reboot single user touser to set root
password (hold shift key until LILO boot: prompt appears and type a1 single) *
c. Reboot and login as root
d. Type ifconfig to get the MAC address of eth0
e.
Type swversion andswversion and confirm these minimum settingversions:
Operating System: Linux 2.4.20-AV14 i686 i686
CCS Release String: CCS-2.1.0.0-35
Software Load: CCS02.1-01.0.035.0
f. Type ccsInstaller and enter the host configuration information: short hostname (no domain), DNS domain name, IP address, Subnet Mask, Gateway, DNS Server/s
g. Unless applicable, ignore the questions about RSA Card and answer High Availability = n.
h. Master Admin on this machine = y
i.
Select the mvss password, but make sure it has only
alphanumeric characters *
j. Start CCS service now = y
4. Post Installation Tasks
a. Login as admin/admin01
b. Type statapp to display the status of the CCS Server applications: Watchdog, Tracelogger, INADS AlarmAgent, CCS TrapAgent, GMM, SNMP Manager, ImLogger, SIP Server, and SME should all show “UP” and Mon may show “partially UP”
c.
Type server to show
the status of the CCS Server, which should look likeinclude these statuses:
Mode: Active
Server Hardware: okay
Processes: okay
IV Configuration
1. Login as admin/admin01 to the web interface http://hostname to configure the proxy
2. Change admin password now.
3. Launch the Administration Web Interface and configure:
a.
Domain:
cChoose
Setup to setup the domain
b.
Hosts
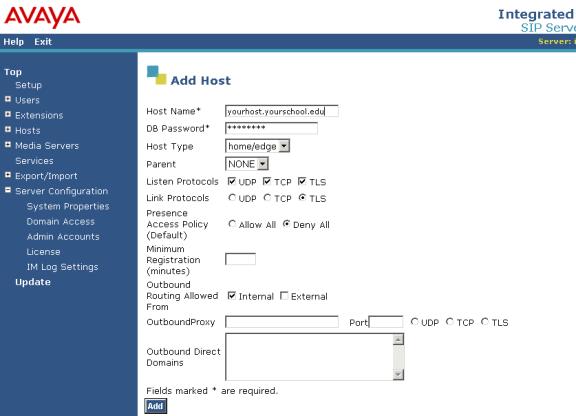
[screen
shot]
c. Default User Profile
d. Media Servers (if applicable)
e. Complete any other Setup screens that show under Setup
4. License management
a. Choose Top – Server Configuration – Manage Licenses
b. Login to WebLM as admin
c. Enter license path of the XML license file (must reside on machine that is browsing this interface)
d. Click Install
e. Change the password
f. Choose Services and Stop Proxy Server and Start Proxy Server
g. Choose Hosts – Update all to save the change. Confirm that there are no errors.
5. Adding Users
a.
Choose
Users – Add
b.
Click
Update, and a link
“Update” will appear at the bottom of the left side Menu
c.
After
completing your changes, click the Update link from the left side Menu, to ensure your changes are
permanent

[screen
shot]
Configuring Media Server (optional)
a.Select
Enter a name for the map
Set a regular expression
pattern for the extension numbers you’ll assign (see
V References
below)
·
Avaya Converged Communication Server
Installation and Administration, 555-245-705, August 2004
·
Avaya CCS 2.1 Quick Setup, September 2004
·
Avaya CCS 2.0 Quick Setup, June 2004
To obtain the latest versions
of these Avaya documents, go to http://support.avaya.com and
click on the link for documentation.
Locate the page for Converged Communication Server.
To do - Directory Consideration- note
Harvard uses inetOrgPerson
Address Map Notes
Pattern
(Required) This is a Linux regular expression that will match the extension
numbers you wish to map. Regular expressions are a way to describe text through
pattern matching. The regular expression is a string containing a combination
of normal text characters, which match themselves, and special metacharacters,
which may represent items like quantity, location or types of character(s).
(NOTE: You do not need to match punctuation like dashes, periods or parentheses
which may sometimes be used to enhance the readability of telephone
extensions.) For example, [0-9] represents any single digit and * represents
any number of digits or characters. So the example in the preceding
illustration
^sip:538[0-9]*
would match any SIP invite message (^ matches the beginning of a line) for any
extension 3 or more digits in length, beginning with the digits 538, and ending
with any other other sequence of digits.
Square brackets contain a selection of characters to be matched, with a hyphen
indicating a range; so in our example,[ 0-9] matches any digit, or for another
example, [13579] matches odd-numbered digits. Curly brackets which contain a
whole number match that number of instances of the preceding item. For example,
[0-9]{4} matches any four digits. Note that the braces may require escape
characters: \{4\}
Another helpful metacharacter is dot (period), which matches any single
character; for example, the regular expression .* matches any quantity of any
character(s).
For more information, refer to "SIP Support in Avaya Communication Manager
2.0, 555-245-206".
Replace URI
In case the contact information in this map is that of an endpoint (e.g., a SIP
phone or a user on a media server running Communication Manager), then this box
should be checked for "yes." The box is checked by default, because
the SIP proxy on a Converged Communications Server will overwrite the URI of
the SIP request for these cases. If, however, you wish to configure this proxy
to forward requests to another entity (i.e., another SIP proxy server) so that
the other entity can resolve the contact and route the request, then uncheck
the "Replace URI" box.
Add user notes
Handle
(Required) Enter a "handle" (i.e., alias) name for the user of at
least 3 alphanumeric characters in length. Each handle must be unique within
the domain, but users may have more than one assigned to them.
User ID
Enter an identifying name, which is at least 3 alphanumeric characters in
length and is used to authenticate user clients (for example, IP Softphone to
IM server). Each user has exactly one user ID. If you do not specify a
different
Avaya SIP.edu Handle-Based Dialing service (LDAP Plugin)
I Architecture
The CCS Handle-Based Dialing
service LDAP
Plugin was written in C++ to act as a type of call-processing bridge when
routing an incoming SIP URI to a destination.
Given a SIP URI like sip:username@bigu.edu, the LDAP Plugin will convert
it to an email address by removing the sip: prefix, and perform an LDAP query
for a unique telephone number belonging to a person with that email
address. The plugin bridge routine is
used for routing calls only when there is no matching registrant on the CCS
proxy.
II Requirements
·
Avaya CCS proxy server installed and configured to
run CCS 2.1.1 or higher version
·
Anonymous or authenticated read access rights to a
local LDAP server from the proxy server
·
LDAP Plugin files: configuration file ldapmod.cfg and shared library module modldap.so
·
Configuration file information as defined below
III Installation
1.
Login
with privileged access.
2.
Define the module in the /usr/impress/sip-server/etc/modules.def file. (Note that modccsldap-params belongs in modules.def and
not ccs.conf):
[modccsldap]
lib=modldap.so
path=/usr/impress/sip-server/module
interfaces=ContactResolver
instances=single
[modccsldap-params]
configFile=/usr/local/etc/ldapmod.cfg
3.
Add
the configuration file parameters to /usr/impress/sip-server/etc/ccs.conf
file. The LocationService alternateCondition
parameter specifies the conditions in call routing that will invoke the module
– – notfound in CCS database (URI doesn’t exist), nocontacts in CCS database (URI exists but person is not
registered with the CCS proxy), or never to disable the module.
[LocationService]
AlternateLookupModule=modccsldap
AlternateCondition=nocontacts,notfound
For troubleshooting later:
[Tracing]
Enabled=true
TraceFile=/usr/local/etc/ccs.log
MaxFileSize=5000000
UseSeparator=true
ShowDate=true
All=off
; trace categories
LocationService=on
modccsldap=on
4.
Copy
the modldap.so shared library to the /usr/impress/sip-server/module
(Note that this is not /modules) directory. Remember to set the execute permissions.
5.
Login
to https://hostname and use the Administration
Web Pages to restart the proxy server service
a.
choose
Services – click Stop on Proxy Server, wait until the status is DOWN then click
Start
IV Configuration
1.
Edit
the ldapmod.cfg for your environment, following the formatting in the example
file below:
version:3
onevalue:1
prefix:9
handler:
yourCommunicationManager.domain.edu
database:yourldapserver.domain.edu
auth:your bind DN (e.g.,
uid=youruid,ou=yourauthou,o=youro,dc=yourdc)
passwd:yourbindpassword
base:your base DN (e.g.
ou=yourbaseou,o=youro,dc=yourdc)
key:email
element:telephoneNumber
The
unique fields can
occur only once in the configuration file:
version – This specifies the LDAP
version to use. This will be either a “2” or “3”. It is strongly recommended
that “3” be used unless there is a specific reason to use “2”
onevalue – This specifies what to do
when more than one telephoneNumber is returned for a single email. If "onevalue" is
"1", then it will only return a value if a single value was found –
returns nothing if multiple values were found. If "onevalue" is
"0" then it will return the full list found. The functionality for a full list of
telephoneNumber values may be implemented in the future to scroll through a
list of telephoneNumbers to reach an intended user.
prefix –This specifies a string that
is to be prepended to the phone number returned from the LDAP directory
handler – This specifies the
Communication Manager server to use. Must be a fully qualified domain name, or
an IP address
These fields occur for each LDAP database that is
to be searched. If more than one is
listed, make sure the group of fields is listed completely and in the order listed below.
database – The fully qualified domain
name or IP address of the LDAP database server.
auth – The bind DN to use for the
bind authorization. (optional)
passwd – The password to use for
the bind authorization.(optional)
base – The base DN to use for the
search.
key – The LDAP field name to
search against.
element – The LDAP field name whose
value is to be returned.
2.
Copy
the ldapmod.cfg to /usr/local/etc
3.
Restart
CCS to post the changes (login to admin web interface and stop and restart the
proxy process)
V Testing and Troubleshooting
1.
Make
sure system log files reflect that the service is running
a.
look
in the /usr/local/etc/ccs.log for entries similar to this:
AlternateLookupModule=modccsldap
AlternateCondition=nocontacts,notfound
loaded ContactResolver from module modccsldap
ContactResolver interface enabled for
nocontacts=yes notfound=yes
establishing database connection
connect okay
2.
Make
a call to a non-provisioned sip URI that is a facsimile of an email address that
exists in the LDAP directory and check your trace file for correct entry. Make sure that the dial string is reflected properly in your dial plan:
a.
tail -f /usr/local/etc/ccs.log should look similar to this:
sip:jstudent@big.edu not found, invoking alternate
lookup module
0: value being used: +1 999 999 9999
result to return is
sip:919999999999@yourCM.edu;transport=tls
module returned 1 contacts
VI References
·
Avaya SIP Trial, Candace Holman, March 2004
·
CCS-LDAP Plugin Requirements, Avaya BCSI Services
Offer, Version 0.3, June 2004
·
CCS/LDAP Plug In Installation, Avaya BCSI Services
Offer, Version 0.2, September 2004
·
SIP.edu Cookbook, http://web.mit.edu/sip/sip.edu/
·
Columbia University’s LDAP Plugin: http://www.columbia.edu/acis/networks/advanced/sip.edu.html
Configuring Communication
Manager 2.1.1 on
an s8300
To implement traditional telephony features via gateway, at a minimum you must also configure a primary
management interface (PMI), register the G350 to a Media Gateway Controller,
configure SIP and ISDN trunks, and configure a SIP signal group.
To Configure the Media
Gateway and Trunks, you will need to access the ANSI graphical interface called
System Access
Terminal (SAT) on the PMI. After configuring the PMI in step II, login
to it and type sat. Use Esc-h for help, Esc-e to submit a change, and Esc-x to cancel.
Type logoff to exit. The most
common commands begin with add, change, display, and remove.
When you can access the SAT
interface, verify
that you have the required (licensed) access to configure these options by entering the command display system-parameters customer-options. Verify that you are able to administer IP trunks, SIP trunks, etc.
I Configure G350 using Avaya Installation
Wizard
II Configure PMI
1.
login to the G350 and issue these commands
2.
interface vlan 1
3.
pmi
4.
exit
5.
Set mgc list [gateway ip
address]
6.
copy running-config
start-config
7.
show pmi
8.
show mgc list
9.
show running-config
10.
reset
III Configure Media Gateway and ISDN signal and trunk group
Collect info for media
gateway – G350 serial number, name, IP
address, media gateway controller IP address, modules. To get serial number from the gateway prompt type: serialnumber –l
Collect provider info for T1
– direction, service type, COR, etc. Connect the T1 interface to your provider and verify it is working.
1.
from
the SAT prompt
2.
add media-gateway 1 (diagram
avayaSATMediaGateway)
3.
add ds1 v2 (diagrams avayaSATDS1-1 and
–2) Check with provider on how to set connect: pbx/network/host/etc, and interface: user/network/etc
4.
add signaling-group 1, group-type isdn-pri
5.
Add trunk-group 1, group-type isdn , service-type: public-ntwrk (check with provider)
6.
Change trunk 1 to set group member assignments: set
23 ports for a T1/PRI,
with port name in format gateway:module:circuit so that port 1 in this case is numbered 001V201. Also indicate the proper signaling group to use.
7.
Add/change ars-analysis and set up the dialed strings
that you want to route over the trunk (especially if there are restrictions)
8.
Change route-pattern 1 to set up a route pattern for this
trunk. Use this to mark which digits of the dial
string are routed over the ISDN trunk or for any special formatting or codes required by
the provider.
9.
Change public-unknown-numbering and configure for your
extensions so that they pass the complete caller id.
IV Configure SIP Signal and Trunk Group
1.
Display system
customer-options – verify maximum administered sip trunks > 0 (page 2/10)
and ip trunks = y (page 4/10)
2.
Change system features - set trunk-to-trunk transfer
= all
3.
Change node-names ip [hostname] and set the host name and ip address of your CCS
4.
List node-names ip and verify an entry exists for procr with ip address of your gateway
5.
Change ip-network-region 1 = domain of the home proxy
CCS as defined in the CCS Administration Web
Interface under Server Configuration – System Properties
6.
Add signaling-group 2. You need at least one
signaling group, but can add more if you have more than one SIP proxy server in your architecture.
a.
Group
Type: sip
b.
Transport
Method: tls
c.
Near-end
node: procr as
verified in step 4
d.
Far-end
node: CCS entry as
set in step 3
e.
Near-end
and far-end listen ports: these must match, default is 5061
f.
Far-end
network region: blank unless different than
the CCS proxy’s
network region
g.
Far-end
domain: blank
h.
DTMF
over IP: rtp-payload
7.
Add trunk-group 2. You need at least one trunk group, but can add more if you have
more than one SIP proxy server in your architecture.
a.
Group
Type:sip
b.
CDR
Reports: y (if
required for
billing or auditing)
c.
Signaling-group:
1 (as entered in
step 2 above)
d.
Service
Type: public-netwrk (or check with provider)
e.
Number
of Members: sum of
all sip trunk-groups, members cannot exceed system-parameters customer-options Max Administered
SIP Trunks
f.
Send
name: y
g.
Send
calling number: y
h.
Format:
public (default for SIP, check with provider
for recommended encoding of Numbering Plan
Indicator)
i.
Send
connected number: y
j.
Group
Member assignments should fill automatically based on the number of members you entered
8.
Add/change route-pattern 2 to distinguish calls that
will travel over the sip trunk. Set secure-sip:n (unless it’s supported)
9.
Add/change ars analysis for your numbered SIP
extensions (if any)
10.
Add/change
public-unknown-numbering to complete your dial plan for the SIP extensions
V References
·
Administrator’s Guide for Avaya Communication
Manager,
January 2005
·
SIP Support in Avaya Communication Manager 2.1.1
running on the Avaya s8300, s8500, or s8700 Media Server, 555-245-506, September 2004.
To obtain the latest versions
of these Avaya documents, go to http://support.avaya.com and click
on the link for documentation. Locate
the page for Communication Manager.
Miscellaneous
References
Mapping Dial Strings to Route Patterns
If you set up a SIP->PSTN
trunk via G350 and Communication Manager, first set up a route pattern in SAT for the dialed strings you
choose. Then make sure that you trunk your dialed strings
to that route pattern. By default most
dialed strings are denied a route. In this example, only one area code is represented
on campus, but there are several exchanges.
Check dialed strings:
list ars analysis
Check route patterns:
list route-pattern
Set up a route pattern to route:
add/change route-pattern x
Set up the ARS dial strings
to use that route pattern:
Add/change ars analysis [areacode] and indicate proper Min and
Max digits, the route pattern number you set above, call type fnpa
CCS sipserver command usage
usage: sipserver
[ -s | --check-config ]
[ -c configFile | --config-file=configFile ]
[ -d | --daemon-mode ]
[ --home-dir=homeDir ]
[ --module-defs=modDefsFile ]
[ --module-dir=modDirectory ]
[ --quiet ]
[ --services-file=servicesFile ]
[ -s ssfConfig | --ssf-config=ssfConfig ]
[ -t | --trace ]
[ --trace-dir=ssfTraceDir ]
[ -w workDir |
--working-dir=workDir ]
[ -h | --help ]
Upgrading from CCS 2.1 to a
later CCS 2.1.x release
Perform this upgrade during a maintenance window,
as it will cause interruptions in service.
The server must be configured properly before upgrading. Caveats – I had to reset the phones afterward. It also erased all of my ldap plugin stuff,
but I was able to revert to the previous boot partition.
1.
Open a management session to the CCS proxy server
via web browser: http://hostname
2.
Login
with your admin account and choose Launch Maintenance Web Interface
3.
Under
Data Backup/Restore, choose Backup Now and backup your data using any of the
given methods
4.
Under
Miscellaneous, choose Download Files and download the tar.gz file, e.g.
CCS02.1-01.0.038.0.tar
5.
Under
Server Upgrades choose Install New Software and follow the wizard steps,
choosing the software file you just downloaded
a.
Choose
software
b.
Choose
License Source – use current license or install a new one
c.
Review
Notices – review the notices carefully and take suggested measures where
appropriate
d.
Begin
Installation – lists the options you chose and asks you to confirm
e.
Install
in Progress – review for errors as the installation proceeds
f.
Reboot
Server – confirm that you want to interrupt service by rebooting
g.
Reboot
in Progress – wait a few minutes and check the status of the reboot by pressing
Continue. Do not exit the browser.
h.
Update
Tripwire Database
i.
Install
License Files - optional
j.
Installation
Complete
6.
Under
Server Upgrades, choose make Upgrade Permanent
7.
Under
Miscellaneous, choose Download Files and load your backup data tar.gz
files
8.
Under
Data Backup/Restores, choose View/Restore Data
9.
Choose
Restore History to verify the data restoration
10.
Under
Server, choose Software Version to verify the new software version
Directory Considerations
Harvard’s Directory Product
Manager requested that we honor privacy settings on LDAP records. Harvard record components such as phone
number and email address may be distinctly protected, so both phone and mail
record privacy settings are honored for SIP.edu. If a user has a private email address, or a public email address
but a private phone number, then a lookup for phone number via email address is
not granted. The number of reachable
parties fluctuates depending on how the end users have set their privacy flags.