
Publishing your Calendar
To setup publishing options and publish a calendar:
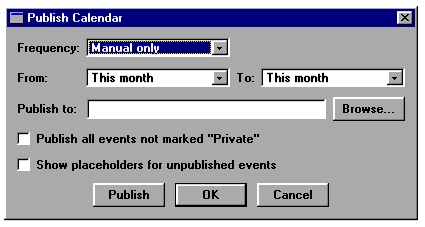
- From the File menu, select Publish. The Publish Calendar dialog box displays:

- Using the Frequency pull down menu, define how often the calendar will be published: Manual only, Every 30 minutes, Every hour, Every 4 hours, or Every day.
- Using the pull down menus From and To define how many months you want to publish.
- In the Publish to field, type the path and file name of the root web page or click on Browse to choose a directory location. If a location is not specified, the file is placed in your Meeting Maker directory.
Note: On a Macintosh there is no field to type the path and file name. You must click on Browse and choose a directory location.
- To have events show on your calendar select Publish all events not marked "Private". All events that are not specifically marked "private" are published.
Note: If you do not select this option, only events that are Publishable get published. For more information about Publishable events, see the Flexible, Private and Publishable Meetings section in Chapter 4.
- Select Show placeholders for unpublished events to show a blocked out section of time for events that are not published.
- Click one of the following buttons: .
- Publish to publish the calendar in HTML format in the location you specified. Meeting Maker executes a publish using the current settings.
Note: Calendar publishing takes place on the client not on the server so your Meeting Maker must be left running in order to update the published calendar. You may publish your calendar while working offline. You may also publish a calendar while acting as a proxy.
- OK to save the current settings, without publishing the calendar. The Publish Calendar dialog box disappears.
- Cancel to exit the Publish Calendar dialog box without saving the current settings.
| ON Corporation http://www.on.com |