STISIM Drive (SDL) - BLCK - Blocks
Display a 3-D block or 2-D
rectangle in the roadway display. The block is transformed so that as the
driver approaches it, the block is in perspective. When looking at the
parameter definitions, refer to the figure at the end of the BLCK discussion
for a graphical definition of the various parameters.
EVENT PARAMETERS:
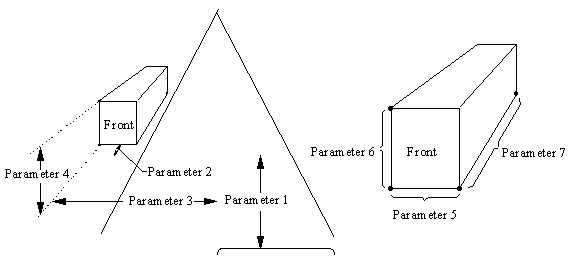
|
PARAMETER 1: |
The longitudinal distance, in feet, that the block is away from the driver when the block initially appears. |
|
PARAMETER 2: |
The longitudinal position, in feet, of the front upper left hand corner of the block with respect to PARAMETER 1. This parameter is an offset with respect to PARAMETER 1. Because of the way the program sorts things and displays them on the screen, if you are trying to display a block on top of another block, you must make the upper left corner for both blocks be the same, and then offset one of the boxes using this parameter. Normally this parameter is zero. |
|
PARAMETER 3: |
The physical lateral position, in feet, of the front upper left hand corner of the block that will be displayed. This is with respect to the roadway’s dividing line. Positive is to the right. |
|
PARAMETER 4: |
The physical vertical position, in feet, of the upper left hand corner of the block that will be displayed. This is with respect to the ground. This should always be positive. |
|
PARAMETER 5: |
The physical lateral width, in feet, of the block that will be displayed. |
|
PARAMETER 6: |
The physical height, in feet, of the block that will be displayed. |
|
PARAMETER 7: |
The physical longitudinal depth, in feet, of the block that will be displayed. |
|
PARAMETER 8: |
The color that the block
will be displayed in. The valid colors are defined using the "Set Simulation Colors" and "Assign Simulation Colors" options, found
in the "Options" menu. You may assign the block a random color by
using the following syntax notation: *[low range]~[high range]
(for example *10~20) In this case, the program will randomly choose a color from all of the colors between the low range number and the high range number. In the example, a number between 10 and 20 (inclusive) would be used. |
EXAMPLE:
100,BLCK,1000,0,-40,20,30,20,100,1
This event example will
display a block after the driver has traveled 100 feet down the roadway and the
block will initially appear 1000 feet away from the driver when it is initially
drawn (100,BLCK,1000,0). The upper left corner of the block will appear 40 feet
to the left of the roadway’s dividing line (-40) and will appear 20 feet above
the ground (20). The block dimensions will be 30 feet wide, 20 feet high, and
100 feet long (30,20,100). Finally, the block will displayed in the color
specified as color 1.
When we created the block
command, we tried to keep it as generic as possible so that it could be used to
create a wide range of display objects. For example you can use to blocks
located in the ground plane to create a cross walk. Obviously, the BLCK event
can be used in 3 dimensions to create buildings, but it can also be used in 2
dimensions to display windows on the building. Some other objects that can be
created are billboards, benches, and even rectangular road signs.