 F150
- Print Dunning Letters F150
- Print Dunning Letters
F150
- Print Dunning Letters F150
- Print Dunning Letters To generate and print dunning letters for sponsor research customers, follow the steps below.
Before generating dunning letters, you can check for blocked
customers and other dunning errors using ZAS1 and for
customers with open items and zero balance using ZAS2.
Role ZSBM => Accounts Receivable => Periodic Processing =>F150 - Dunning
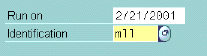
Run on (Enter current date)
Identification (Enter unique ID for this run, for example your initials)
Result: Fields for entering Dunning parameters display, as shown below.
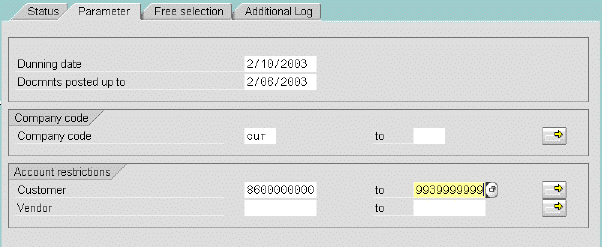
Dunning date (Date of issue of Dunning letters)
Documents Posted up to (The last posting day subject to dunning)
Company code (CUR)
Customer (enter first range of customers to be dunned; see note below)
Note: For sponsor billing, 4 ranges of customer numbers are entered. The first customer range is entered here (8600000000 to 9939999999, as shown above). See step 3 to enter additional customer number ranges.
Result: The Multiple Selection for Customer window opens,
as shown below.
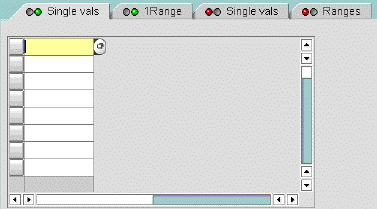
The 1Range tab displays the first customer range entered, as shown below.
The additional ranges are: 8000000005 to 8000000006, 8000000031 to 8000000032, and 8000000035 to 8000000036.
After you enter the 3 additional ranges, the tab title changes to 4Ranges.
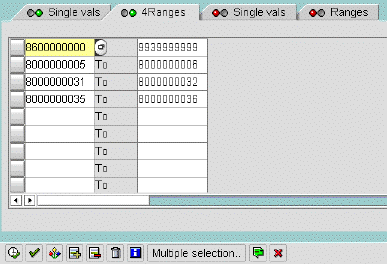
Note: Clicking on green check will NOT save the additional customer ranges.
Result: Back at the Parameters screen, a green bar ![]() displays under the yellow arrow.
displays under the yellow arrow.
 to SAVE on the Parameters screen.
A message says that "Details have been saved for the run on MM/DD/YYYY ID ".
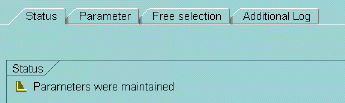
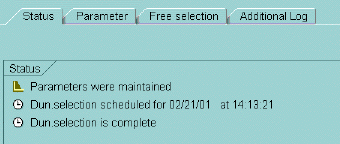
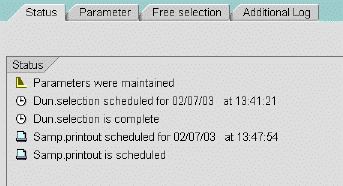
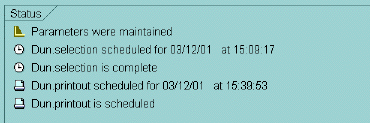
Result: The Status tab reports that Parameters were maintained, as shown below.
The Schedule Selection and Print window opens, shown below.
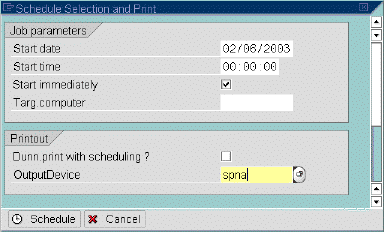
Start Date (change to current date, if needed)
Start Immediately (click here to begin run now)
Output Device (select printer SPNA)
Result: The Schedule Selection and Print window closes. The Status box says that dunning selection is scheduled, as shown below.

Note: To view status changes, you may need to click on another tab, and then return to Status tab.
![]() Notes: In case of problems,
you may find the following options helpful.
Notes: In case of problems,
you may find the following options helpful.
To delete the dunning run, select Dunning Notices =>Delete Dunning Run from menu bar. This deletes the run without deleting your dunning run parameters.
After correcting problems, begin again at Step 1
or Step 2.
 Note: A dunning run that has NOT been printed
can block customer records for later dunning runs. Unwanted dunning
runs that are "finished" but not "printed" should
be deleted, as described above.
Note: A dunning run that has NOT been printed
can block customer records for later dunning runs. Unwanted dunning
runs that are "finished" but not "printed" should
be deleted, as described above.
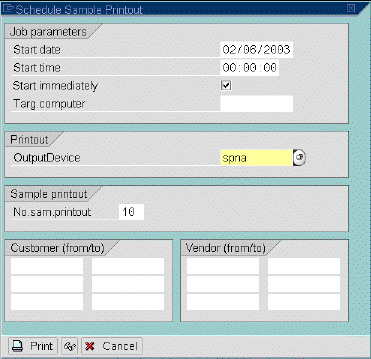
The Schedule Sample Printout window opens, as shown below.
Result: The Status tab shows that sample printout is scheduled, as shown below.
Note: The dunning run sample printout is identified by your dunning run ID and start date in the last column ("Title or name..."), for example "MLL030206" as shown below. The default number of pages is 20 (10 sample customers times 2 pages/customer).

If the sample documents are satisfactory, you can continue with the next step.
The Schedule Print window opens, as shown below.
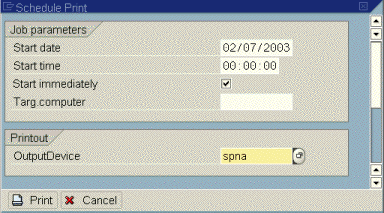
Start Date (defaults to today's date)
Start Immediately (click here)OutputDevice (defaults to your recent selection; use SPNA)

Note: The dunning run spool request is identified by your
dunning run ID and start date (YYMMDD) in the last column ("Title or name..."),
for example "MLL030207" as shown below.

The usual number of dunning letter pages is 400 - 500 (2 pages/customer or 200 - 250 customers).
Copyright © 2003, Massachusetts Institute of Technology. All rights reserved.