F150 - Print Dunning Letters


To generate and print dunning letters, follow the steps below. Before generating dunning letters, you can block dunning of customers or line items or update A/R responsible persons (see Print Dunning Letters subtasks on A/R menu)
  1. Enter/maintain dunning run parameters
  2. Schedule dunning run
  3. Schedule dunning printout
  4. Print dunning letters

Get Started

Step 1 - Enter/maintain dunning run parameters

  1. On Dunning screen, fill in Run on and Identification fields, as described below.


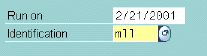
    Run on (Enter current date)
    Identification (Enter unique ID for this run)

  2. Enter Dunning Parameters:

    1. Click on the Parameter tab:

      Result: Fields for entering Dunning parameters display, as shown below.

    1. Fill in these fields:

      Dunning date (Date of issue of Dunning letters)
      Documents Posted up to (The last posting day subject to dunning)
      Company code (CUR)
      Customer (enter range of customers to be dunned; for example, 1 to 7999999999)

    2. (Optional) To dunn specific dunning areas, click on Free Selection tab.

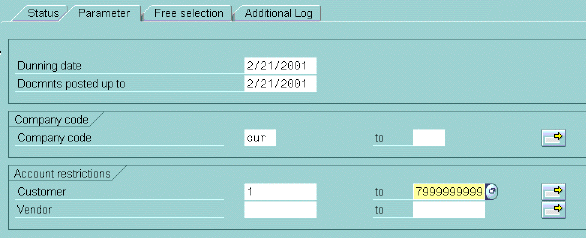
      Result: The Free Selection fields display, as shown below.

      • fill in these fields:

        Field Name (BSID-MABER)
        Values (Dunning area to report on, for example MD)

        (end of optional step)

  3. to SAVE
    A message says that "Details have been saved for the run on MM/DD/YYYY ID ".

  4. Click on Status tab.

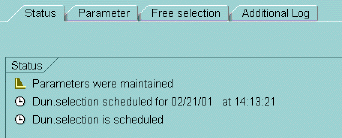
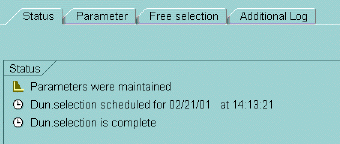
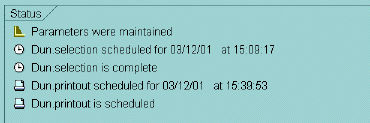
Result: The Status tab reports that Parameters were maintained, as shown below.

Step 2 - Schedule dunning run

  1. On Dunning screen, click on Schedule

    The Schedule Selection and Print window opens, shown below.

  2. Review/complete these fields,

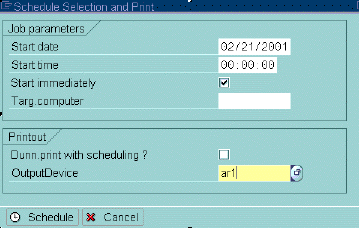
    Start Date (change to current date)
    The default Start date is usually the next day, so you need to change to current date.

    Start Immediately (click here to begin run now)
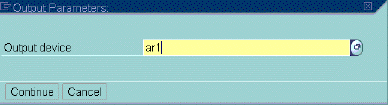
    Output Device (select printer AR1)

  3. Click on Schedule
    Result: The Schedule Selection and Print window closes.

    The Status box says that dunning selection is scheduled, as shown below.

  4. Click on Status tab periodically to check progress of run and find out when it's complete.
    Note: To view status changes, you may need to exit then reselect the Dunning procedure.


    Notes: You may find the following options helpful.


Step 3 - Schedule dunning printout

  1. If the dunning run is successful, click on Dunning printout
    Result: The Output Parameters windows opens (shown below).

  2. Select output device of AR1; then click Continue.

  3. The Schedule Print window opens, as shown below.

  4. Review/complete these fields,

    Start Date (defaults to day after date you selected; so you will probably need to change it)

    Start Immediately (click here)

    OutputDevice (defaults to your recent selection)

  5. Click on
    Result: The window closes. The Status tab displays that "Dunning printout...is scheduled".

Step 4- Print dunning letters

  1. From menu bar, select System=>Services=>Output Controller; then select GoTo => Overview.

    Result: The Spool Request overview displays, as shown below.

  2. Did your dunning run result in less than 600 pages (or records)?

  3. Select the spool request to print by clicking on box to left of Spool No. on overview record, shown above.

    Result: The Output Request screen displays, as shown below.

  4. Under "Part. output", type 1 after "from page" and 600 after "to page"; then click on .

    Note: You need to do this because the AR1 printer can only hold about 1000 sheets of paper at a time.
    Result: The spool request overview redisplays. A message says "Print request created for spool request".

  5. Repeat steps 3-4, but this time type 601 after "from page" and your last page number after "to page"; then click on .
    Result: The spool request overview redisplays. A message says "Print request created for spool request".

Copyright © 2002, Massachusetts Institute of Technology. All rights reserved.