 VA41
- Create Sales Contract for Single Sponsor or Consortium
  VA41
- Create Sales Contract for Single Sponsor or Consortium
 Use these steps to create a sales contract to schedule billing for a sponsored project. The sales contract is linked to the sponsor and project and includes a billing schedule.
![]() Role
ZSBM=>Advance Scheduled=>Sales Contracts => VA41 - Create Contract
Role
ZSBM=>Advance Scheduled=>Sales Contracts => VA41 - Create Contract
At the Command Line, enter: /nVA41
To complete the initial screen, you need to enter the contract type and information about SAP at MIT.
Contract type (Enter "ZCON" for schedule billing contract)
Sales organization (Enter "1000" for Sponsored Billing)
Note: Parameter ID VKO can be set up in the user's profile with the value 1000 - System -> User profile -> Own data -> (tab) Parameters
Distribution channel (Enter "10" for MIT Distribution Channel)
Note: Parameter ID VTW can be set up in the user's profile with the value 10 - System -> User profile -> Own data -> (tab) Parameters
Division (Enter "10" for MIT Division)
Note: Parameter ID SPA can be set up in the user's profile with the value 10 - System -> User profile -> Own data -> (tab) Parameters
 or ENTER
You need to perform this step only if one contract is being closed out and a new one created.
- From GoTo menu on menu bar, select Header > Financial Accounting.
The Create Contract: Header screen displays; the Accounting tab is open.
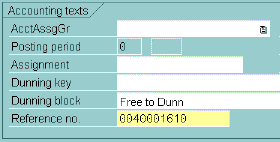
- Type the old contract number (10 digits) in the Reference No. field, as shown below.
Note: You should also enter the new contract number on the old contract record using VA42 - Change Contract.

- From GoTo menu on menu bar, select Overview.
The Create Contract: Overview screen redisplays. Continue with the next steps.
Sold-to party (enter 10-digit sponsor ID number)


Material (Enter "PROJECT" to identify as sales contract for sponsor billing)
 (or ENTER) to display additional system defaults (shown below). The Description
defaults to Sponsored Research Billing and Item Category (ItCa; to right of
Description) defaults to periodic billing, ZCN2.


 (F7)
(F7)


 (or ENTER) to display additional system defaults.
 (F3) to return to Create Contract: Overview screen.
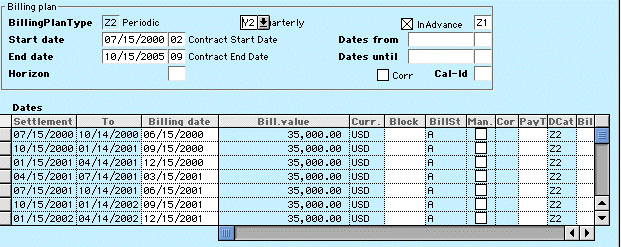
To enter the billing schedule,

 (F6).
(F6).

You can change the periodicity, for example, monthly, Y1;
semi-annually, Y3; yearly, Y4. You can also indicate that it should not
be billed in advance or that it should be billed 2 or 3 months in advance
(Z2 or Z3). You can also indicate that there was an advanced payment by
entering the block ZA, as described below.
 Billing
blocks (Block field) are used to block creation of invoices. There are 5 billing
blocks for sponsor billing:
To apply a billing block, press  or type ZA, ZH, ZP, or ZT into the Block field,
shown above.
 (F3) to return to Create Contract: Overview.


 (F3) to return to Create Contract: Overview screen.

Note: To mark the sponsor record for special handling (including all bills and dunning letters for the sponsor), see XDO2 - Change Sponsor Research Customer Master Records.
![]()
 (F11) to SAVE.
Copyright © 2002, Massachusetts Institute of Technology. All rights reserved.