Exterior Lighting
- 5-light Brakes with installation walkthrough.
- Euro Light Switch
- Disable Daytime Run Lights
- Rear Fog Lights
- Clear Directionals
- E-Code Headlights
- LED Retrofit
5-light Brakes
This is a very simple and cheap modification to a stock A3 in preperation for installing front and rear fogs. In addition, it greatly adds to the rear visibility of the car to help alert those who are unable or unwilling to keep their eyes on the road and not rear end me. A number of people have done this modification and it is pretty straight forward although there are some quirks. Deliverable parts costs are only about $6, so if you have the tools, I'd definitely recommend this.
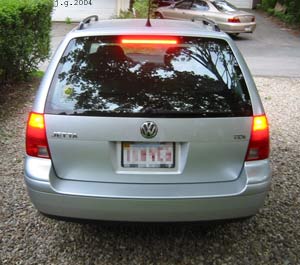 |
| Unmodified Tail Lights |
The first step to this modification probably the most difficult: remove the tailight housings from the body of the car. The lights can be accessed through the panels on the right and left side of the wagon trunk. Remove the wiring harness connector by pressing the tabs in and then take out the upside-down "T" shaped light base. Be careful with the tabs as they are fragile (I broke one). The tail light housings are held to the car frame using three 9mm nuts which need to be removed. This is pretty easy on the passanger side but it helps to use a flexible shaft on the driver. The housing then pulls off the outside of the car. On the driver side however, the foam/plastic bracket that holds the CD changer and Monsoon amplifier is in the way. The entire trunk floor and driver side panel needs to be removed (use a T-30 Torx in the tie downs and then pull it off). Then the bracket can be removed by taking out the four 10mm bolts. Because I want to put the car computer in this in this area, I'm leaving the CD changer bracket out and I just wedged the Monsoon amplifier in for now.
 |
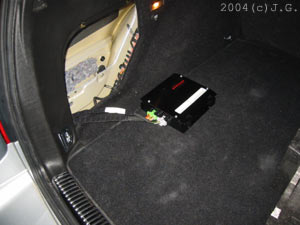 |
| CD Changer Bracket | Bracket Removed |
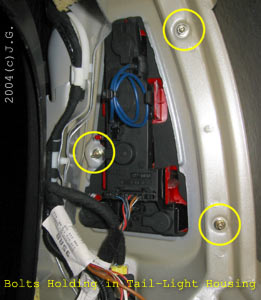 |
| Bolts for housing, Completed modifications |
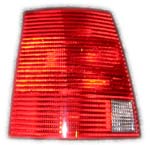
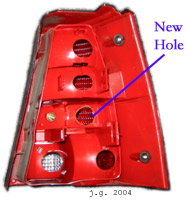
Once the light housings are out, you will see one of the reflector areas does not have a hole drilled in it for a bulb but obviously there is an extra unused bulb receptacle in the "T" light base. Use 1-1/8" spade bit to drill this space out but be very careful not to damage the rest of the housing. Install a P21W (aka 1156 or 7506) bulb and snap the "T" light base back into the taillight housing. I needed to shave off just a little more plastic around the hole to make everything fit.
 |
 |
| Tail Light Housing | Rear of Housing |
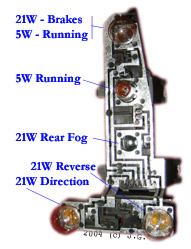
If the European OEM wire harness was installed, the rear fogs lamps would activate with the rear fog switch, but that is not what the first purpose is. On the back side of the "T" light base, there are a number of connector areas besides the main wiring harness. By installing a jumper between the upper "BR" terminal and the "-" terminal (between "31" and "S"), the newly installed lamp will come on whenever the brake lamp is illuminated. The jumper is made with 14AWG stranded wire between 0.187" female quick disconnect terminals. I heat shrinked around the connectors just to be sure.
 |
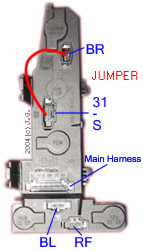 |
| "T" Bulb Positions | "T" Rear Pins |
I noticed that the location of my blinkers and the rear fogs were swapped from what others have in their vehicles. I may choose in the near future to swap these by switching the pins on the main connector. Electrically this is a trivial change, but it does change the light patern significantly. Especially when the complete Euro-spec lights and switches are installed, this could be more important.
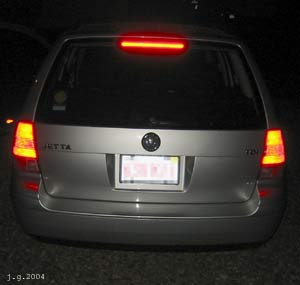 |
| Completed 5-lights Mod |
Euro Light Switch
The North American light switch is crippled. There are two switch positions: on and off. The city lights (i.e. driving lights) are tied into the main low-beams. Because I plan to install front and rear fog lights, I'll need a way to control these independently of the low-beams. Remember that if the low-beams are on when the fog lights are on, one has just defeated the purpose of fogs. Standard US cars have lighting systems that meant to look nice, but are usually flawed in terms of functionality and visibility. Installing the European code light switch is one step to fixing some of these problems.
 The European light switch has seven positions including off. The knob turns clockwise one click to turn on city-lights and two clicks to turn on the main low-beams. Pulling the knob out one click turns on the front fog lights and two clicks turns on the rear fogs. Of course, one now needs to make sure the vehicle wiring supports the desired functionality now that the switch is in place.
The first step involves disabling the Daytime Running Lights (or DRLs). DRLs are not manditory but in low-light or adverse weather conditions can be helpful in making one's car more visible to other drivers. But there is little need to run the low-beams at all times and thereby reduce their lifetime and increase possible glare to others. Also, as stated before, we need to ensure that when we select the front fogs, the main low-beams are disabled. The modification is remarkably simple to perform, even on a non-Euro switch. With the cable harness removed from the rear of the switch, place a small piece of electrical tape over the pin labeled TFL so that it cannot make contact with the wiring harness.
The switch has a red icon that changes to green when the front fog lamps are on. However, the stock switch does not do the same for the rear fogs. It is missing the LED and so the circuit board found inside the switch needs to be changed slightly so an LED and a small bridge wire can be installed. Detailed instructions can be found at http://junglist.org/fogmod/.
Pending. Awaiting LED install.
Disable Daytime Run Lights (DRLs)
There are many pro and anti DRL opinions and each side does have some valid points. However, the main point of this mod is flexibility. I like the look of having the dash lights on, so I will normally run with city lights at all times and I switch on low-beams if necessary for visibility. But DRLs do decrease the usable life-time of the bulb in terms of night-driving hours and I'd rather not have to deal with this. It isn't like we are living above the arctic circle here (although the winters....).
Disabling the DRLs is as easy is covering the pin labled "TFL" on the rear of the light switch with electrical tape. The mod can be undone usually just by pulling the connector back out, which usually ends up pulling the tape off anyway.
Rear Fogs
Rear Fog lights installed per 5-light brake mod above, pending installation of switch and wiring.
If one was only installing the rear fog lamps and not the 5-light brake mod, then only a connection from the switch to the tail light is needed. In some locations, it might be the case that only the driver's side rear fog should be connected, but since these lamps will only be used in poor visibility conditions (i.e. they will be off under normal driving conditions) I'd wire up both sides. A simple Diode-OR function is needed to allow the fogs and 5-light brake mod to interoperate and a few VW repair wires make the setup closer to stock and easier to remove.
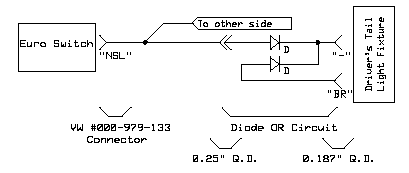
This diagram shows how the wiring harness should be modified to support the rear fog/5-light brakes. The NSL pin on the Euro. switch is contacted by using a VW repair wire #000-979-133. From this, two 14 AWG lines are spiced and are routed to the rear tail-light housing and end in an insulated female 1/4" quick disconnect terminal. The diode OR circuit uses two general purpose silicon diodes with at least a 3A 50PIV rating. Schottky diodes should be usable here as well. The circuit is then tied to the lighting fixture using 0.187" quick disconnect terminals as described above in the 5-light brake mod. If necessary, this entire modification could be pulled out very quickly.
Overall, this wasn't a very difficult mod, just an extension of the 5-light brake mod above. What was a slight problem was removing all the trim to run the wiring resulting in me losing a 8mm socket somewhere in the rear bumper. Because of the use of quick disconnects on both sides, I can independently disable the rear right or left fog or double brake light in about 2 seconds if necessary. Now I'd like to switch the location of the rear fogs and the rear blinkers, but the connector was being very difficult to remove. If I am unable to get it out, I will use the extra repair wires I have and splice the factory harness, but I'd rather avoid this course of action if possible. I also chose to reverse the front/rear switch settings, so the rear fogs activate before the front ones do. This can be changed later.
Clear Front Directionals
Although this is not a very exciting modification, with the eventual change to the black rub-strips, the overall look of the front of the vechicle looks more uniform using crystal clear bumper side markers. Installation was easy by just pushing on the housing and sliding the lights out.
E-code Headlights with fogs
Pending
LED taillight conversion
LED's are wonderful. Anyone who knows me knows that I put LEDs on everything. But LEDs can serve a useful safety purpose on a vehicle. However, it is important to pay attention to the details because it is easy to take a great idea and make it unsafe. How? Because LED's aren't as bright functionally as incandescent bulbs.
I have two reasons for wanting LED indicator lights on my car. The first is aesthetics, I prefer the look of LEDs, the uniform strong color and the quick response. The leads me to the second reason directly related to the speed of LEDs, under driving conditions, and LED light that comes on faster allows for a quicker response. At 60 miles per hour, a 100ms turn on time is approximately 9 feet. Beyond distance, a quickly activating signal is much more likely to get the attention of other drivers as opposed to the graduate turn on/off characteristic of normal incandescent bulbs. There is a functional advantage of decreasing current load and increasing bulb life.
The problem arises when someone tries to install LED tail lights and does not properly account for the true brightness of the LEDs. A single LED isn't as bright as a standard 21W tail light bulb. Actually, even a lot of LEDs don't make up for one bulb. A single P21W bulb has an average flux of 460lm radiating in all directions (service life of ~200 hours). Now look at the light output of an LED, it may have an output of perhaps 1-10lm but that light will be concentrated in a very narrow beam. The narrow beam is what makes the LED look significantly brighter than the incandescent bulb, even though its light output is significantly reduced. Of course, part of the light from the incandescent bulb is blocked by the color filter, where a red LED wouldn't have as much light blocked, but this is still insignificant when compared to the viewing angle problem. A narrow viewing angle will not shine light on to the light housing reflector and will reduce the visibility of the light at anything other than head on conditions. And using about 40 LEDs seems to be somewhat impractical.
The way to get around this is to accept that the LEDs are dimmer, but that we still want the instant-on functionality. It makes sense then to use LEDs to augment the current lighting system. For instance, keep the original brake light, but use LEDs for the 5-light/fog indicator. Use LEDs for city-lights and directional indicators where the total needed light flux is less but there is still enough physical room to mount a dozen or so LEDs. A word to the wise here: those retrofit LED tail light kits DO NOT cut it. I would highly recommend against using them as main brake lights unless the lights are augmented by some other means.
That said, I believe that I may switch to white LEDs for the rear licence plate lights if I can add enough of them.
Pending