Building a MacOS Installer
by Scott McGuire
(smcguire@mit.edu)
and Rick Gansler
(rick@gansler.com)
Last Updated: September 3, 1997
Table of Contents:
Files You'll Need
MacBinary, BinHex, and ASCII
Step 1 - Encode & FTP the files
Step 2 - Create Alias files
Overview
The Control File
Using MakeAlias
Step 3 - Example of Using VISE
Step 4 - Setting FTP options
Step 5 - Test the Installer
Miscellaneous, but Important Information
Updating an
Installer
"Don't Quit" Application Exceptions
Files You'll
Need
To create an installer, you will
need the following:
* MindVision Installer
VISE - creates the actual installer.
(1) You can download the latest version of VISE from
the MindVision site (these
instructions assume version 4.6).
(2) MIT has a site license for VISE. The registrations numbers
you'll need are stored in the license directory of the
installers locker (path:
/afs/athena.mit.edu/project/installers/license/ ). Access to these
are restricted to members in the installers acl.
* StuffIt Lite or
StuffIt Deluxe - creates a "MacBinary" version of each file that
is part of the installer. An ftp server cannot normally store MacOS
files. MacBinary is a file format that retains all the MacOS file
information, yet uses a storage format that is compatible with an ftp
sever. Download StuffIt Lite from the
Alladin site. (Stuffit
Deluxe is also an alternative, if that is available to you.)
*
Fetch -
an ftp client program that is used to copy files from your Macintosh
to the ftp server.
* The
MIT
FTP Installer Tools distribution, which contains:
* MakeAlias - creates custom "alias" files that
VISE uses to build the installer.
* FTP Installer Code Resources - a ResEdit file containing the
add-on routines for VISE that allow files to be downloaded via FTP.
* Convert Files To MacBinary - an Applescript droplet to convert
multiple files to MacBinary format at once.
* Kerberos Template.vct - a VISE installer project to install
KClient and/or Kerberos 5; use this project as a base for your
installer.
MacBinary, Binhex,
and ASCII Files and Filenames
MacOS files can not be stored in their normal format
on an ftp server. The files must first be specially encoded. The
reason for this is that Mac files have both a data "fork" and
resource "fork". In addition, Mac file attributes (such as creation
and modification dates, file type, position of the icon in the Finder
window) would be lost if the file were not encoded.
Two encoding methods are supported in the installer - MacBinary
and BinHex.
A MacBinary file consists of a 128 byte header containing the file
attributes, followed by the data fork, followed by the resource fork.
Since the MacBinary file is a "binary" file, its size is only
slightly larger than the original file, and decoding it can be done
relatively quickly.
BinHex files are ASCII files. Some e-mail systems can not transfer
a binary file, so you might receive an ASCII BinHex file via e-mail.
If you want to use BinHex in the installer, keep in mind that these
files are significantly larger than the original file. BinHex files
are more complex than MacBinary, so take longer to decode.
This installer can decode both MacBinary and BinHex files
on-the-fly. We recommend only using MacBinary,
and the instructions below will only refer to MacBinary. Other
programs, such as Navigator and Fetch, will download and save the
encoded file, which is then decoded using a program such as StuffIt
Expander. This presents two problems. The first is that a program
such as Stuffit Expander must be present on the local machine. The
second is that the two copies of the file are saved to disk - the
larger MacBinary or BinHex, then the decoded file. Using the
on-the-fly method only the decoded file is saved, saving both disk
space and time, since writing and reading from disk is slower than
operating on data already in memory.
Step 1:
Encoding the Files
Create the MacBinary version of
each file that is to be included in the installer:
Method 1 - Using the "Convert Files to MacBinary"
(1) In the "FTP Installer Tools" folder
provided in the distribution, there is an Applescript applet called
"Convert Files to MacBinary". You can use this to create MacBinary
versions of all the files you need to upload at once, which is handy
if you have a lot of files to be encoded.
(2) To use, drag the files or a folder containing your
files on to the "Convert Files to MacBinary" icon.
(3) Stuffit Deluxe will launch (the applet may ask you to
locate your copy of Stuffit Deluxe the first time you use it), all
your files will be converted, and Stuffit Deluxe will quit.
(4) A MacBinary version of each of your files (they will
have a generic icon and a ".bin" suffix) will reside in the same
folder as the original file. You will have to go through the folder
and collect them (it's probably best to move them to a new folder).
Method 2 - Using Stuffit Lite/Deluxe only
(1) Launch StuffIt Lite/Deluxe.
(2) From the "Translate" menu, choose the "MacBinary
Encode" option.
(3) Select the appropriate file, and click "open". You may
choose any name that you want, but it is strongly suggested that
MacBinary filenames end with a ".bin" suffix. (See "Fix Filenames"
just below.)
(4) Repeat steps 2-3 for all your files.
Fix Filenames
It is required that the filename of the encoded file be compatible
with the naming conventions on the ftp server. Do not use Mac-specific characters or blank spaces in
a filename. (Mac-specific characters are the ones that you
type using the "option" key. Spaces should be replaced with an
underscore. "file name.hqx" becomes "file_name.hqx".)
Also keep in mind that while the Mac retains upper and lower case
in filenames, the operating system doesn't really care about it. When
using the ftp server, however, you must refer to a filename's case
exactly the way that you saved it.
Since they will be uploaded to the ftp server, make sure the
filenames of the MacBinary files contain no spaces or Mac-specific
characters. They should also match the pathnames listed in your
control file (see below).
Upload the MacBinary Files
The MacBinary files need to be uploaded to the net-dist.mit.edu
ftp server. However, since access to net-dist is limited, for now you
should send mail to the installers list when you're ready to
ftp your files to net-dist. Someone will contact you and help upload
your files.
Step 2:
Create Alias files
Using MakeAlias to create the
installer placeholders:
Overview
You should not add either the original files or the MacBinary
files to the VISE installer. Instead you will add a special kind of
alias file.
* What is an alias? On the Macintosh, an alias is a
file that refers to another item (such as an application, file, or
disk). When you open the alias, the original file opens. The alias
has the same icon as the original file, but its name is displayed in
italics.
Normally, to create an alias, you would select the original file
and choose "Make Alias" from the Finder's "File" menu. The Finder
creates the alias in the same directory as the original file, and
names it the same as the original file with "alias" appended to the
end of the filename. The alias files that are needed to build the
installer require a few extra features, so a special program called
MakeAlias is used to build the custom installer alias files.
The custom aliases MakeAlias creates differs from normal aliases
in three ways:
* They have exactly the same name as the original
file, so when they are created they are placed in a new subfolder in
the same folder as the control file (see below).
* Each is the same size as its source file. This is necessary so
that VISE will know the size of the actual file and can calculate
disk space requirements. (The data fork of the custom alias file gets
filled with zeros to mimic the original file size. VISE will compress
these zeros down to almost nothing.)
* The data fork of the custom alias contains the path and filename
that the file will have on the FTP server.
The Control File
MakeAlias requires a "control file" to tell it which files to make
custom aliases of, and what ftp pathnames to associate with them.
The control file is a plain text file with tab-delimited entries.
Each line should consist of:
- the Mac path name (either a complete path name, or a partial
pathname, assumed to start from the folder the control file is
in);
- followed by one or more TAB characters;
- then the path name of the file as it will be stored on the FTP
server;
- followed by a return character.
Example FTP pathnames might be:
/mit/bin/mac/krb/r1/KClientPrefs.bin
/mit/bin/mac/macdiscuss/1.1/r1/MacDiscuss_Guide.bin
The methodology we have chosen for creating pathnames is as
follows:
- start with /mit/bin/ ;
- followed by the destination machine type (e.g., /mac
);
- followed by the product name (e.g., /krb or
/macdiscuss );
- followed by the version number of the software if there is one
(e.g., /1.1 for MacDiscuss, the kerberos installer has no
version because it has several components, each with different
versions);
- followed by the "release" of the installer (e.g. /r1
or /r2 ), this is in case new installers for the same
software are created after the initial installer is released.
- It is assumed that all files will be stored on the server
"net-dist.mit.edu", so don't include a server specification in the
pathname. (To use files from a different server, refer the section
"FTP Preferences". )
The control file may also include blank lines and comment lines
(the first character of the line must be a # [pound sign]).
Click here for a sample control
file.
Note that it's acceptable to have spaces in the Mac path names,
but you should not use them in the FTP path names (although MakeAlias
will not complain).
MakeAlias will strip extra white space from the front and end of
each path name, and will do some rudimentary error checking.
MakeAlias generates a log file reporting which aliases it created
successfully, and any problems it may have had.
The control file can have any name, but it's recommended you give
it a name related to the project for which you are creating an
installer. We have been giving them an extension of ".icf"
("installer control file"), but that's not necessary. (The control
file's name is also the basis for the name of the folder that will
hold the custom aliases, and the results log.)
Using MakeAlias
(1) Create the control file as specified above (with a text
editor such as BBEdit or SimpleText).
(2) Either drag the control file's icon onto the MakeAlias
icon, or launch MakeAlias and it will prompt you to select a control
file.
(3) MakeAlias will create a folder to hold the custom
aliases, create the custom aliases, and create a log file. The custom
alias folder and log file are placed in the same directory as the
control file.
* If the control file is named "Foo.icf", the custom
alias folder will be called "Foo.icf Aliases", and the log file will
be named "MakeAlias Log-Foo.icf".
* If a folder for custom aliases already exists &endash; because
you've run MakeAlias previously &endash; MakeAlias will go ahead and
reuse it, overwriting any aliases with duplicate name that may
already be in the folder.
(4) No attempt to duplicate the directory structure of the
original files is made; the custom aliases will all be at the top
level of the new custom alias folder. You should reorganize the files
into folders and position the files as you want them to appear on the
user's computer.
(5) MakeAlias will ask you to consult the log if errors
occurred while it was creating the custom aliases. However, you
should probably read the log regardless, to confirm that MakeAlias
operated as expected.
|
Remember:
|
|
*
|
The filename of the alias file must be the same as the
filename of the original file.
|
|
*
|
The filename part of the ftp pathname that you specify in
the MakeAlias control file must be the same as the filename
used on ftp server (which should be the same as the
MacBinary file's name).
|
Step 3:
Example of Using VISE:
The following instructions provide an example of
creating an installer using VISE 4.6.1 .
For your convenience, a Kerberos Template VISE project file has
already been created and is available for you to use as a base for
your installer projects. It is distributed as part of the MIT FTP
Tools Distribution. This should prove useful if your installer
requires the KClient or Kerberos 5 as part of the install package.
This example uses the MacDiscuss installer to describe the
process. It assumes the custom aliases for all new files to be added
have already been created. (The kerberos file aliases have been
provided as part of the distribution - you shouldn't need them, but
they're there just in case.)
(1) Make a copy of the Kerberos Template.vct file
and rename it (e.g., to MacDiscuss.vct).
(2) Launch VISE and open the project file (or just
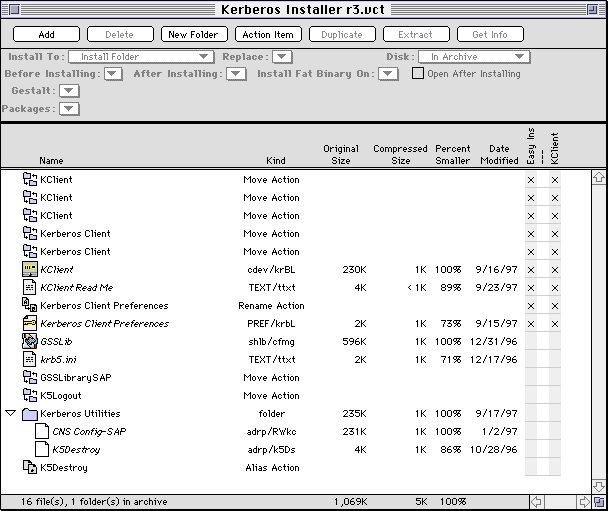
double-click on the project file). You will see the
project window with the
Kerberos files already set up.
(3) Now you need to tell VISE where it can find the code
resources file to include in the final installer application. This is
very important, since the installer won't run without them!
(a) Go to the "Archive" menu, and choose the
"Archive Settings" item. The Archive Settings dialog appears.
(b) Click on the "Advanced" tab. Click on the "Set Resource
File..." button in the "External Files" section near the bottom of
the dialog. A standard open file dialog appears.
(c) Navigate to find the file called "FTP Installer Code
Resources". It is probably located in the folder called "FTP
Installer Tools". Select the file, and click on the "Open" button.
The pathname should appear in the box to the right of the "Set
Resource File..." button.
(4) Still in the Archive Settings dialog, with the
"Advanced" tab selected:
(a) In the "External Codes" section, make sure
"ftp" from the "Before Install" popup menu is selected.
This is a very important step. At startup, the ftp
code perform two tasks:
- It will open the FTP connection to the server; and
- The ftp code will check for the existence of a file called
"notice.txt" (suggested
name, see below). If that file exists, then the contents of the
file will be displayed to the user, and the user is given the
opportunity to cancel the installation. This file would typically
be added to the ftp files directory when the installer has become
out of date. (See below for information on
how to set the pathname the installer will use to look for this
file.)
(b) Still in the "External Codes" section, make sure "ftp"
from the "After Install" popup menu is also selected.
This tells the installer to close the FTP connection
with the server after all the files have been transferred.
(c) Close the "Archive Settings" dialog by clicking on the
"OK" button.
(5) From the "File" menu, choose the "Preferences" item.
Make sure that the item "Archive Original Instead of Alias" is
not checked.
(6) Drag the alias files (created with MakeAlias) for your
product to the VISE project window.
Example: MacDiscuss has four files in addition
to the kerberos files - the application, an AppleGuide help file, a
read me, and a version history. Aliases of these files have been
created and placed in a folder called "MacDiscuss". This folder is
dragged and dropped to the project window.
(7) In the VISE project window, for each file that you just
added:
(a) Select the file in VISE project window.
(b) From the "After Installing" popup menu, select the
"ftp" item.
(c) Select the options from the "Install To", "Replace",
and "Gestalt" popup menus as appropriate.
(8) Two packages already exist in the project file - "Easy
Install" and "KClient". "Easy Install" is the default set of files
that will be installed; any other packages will only appear on the
Custom Install screen of the installer.
Easy Install
The KClient files are already marked as part of this package. Any
new files that you added (step 6) should have been marked as part of
the Easy Install package as well.
KClient
Installs just the KClient software (removing out-of-date versions).
NOTE: In theory there should be a "Kerberos 5" package which
installs the Kerberos 5 files (GSSLib, CNSConfig, etc.). However, the
Kerberos 5 package has been deleted from the template, although
placeholder files are still in it. You should not offer the Kerberos
5 files for installation unless your application absolutely requires
them. This is because we will be changing the Kerberos 5 files in
the near future.
(9) Create any additional packages you want. It is
suggested that you create at least one more package for the files of
your product.
(a) Go to the "Archive" menu and choose the
"Edit Packages" item. The Packages dialog appears.
(b) Click on the "New Package" button. The Edit Package
dialog appears.
(c) Enter a name for your package (e.g., "MacDiscuss") in
the Name field.
(d) Enter a brief description of the files this package
will install, and if appropriate, who should install them in the
Description field (e.g. "This package installs the MacDiscuss
application, AppleGuide file, and read me files.").
(e) Consult the VISE manual for information about the other
options. Click on the "OK" button when finished. Then either create
the next package you need, or click on the "OK" button to dismiss the
Packages dialog.
(10) Add (or reassign) files to the appropriate packages.
For each file:
(a) Select the file/folder in the VISE project
window. (Adding or removing a folder from a package adds or removes
its entire contents from a package as well.)
(b) Either go to the "Packages" popup menu and check (or
uncheck) packages from the list as desired; or
(c) On the far right of the VISE project window, you will
see a series of columns with X's in them, and the names of the
packages as the column headers. Click at the intersection of the
file/folder's row and the desired package's column to add/remove a
file/folder from the package.
Example: we add the entire MacDiscuss folder to the
MacDiscuss package, and double-check to make sure it is part of the
Easy Install package.
(11) Some tips on packages:
- If your product requires Kerberos 5 instead of KClient, you
should remove the KClient files from the "Easy Install" package,
and add the Kerberos 5 files to it.
- If there are any parts of your product that you do not want
installed automatically, be sure to remove them from the "Easy
Install" package and create a separate package for them.
(12) Enter the "Easy Install Text". This is short,
descriptive text that appears on the main installer screen, telling
users what your installer does.
- To edit the "Easy Install Text", go to the "Archive" menu and
choose "Archive Settings". Click on the "Interface" tab. In the
"Easy Install" section, click on the "Edit Easy Install Text..."
button.
- Begin by warning the user that the installer needs a network
connection. The wording we recommend is:
This installer requires an active connection to MITnet.
Please make sure you have such a connection before proceeding with
the installation.
- Then describe what the installer will install:
Click on the "Easy Install" button to install the
MacDiscuss application and help guide, and KClient.
- You may also want to note any special installations that are
only available as custom install options.
- Click on the "OK" button to accept the Easy Install Text.
(13) You should also:
- Assign a read me file (go to the "Archive Settings" dialog,
click on the "Extras" tab, and click on the "Select File..."
button in the "Read Me" section);
Optionally you may want to:
- Add splash screens (place the graphic for the splash screen on
the clipboard, go to the "Archive Settings" dialog, click on the
"Extras" tab, click on the appropriate square in the "Splash
Screen" section, and paste);
- Create and add an installer icon (go to the "Archive Settings"
dialog, click on the "Attributes" tab, and follow the instructions
in the "Installer Icon" section).
- Add a License Agreement (VISE can display these separately
from a Read Me) if the files your installer installs are
distrubted at MIT under special agreement ( "Archive Settings"
dialog, click on the "Extras" tab, and click on the "Select
File..." button in the "License Agreemet" section).
(14) Save your work and create the installer:
(a) Choose "Save" from the "File" menu.
You should notice that the numbers in the "Compressed
Size" column of the project window will be zero, and the "Percent
Smaller" will be very close to 100%. If these numbers are
significantly different from what you see, then you might have added
the original files rather than the alias files.
(b) Then choose "Build Installer" from the "File" menu.
(Enter a name for your installer; the "segment size" option should be
left as "Fill Disk".)
If the installer says, "There are resources in the
file 'FTP Installer Code Resources' which are not in the valid range
of 5000-10000. Please renumber these items and try creating your
installer again.", do not worry. This is normal.
Go to the "Archive Settings" dialog, click on the "Advanced" tab,
and make sure the "Allow Installer Resources To Be Replaced" button
in the "External Codes" section is checked. The "FTP Installer Code
Resources" file includes several resources that require this box be
checked for inclusion.
Step 4:
Specifying FTP Options:
(1) Using ResEdit or Resourcer, edit the
installer file you have just created.
(2) Now double-click on the "STR " item, then double-click
on the resource ID 6000 .
(3) In the field that is labelled "The String", enter the
string to be the path where the "notice.txt" file will be stored on
the ftp server.
If the installer finds this file, it will display it and suggest
to the user to stop the installation. (Usually this path should be
the same directory that you have chosen to store the other ftp files
for this product in.)
Example: For MacDiscuss, the ftp files will be
stored in /mit/bin/mac/macdiscuss/1.1/r1/ , so the string we
enter in "STR " #6000 is
/mit/bin/mac/macdiscuss/1.1/r1/notice.txt .
(Ignore the "DATA" field.)

|
If you do not perform steps 2-3, your installer will give
an error and refuse to run when you try to use it.
|
(4) You may also want to edit the "STR#" resource ID #1000,
item 26. This is the name of the VISE Install Log File (different
from the ftp log file, below). You can change it from the generic
"Install Log File" to something more specific such as "Eudora 3.02
Install Log File"; be sure not to exceed 31 characters (the limit for
Mac file names).
(5) Optionally, double click on the "pref" item, then
double click on the resource id "6000". (For most people the default
settings will be fine.)
You may set the following options:
Use Log File: default: false
A file will be created in the same directory as the
installer that chronicles the ftp part of the install. It may prove
useful if something goes wrong with the install, and the user needs
to request technical assistance.
For shipping installers, this should be remain false.
Silent: default: false
If silent, then no error alerts will be displayed,
which is probably not a good idea. If something goes wrong, you
probably want the user to know.
For shipping installers, this should be remain false.
Host: default: net-dist.mit.edu
If for some reason the files for your installer are to
reside on a server other than net-dist.mit.edu, put the hostname of
that server here.
Username: default: anonymous
This should never be changed.
Password: default: macftpinstaller
The password should be changed to the name of the
installer that you're editing, so installer usage can be tracked in
the net-dist ftp logs. The suggested format is, if your program's
name is "foo", change the password to be "foo@macftpinstaller".
Log filename: default: (blank)
If you specify a log filename, then it will be used.
Otherwise, a name will be created at runtime, using the current date
and time. For example: "Tue, Aug 27, 96 10;26;03 AM".
(A few of the fields are not used in this version. They are
labeled in the ResEdit template as "unused".)
(6) Save the file and quit ResEdit.
Step 5:
Test the Installer
(1) Test your installer locally before
distributing it. Test the Easy Install, and each Custom Install
option, to make sure they do what you expect. You should also test it
under both MacOS 7.x and MacOS 8.0; there are several significant
differences between the two which may affect installers.
(2) Then make the installer available to the installers
group for testing prior to releasing it to the public.
Miscellaneous, but Important, Information
Updating an Installer
If you use the "Update Archive" feature of VISE
(consult the VISE manual for details), you must be extremely careful
of these two points:
(1) Be sure you select your new aliases, not the original
files, when showing VISE matching files.
(2) VISE may not recognize alias files as updated even
though they have been. You should force VISE to update all the files
by checking all the boxes in the "update" window. It doesn't hurt to
update the information about files that haven't changed, and this
will make sure all your changes are incorporated.
This supersedes a statement in previous versions of this document
that you couldn't use the Update Archive feature of VISE to fix
aliases you had to replace.
"Don't Quit" Application
Exceptions
Starting with version 4.6, VISE provides a way to
specify applications that shouldn't be quit when the installer quits
all applications to install system extensions.
This is important for the FTP installers because previously, under
VISE 4.5 and earlier, on certain systems (Powerbooks and users of
Geoport adapters) the installer would force the Express Modem
software to quit. This caused the PPP connection to drop, preventing
the install from taking place.
In VISE 4.6 and later, the 'SdEx' resources specify the file type
and creator of applications that should not be quit. In the FTP
Installer Code Resources we have specified two in 'SdEx' ID #1000:
|
Application
|
Type
|
Creator
|
Reason
|
|
Express Modem Background App
|
cdev
|
3615
|
If quit, PPP connection drops.
|
|
HP Backgrounder (for HP inkjet printers)
|
appe
|
HPBG
|
Sometimes doesn't respond to quit AppleEvents, which
confuses the installer.
|
A template is provided for the 'SdEx' resource type if you decide
you need to add your own (add to the end of the list of 'SdEx' ID
#1000). However, be sure to have a very good reason for excepting an
application.