The Paintball project illustrates some of the basic game-play elements that can be easily programmed with StarLogo TNG. This includes movement, collisions, terrain and "say bubbles". In this game we'll create a breed of agent called "Mario" who will run around and fire spheres of paint and some turtles to give them some color.
Setting up Breeds
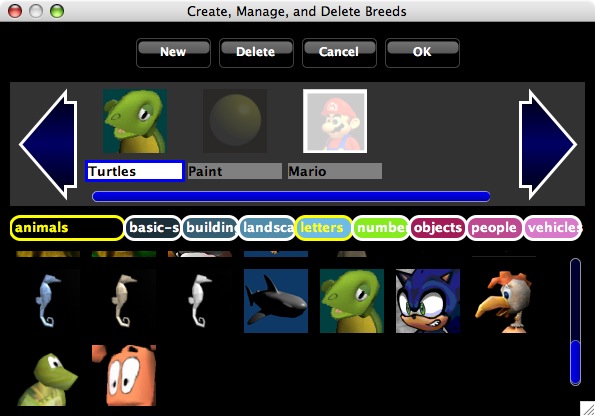
| We start this game by thinking about the breeds that we'll need. Let's leave the Turtle breed (though we'll change its shape in a minute). But let's add two new breeds. We'll add Mario who will look like Mario. And we'll add Paint that Mario can throw. Go to the Breed Editor (find the Edit Breeds all the way at the top to the right of the My Blocks button). Click add breed and give the name Mario to the breed and select Mario as the shape. Make another breed called Paint and select the sphere shape for that one. Finally click on the Turtles breed and select the other turtle as the shape (the one with a slight blue background - these are turtles that can be painted different colors). |
 |
Movement
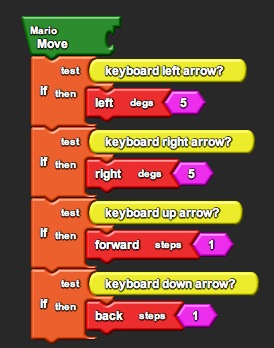 |
You saw in the epidemic tutorial how agents can move using the forward, left and right commands. To make a game you can use keys on a keyboard or joystick controls in combination with those commands. In this example we'll use the keys on a keyboard. To get started, let's begin with by defining a "Move" procedure. Grab a procedure hat from the Procedures tab. Put this on the Mario section of the canvas and name it Move. We want move to respond to the left, right, up and down arrow keys.
Grab an If block from the Logic tab and attach it underneath the Move procedure hat. For the test condition, go to the Controls tab and grab a block that says "keyboard left arrow?". This block will only be true when someone is hitting the left arrow key. In the then part of the block, attach a left block and change the angle to 5. Bring out another if block (or copy the one that is out there using control/command-c to copy and control/command-v to paste) and instead of the left arrow key, use the drop-down menu to change this to the right arrow key and change the left 5 to right 5. Copy the block again, and change the key to be the up arrow key. Make the condition forward 1. Finally repeat that last step only using a down arrow key and a back 1 block. This can all be easily done by copying the last block you used and changing the conditions. |
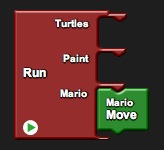 You can already do some interesting things here. Drag out a Forever block onto the Runtime space on the canvas. Drag out a Move call block from the Mario drawer. Create a new Mario by grabbing a Create Mario block from the Mario tab (under My Blocks) and putting it on the setup area. Change the number to 1 and double-click to create a Mario. Change to the "agent-eye" view by clicking on the Agent View button in Spaceland. Now start the Forever block (using either the runtime or blocks modes). Try navigating around using the arrow keys. See how Mario moves around the world.
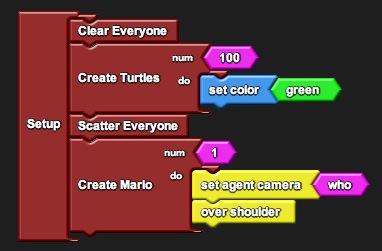 To setup the project correctly we'll need to create some characters to paint for Mario and Mario himself. Let's clear everyone, create some turtles and then create a single Mario. This should all look pretty familar with one exception. We want the camera by default to be looking out of Mario's eyes. So when we create Mario with a Create Mario and Do block, we put inside the "do" part "set agent camera who". This will set the camera to be looking out of the eyes of Mario.
Launching Paintballs
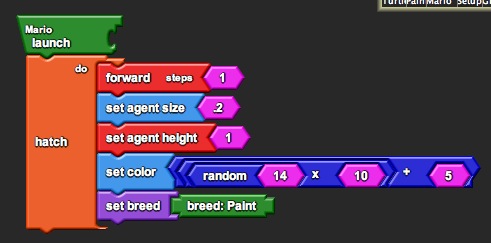 Let's figure out how Mario can launch paintballs. We'll create a new procedure called launch. This procedure will "hatch" a new agent. Hatch creates an exact copy of an agent. But it also allows us to do some things to that newly created agent. In this case we want to create a small sphere and set it going. Grab a hatch and do block from the Logic tab and attach it to the launch procedure. Inside of the hatch we want to have that new agent move forward a little, get a lot smaller, move off the ground, change its color to a random color and change its breed to "Paint". You should be able to easily move the agent forward. You can find the set agent size (change to .2) and set agent height blocks (change to 1) in the traits tab. Color is a little tricky. There are 140 whole number colors in StarLogo TNG (there can be fractional numbers as well). The "main" colors in StarLogo are all of those that end in 5 (5, 15, 25, 35, etc.). These are all of the named colors. To create agents of only those colors you take a random multiple of 10 and add 5 to it. The blocks here show how to do that. Finally you can set the breed using a set breed block from the tab and then use a breed string block that you will find in the Paint breed tab to fill it in.
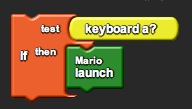 Now we have a procedure to launch paintballs. But that procedure needs to run some time. Let's add an additional key at the end of the Move procedure that has the "a" key call this launch procedure. That way when we press the "a" key a new paintball will launch.
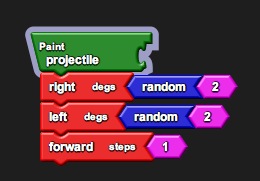 If you try to run your procedure now, you'll find that it doesn't do much. It creates a new sphere but it doesn't go anywhere. In order to get it moving we need to tell Paint how to move. One way to do this is to tell them to move forward, but add a little bit of randomness. This is similar to how we made the spheres move in the epidemic model, and is called a random walk. The block stack ont the right shows a new procedure called projectile that runs such a random walk. Put this procedure in the Paint space on the canvas. Then go to the Paint tab and pull out a call projectile procedure block and attach it in the spheres space on the Forever block.
Collisions
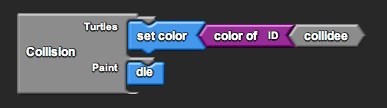 Now that Mario can move around and launch spheres, we actually want the paintballs to change the color of the turtles that they collide into. We can use a version of the collision block similar to the one we saw in the epidemic tutorial. Drag out a collision block from the Turtle's tab and put it on the Turtle space on the canvas. You will see several collision blocks in there, one for each possible pair of agents on the screen. The one that you want is the one that has 1: Turtles colliding with 2: Paint. In the Turtles part of the block grab a set color block and change the color to the color of the sphere being collided with. You can get that color by going to the Other Agents tab and grabbing a agent-color of block. Attach a collidee block to the agent-color of and that agent will set its color to the color of the agent it is colliding with.
Once the Paint has Collided with a Turtle its job is done and it can go away or "die". So you can grab a die block from the Traits tab and attach it to the Paint part of the Collision.
Now try running the project. You should be able to paint the turtles now.
"Speech"
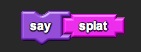 While there are now sounds in this version of StarLogo TNG, agents can "say" things through "say bubbles", much like the bubbles that you would see in comic strips. To get agents to say things you use the say command found in the Strings tab. Let's add a "splat" when a sphere collides into a Turtle. Grab a say block and attach it beneath the set color block in the Collision. Go to the Strings tab and bring out an empty string block (it will say "abc") on it. Edit the string to say "splat" or whatever you like. Now run the model and see what it looks like when paintballs collide into turtles.

Editing Terrain
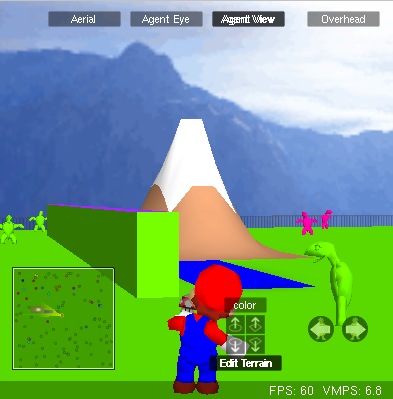 One other interesting thing you can do with StarLogo TNG is edit the "terrain". The landscape need not be a flat green square, you can add craters, mounds, plateaus and colors. To edit the terrain, click on the
 Edit Terrain button at the bottom of Spaceland. This will take you into terrain editor mode. Try using the four tools (starting from the top left and going clockwise: build mound, build wall, dig a wall, and build a crater) that are provided to change the shape of the terrain. These can all be combined with colors that you select with the Color button. You can control the height of the mounts or depth of the craters with the scroll wheel or by clicking on the buttons multiple times. To change the terrain just click and drag over areas.
When you are done editing your terrain just click off of the Edit Terrain (Note: in future versions there will be multiple terrains that can be selected programmatically to create "levels").
When you view your terrain in StarLogo TNG you should see the mounds and craters that you built. Note that all agents glide along the surface of the world by default, staying at their current "height above ground". Consequently, if you launch a sphere from one side of a crater, over the crater, it will come down into the crater and then come back up on the other side. It is possible to have more "realistic" interactions, but you'll have to experiment with that by programming.