StarLogo Tutorial |
|
|
 |
|
|
|||||||||
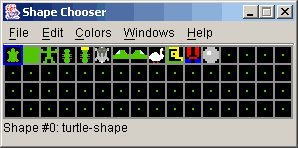
created by the StarLogo development team, MIT Media Lab, Alan Epstein, Rebekah Wahba, and Robert TauStarLogo is a program used to control "turtles" on the screen, much like Logo. However, unlike Logo, StarLogo enables you to program hundreds or even thousands of turtles and program the "patches" underneath the turtles too! StarLogo is used primarily for modeling systems that have no leaders. Some examples of these "leaderless" systems in our everyday world are bird flocks, traffic jams, and termite and ant colonies. Let's create a program to model a colony of artificial termites! As you go through this tutorial, you will be asked to type some things on the computer. These will be in Bold letters so it will be easy to figure out when and what to type. |
|||||||||
|
|||||||||
|
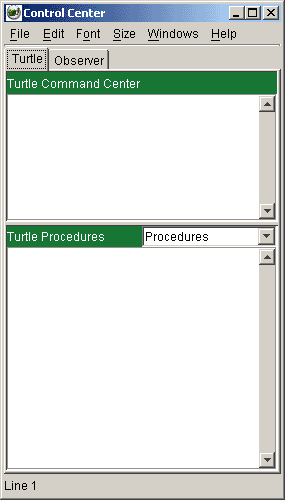
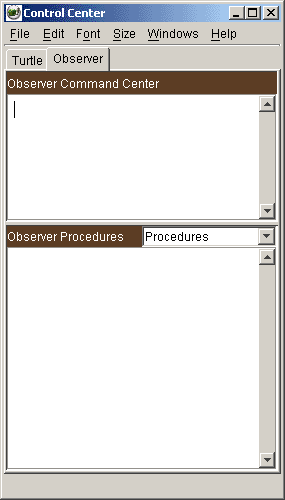
Start up the StarLogo program, and select the New menu command from the File menu to start a new model. There are four panels in the Control Center, only two of which you can see at a time. There is a Command and Procedures window for the Turtles, which should be initially visible. There is also a Command and Procedures window for the Observer that can be accessed by clicking on the Observer button at the top of the window.
When you want to tell a turtle to do something you can type the command in the Turtle Command Center or in the Procedures window. Commands typed in the Command Center are executed immediately while commands typed in the Procedures window must be called by either a button or another command in the Command Center window. Commands typed in the Turtle window will be executed by all the turtles. If you want the observer to do something (like create new turtles or change the color of all of the patches), you need to click on the Observer button and type those commands into the Observer window. |
|||||||||
|
|||||||||
|
When you first open StarLogo, the program gives you some turtles to start. (If you start a new project then you have to create some turtles yourself using the create-turtles Observer command and a number. If this is the case then skip the next section and move to "Creating Turtles". Try typing fd 10 in the Turtles Command Center, and return or enter. And there they are! Since they are all facing out in different directions, by moving forward they create a circle. Also notice that you only typed fd 10 once and all of the turtles moved at the same time! Each command you type is run by all of the turtles. |
|||||||||
|
|||||||||
|
So how can you make your own turtles? First, type clearturtles (ct) in the Observer Command Center to get rid of the existing turtles. Then, in the same window type crt and a number to create that number of turtles. You might be wondering, "Where are all the turtles?", since it looks like there is only one turtle in the center of the StarLogo window. Well, they're actually stacked up on top of each other. If you want to see them all, switch to the Turtles Command Center and type fd 30. |
|||||||||
|
|||||||||
|
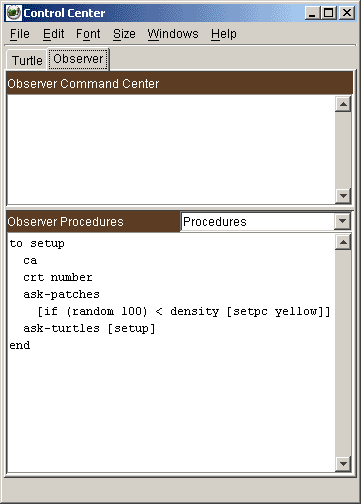
A procedure is a collection of commands, like the ones you have typed in the Observer Command Center or the Turtle Command Center, that get used together. All you have to do is type the name of the procedure to make all the commands in that procedure run. All procedures go in one of the Procedures windows. First, let's put these first few commands into a setup procedure in the Observer Procedure window. Remember though that the Observer can only control the patches and the creation of the turtles; it can however, send messages to the turtles to ask them to do things. We need to use the special command ask-turtles when we are in the Observer window and would like to ask the turtles to do something. to
setup Remember that the word to begins every procedure. (In this case, you are telling the computer how to "setup"). The word 'end' must also close every procedure so that the program knows when your commands are finished. Try running your first procedure. First type ct in the Observer Command Center to clear the turtles. Now type setup, and watch your turtles appear. Typing setup caused the setup procedure to run. But what if you don't want to have to type ct every time you start over. You can incorporate that into the setup procedure: to
setup
Now the turtles will be automatically cleared each time you type setup. Try it. |
|||||||||
|
|||||||||
|
So far, so good. Save your work up to this point. Use the Save As command in the File menu an, and type your name as the file to save. Click OK. It's usually a good idea to save your work every once in a while. |
|||||||||
|
|||||||||
|
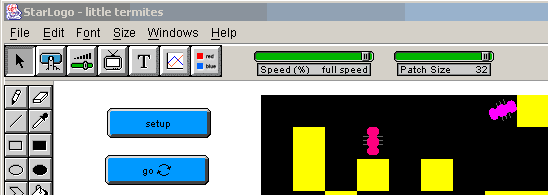
To make it even easier to run the setup procedure, you can create a setup button. Then, when you press the button, StarLogo will run the procedure setup. First, click on the blue button icon at the top of the main StarLogo window. Then click on the white space below the icons. When a window pops up, type setup in the box where it says logo instruction. Now you have to select the location where you put your setup procedure. Since you put it in the Observer Procedures select Observer.
Now you have a setup button that when pressed, will run the StarLogo procedure called setup which creates 30 turtles and moves them forward. Try pushing the button. |
|||||||||
|
|||||||||
|
You just created 30 turtles (or termites). Let's make all of your termites blue. Use the setcolor command, or just setc blue, to set the color of the turtles to be blue. Type setc blue in the Turtle Command Center. Now try making them red (setc red) and add that to your setup procedure: to
setup
|
|||||||||
|
|||||||||
|
You're now ready to create the woodchips. While we could use the turtles for woodchips, it is easier to use patches.
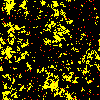
You can draw in your own woodchips by using the StarLogo paint tools. First, click on top of the main StarLogo window. Then, click on the paint brush icon to choose the painting option. The paint palette will pop up. In the box on the left, click on the pencil icon. In the box on the right, click on yellow so you can draw yellow woodchips. Now just click on the canvas wherever you want the woodchips to appear. You can also set the color of the whole patch-canvas by using the Observer Command setpc and the name of a color or the number of a color. Another way to change the color of a single patch is to use the Turtle Command stamp. For example type this in the Turtle Command Center repeat 100 [fd 10 stamp yellow] This says to the turtles to walk 10 steps and change the color of the patch they are on to yellow. They all repeat this action 100 times. |
|||||||||
|
|||||||||
|
The previous procedure did not really create a random arrangement of woodchips. If we want to really scatter the woodchips we need to change the direction of each turtle, and use the random command. Type this in the Turtle Command Center: repeat 100 [seth random 360 jump random 200 stamp yellow] This says that each turtle should jump in a random direction and stamp the patch that it lands on yellow. Each turtle should repeat this process 100 times. Now we can write a procedure that puts woodchips on the patch-canvas. Put this procedure in the Turtle Procedures window. to
patch-setup Next we can add this command to the setup procedure in the Observer Procedures window which now looks like this: to setup
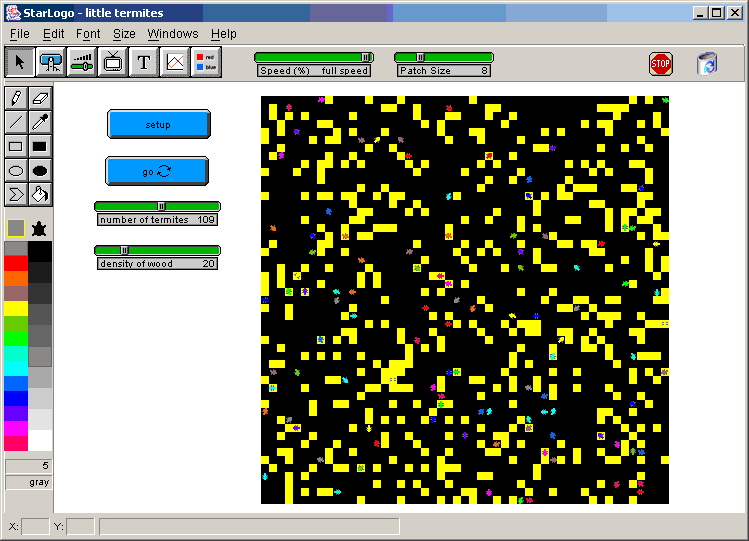
Now when you press the setup button, you see red termites and yellow woodchips. If you want to clear the patches, use the command cp. You can therefore use both ct and cp to clear the patches and the turtles. Add that to your setup procedure: to
setup Note: If you know you want to clear both turtles and patches, you can use the command ca, or clear all. Let's add ca to our setup procedure: to
setup Now you've completed the setup procedure for our program, and learned something about making a lot of termites, coloring things, and using procedures. Note: If you haven't saved recently, you should do so now. |
|||||||||
|
|||||||||
|
So how can you make this bunch of termites interact with the woodchips? To do this, you need to think about all the tasks the termites need to accomplish. If you break down the tasks, then it's easier to write procedure for them. You want the termites to search for woodchips and place them into piles. But to place woodchips into piles, termites need to first find a woodchip. But to find woodchips, they need to be able to move around to get to the woodchips. Once they've found a woodchip, they need to pick it up. Then they need to find a place to put it. And then to actually put it down. Therefore, there are four steps a termite needs to follow to succesfully make woodchip piles. a) First they need to know how to move. b) Then they need to search for woodchips. c) Next, they need to find a pile for the new chip. d) Last, they need to drop the woodchip down in the pile. a) MovementFirst, get the termites to move around, since that's the first thing a termite needs to know how to do before it can do more complicated things. To do this, type this procedure in the Turtle Procedures window: to
wiggle With this procedure, the termite moves forward 1 unit and then wiggles by turning a little to the left and to the right. Try typing wiggle a couple of times in the Turtle Command Center and watch what happens. b) Search for WoodchipsKeeping the main goal in mind, the next task the termites need to be able to do is find a woodchip. You can call the procedure search-for-chip. If a termite sees a yellow woodchip, then it removes it from the patch. To do this, type this procedure in the Turtle Procedures window. Leave a line below the wiggle procedure. to
search-for-chip This procedure means that every termite checks whether the patch it's on is yellow, and if it is, it turns the patch to black (to signify that it picked up that woodchip). It then jumps far away, and stops. You can test this procedure by typing search-for-chip in the Turtle Command Center. This will result in the termites moving around and turning many of the yellow woodchip patches to black. Of course, the red termites will be covering the black patches so you won't be able to see them yet. So now you have search-for-chip which changes yellow woodchips to black to indicate that they have been picked up and are no longer on the ground. You can also change your search-for-chip procedure to do wiggle before checking for a woodchip, and to keep going as long as it hasn't found one. Find the search-for-chip procedure in the Turtle Procedures window and change it to look like this: to search-for-chip
Now click on the StarLogo window. WHOOPS! I'm sorry. That was an error. A popup box displays the following phrase: "i don't know how to wig in the procedure named search-for-chip in the turtle procedures page". Sometimes errors will occur during programming, and a popup box will help you figure out what went wrong where. Click OK in the popup box, and change wig to wiggle in the search-for-chip procedure. That should fix the bug in your program. c) Find a New PileNow that the termite is carrying the woodchip, it needs to find a new pile to place it. This procedure will look a little like search-for-chip. To do this, type this procedure in the Turtle Procedures window. Leave a line below the search-for-chip procedure. to
find-new-pile All you had to do for find-new-pile was tell the termite to wiggle, and if it sees a yellow woodchip, to stop. Otherwise, keep looking (do find-new-pile again). You can test your latest procedure by typing find-new-pile in the Turtle Command Center. The termites will move around looking for an existing woodchip on the ground and then stop. d) Find a Place to Drop the WoodchipYou just wrote a procedure for the termite to find a new pile to drop its chip. But the termite just stops once it's found it. Now you need to write a procedure for the termite to put down its woodchip. You know a patch is empty if it's color is black, that is if pc = black. To drop the woodchip, you can make the black patch turn yellow by stamping it yellow. To do this, type this procedure in the Turtle Procedures window. Leave a line below the find-new-pile procedure. to
find-empty-patch Here you tell the termite to wiggle, and if it finds an empty (black) patch, stamp the patch yellow (the same as dropping a yellow woodchip), and stop. If not, keep searching for an empty patch. |
|||||||||
|
|||||||||
|
After they've found an empty patch and dropped the woodchip, you'll want them to keep looking around for more woodchips so that the piles of chips can form quickly. You can write a simple get-away procedure to accomplish this: to
get-away seth random 360 sets the heading of the termite to be some random compass between 0 and 360 degrees. jump 20 is similar to fd 20, but much faster, more like teleporting. If a termite lands on a black patch, stop. Otherwise, keep jumping to get away. Add get-away after it puts the woodchip down in our find-empty-patch procedure: to
find-empty-patch You can test your last rule by typing find-empty-patch in the Turtle Command Center. The termites will move around looking for a patch to drop their yellow woodchip and jump away. |
|||||||||
|
|||||||||
|
In summary, there are four rules that each termite follows to successfully make woodchip piles (the wiggle procedure is a sub-procedure because it is included in the search-for-chip procedure and the get-away procedure is also a sub-procedure because it is included in the find-empty-patch procedure): If the termite sees a woodchip, pick it up Search for another woodchip in a pile Find an empty space near that pile and put the woodchip down To make all these procedures run at the same time, you can write one more procedure to call the other three. To do this, type this procedure in the Turtle Procedures window. Leave a line below the find-empty-patch procedure. to
go Now type go in the Turtle Command Center and see that your procedures work. Now all your procedures are completed and tested! |
|||||||||
|
|||||||||
|
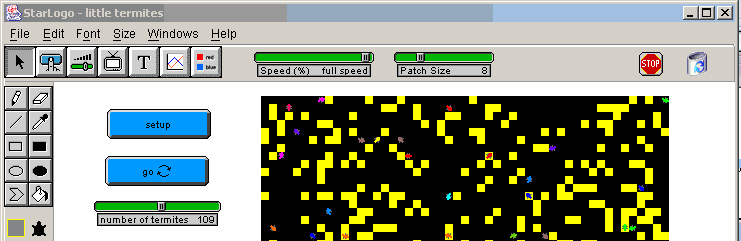
Unfortunately your go procedure tells each one of your 100 termites to move a woodchip to another pile, but only one time. What you need is a button to run the go procedure over and over again. To create a go button, press the button icon again in the StarLogo window, then click in the whitespace below to make a new button. In the popup window type go as its logo instruction, and click the box that says Forever to make the procedure go continuously. Click Turtle because that is where you wrote your procedure. Finally, click OK.
Don't forget to save your file. Now, press setup and then press go and watch the termites walk around collecting woodchips into piles. When you want to stop the simulation press the go button again. |
|||||||||
|
|||||||||
|
You have written your first StarLogo program! Feel free to make any changes to the program you like, such as changing the termite's color while it's carrying a woodchip to indicate when it's carrying. |
|||||||||
|
|||||||||
|
In the Observer Procedures Window: to
setup In the Turtle Procedures Window: to
patch-setup to
wiggle
to
search-for-chip to
find-new-pile to
find-empty-patch to
get-away to
go |
|||||||||


Getting
Started | Download
| Community | Tutorial
Commands | Projects
| FAQ | Info