|
|
home | project | blog | media |
|
week | 1-2 | 3-4 | 5-6 | 7-8 | 9-10 | 11 | week sevenMonday 7/6 - Wednesday 7/8: green page, continued I've spent most of this time putting together the "hardware" for the green page. In terms of the pop-up mechanism, I've been experimenting with angular pop-ups so that when the page is opened, several leaves of the venus fly trap burst outward from the center at odd angles. The hardest part about getting this mechanism to work is getting the leaves to pop back down when the page is closed. For the opening/closing mechanism, I've had to spend a lot of time finessing with the nitinol wire. Since each leaf is slightly differently shaped and therefore each one requires slightly different amounts of pulling force. For the circuit, I've used the same circuit as the paper flowers (so that the input comes from the arduino but the current running through the nitinol comes from a separate power source). 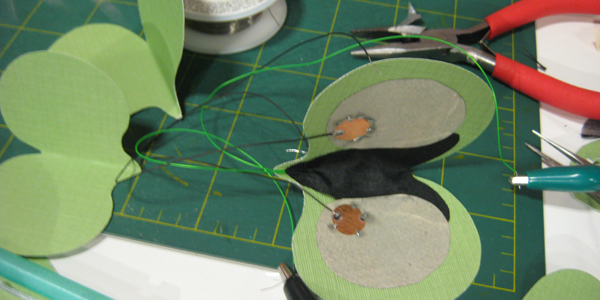 I've come to learn that nitinol (nickel titanium) wire is extremely fragile, which is unfortunate because the stuff is very expensive! The springs we use come wrapped very tightly along a wire, so we must first unwrap the nitinol from the other wire. However, if the nitinol is stretched too far in this process, it will lose its ability to contract. Another time I accidentally sent too much current through the wire, which caused it to heat up tremendously and turn an ominous shade of orange. At this point the wire was pretty much dead. I'm happy to say, though, that I've gotten all the wiring tweaked so I'm done playing with nitinol for now. 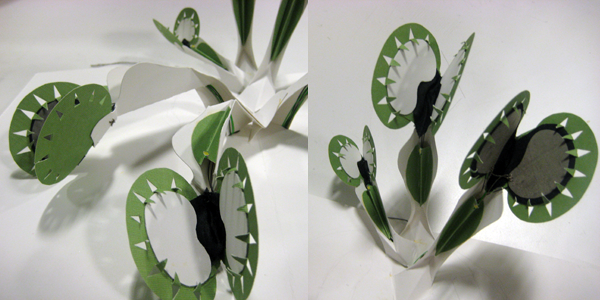 In other news, I've fallen sick from sailing over the weekend. It was well worth it though! The sailing pavilion is definitely the best seat for firework watching. Thursday 7/9 - Friday 7/10: paper PCBs! Still working on the green page. I've put together the (insane!) wiring and I've added all the painted traces for the arduino and separate power source. I'm crossing my fingers at this point that this mess of wires works! 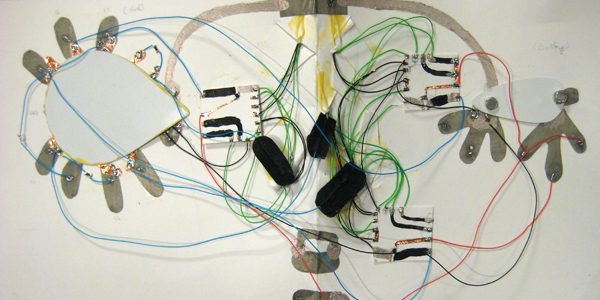 I've also spent some of my free time working on a new idea: paper PCBs. After a tutorial on how to use the new laser cutter, which both cuts and engraves, I thought of trying to engrave a circuit board. The idea is to paint a piece of cardstock with conductive paint and then use the laser cutter to engrave away the negative image of the board. The traces of the board remain after engraving. I tried out this idea and it seems to work! Granted, it's somewhat challenging to solder to paint, but the concept is definitely sound. I made a simple circuit that includes an LED, resistor, and pushbutton on a single-layer board. The traces are about 1mm wide, though conductivity is not lost with slightly smaller traces. I'm very excited since it is much faster to print out a board using the laser cutter than to get one manufactured at a board house. One serious issue, however, is that the conductive paint has some resistance compared to the virtually zero resistance of pure copper traces on a regular PCB. 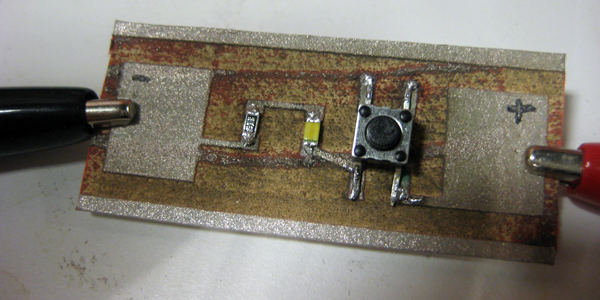 week eightMonday 7/13 - Wednesday 7/15: orange page My original plan was to finish up the programming for the green page. However, try as I might, I cannot get the transistors powering the leaves to turn on. The circuit is set up so that when I input 0V, the transistor sends about 400mA. However, the output of the Arduino only goes down to about 1.5V, which isn't low enough. Dr. Buechley is gone from the office until Thursday, so I'm going to work on the next page for now The next page is the orange page, which has examples of sliding and turning potentiometers and is themed after the ocean. For the sliding potentiometer, I made two fish whose eyes dim as they are pulled across the page. I also made a coral that has two sets of lights. When the potentiometer is turned to one side, one set of lights is brightest. As the potentiometer is turned to the other extreme, the first set of lights dim and the second set brightens. I also made three jellyfish that use a cam system to "float" in this rotational movement when a lever is swing back and forth. As they move, the lights on the jellies dim and brighten.  Thursday 7/16: orange page completed! I finished up the orange page! One issue I have with it, as well as with the pink page, is that when there are sliding mechanisms that also function as switches, the sliding has to be tight or else conductive contact will be lost. However, as a result, the tabs become very difficult to push or pull. For the rotational levers, I tried to remedy this by using magnets, which worked somewhat. I also played a bit more with the paper PCB idea. Shen, another undergrad in the group, designed a board for magnetic high-powered LEDs. I took his design and tried to translate them into paper versions. The design works fairly well. The only difference is that there is more resistance in the paint traces than in the copper traces of the actual PCB. As a result, the LED is slightly less bright than the original.  Friday 7/17: green page completed! Dr. Buechley came back and pretty much figured out how to get the green page to work. It turns out the issue was with the arduino. Previously, I used the fabric version of the arduino, which apparently had too much resistance to provide the current needed. Now that Shen has created a magnetic arduino using traditional etched boards, there is much lower resistance and the page works perfectly! 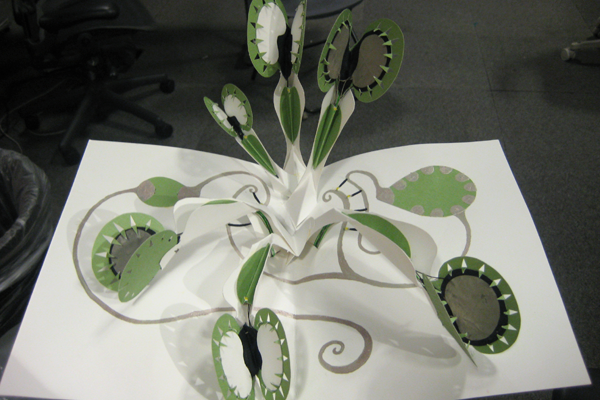 |