


2.00b Toy Product Design
Thermometer Step-by-Step
Deliver user feedback
Good user feedback is an important part of product design. Without it, users don't understand what is happening or know if things are working properly. For our thermometer, we will perform some basic user feedback by showing messages to the user on a display.
Prepare display module
Take the memory card out of the case and put it into the display module. From the top view, the contacts of the memory card face up.
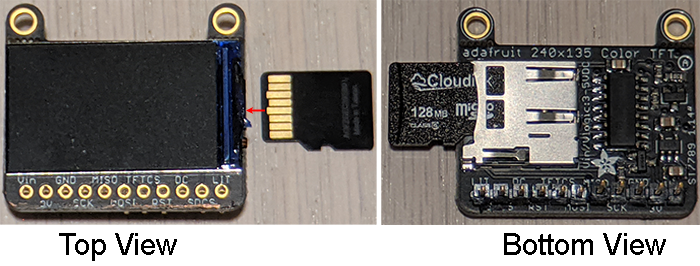
To remove the memory card, push it in a little, and then it will disengage and pop out a bit so that it can be removed. You may try this out, but please have the memory card in the display module before proceeding to the next step.
The display module may also have protective wrap over the screen. If so, you may peel that off.
Place and connect the display module
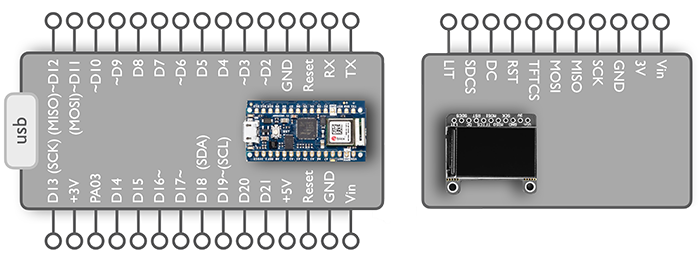
Place the display module on the breadboard. We recommend placing the Vin pin at 45h. Since you may be removing and inserting the memory card, you'll want to leave space to do that.
Wire the display module:
- Connect Vin (45j) to positive red bus.
- Connect GND (43j) to negative blue bus.
- Use a 7 strand male-to-male jumper cable for:
Display Nano SCK SCK MISO MISO MOSI MOSI TFTCS D10 RST D9 DC D8 SDCS D7
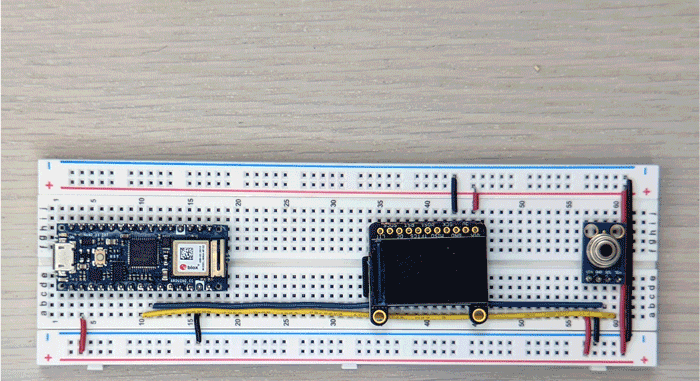
Here, we suggest using a ribbon cable for quick wiring. The ribbon cable does block the view of the display a bit. If we were going to use this prototype for a while, we might want to change some or all of the ribbon cable to hookup wire that we strip ourself, so the wire sits closer to the breadboard. However, this breadboard is just a temporary setup, so leaving it as the ribbon cable is just fine.
Test the display
Download display_test.zip (Right-click -->Save Link As...). Uncompress the folder and place it somewhere. From within the Arduino IDE, Open the display_test.ino file that is inside the folder. Click Verify, then Upload. Open the Serial Monitor. You should see the screen turn a series of different colors, some text written to the display, and the loading of each of the three 2.00b graphics files. Watch the video below for a demonstration of this program.
Note: The video above shows the button already wired. At this point, you should not have the button wired yet (that is the next step).
If there are any problems, open the Serial Monitor to see if there is any helpful debugging information printed and double-check the wiring.
Now we'll run a program that integrates the temperature sensor with the display module. Download display_temp_test.zip. Open and run the display_temp_test.ino file. Open the Serial Monitor to observe what is happening. In this program, 10 readings are taken every second and the average value is displayed on the display. All values read are sent to the Serial Monitor. Try putting the sensor near different objects to take their temperature.
Unlike our first thermometer test program, this one doesn't stop reading temperatures. The loop function repeats over and over again. The values in the Serial Monitor scroll too fast for us to really process it. The only way to stop it is to unplug the USB cable either from the Nano or our computer. We'd like a better way to control when the temperature is being read, which is why we'll add user input next!