


2.00b Toy Product Design
Thermometer Step-by-Step
Test the microcontroller
For this project, we are using an Arduino Nano 33 IoT microcontroller. Arduino makes a whole line of microcontrollers. People usually start with the UNO. However, because we want to package this project in a housing, we wanted the microcontroller to be much smaller than an UNO. We also wanted to have built-in WiFi capability, which is why we are using the Nano 33 IoT, which has both a smaller form factor and built-in WiFi support.
The "33" in the board name highlights that the board supplies and works with 3.3V components, unlike most other introductory microcontrollers that support 5V components. So, the IR temperature sensor module and display module that we are using are ones that work at 3.3V. These two modules happen to work at 5V as well since they have built-in power regulators, so they can be used with most microcontrollers. However, 5V components will not normally work at 3.3V.
Place and connect the microcontroller
Take the microcontroller out of the box and place the microcontroller on the breadboard. We suggest that the top-left pin go in 3d so that the USB cable can hang off the board and the microcontroller and the pins will be in the same orientation as shown in the earlier circuit diagrams.

Connect the micro-USB end of the micro-USB cable to the Nano (flat side of connector goes up) and the other end to your computer. If you told us that you would need a USB-A adapter, you should have one in your kit. Please contact the TAs if you still need an adapter.
With the Nano connected to your computer, it will now be powered. The green power indicator (near 2g in the video below) should be on at all times when the Nano is powered. If not, please try reattaching the USB cables and also trying out a different USB port on your computer.
Install the SAMD board library
The Arduino IDE comes with support for a number of microcontroller boards built-in. However, the Arduino Nano 33 IoT is not one of them. So, we need to install a board library before we can use the Arduino Nano 33 IoT. To do this:
- From the Arduino IDE menu bar, select
Tools --> Board: "current_board_name" --> Boards Manager.... - In the Boards Manager, search for samd
- Install the Arduino SAMD Boards (32-bits ARM Cortext-M0+). You will see that the Arduino Nano 33 IoT is listed in this library's description.
- Close the Boards Manager when it is installed.
Important! If there are any issues during the installation of the SAMD boards manager (e.g., Arduino crashes), please Remove the SAMD board library (the Remove button will be where the Install button was) and Install it again. If the library is not installed correctly, there will be errors (e.g., "no such file or directory ... arm ...") while trying to compile the code for the board.
Watch the video below for a demonstration of the steps above.
Configure the IDE for the Nano (set board and port)
Before we start programming, we need to tell the Arduino IDE what type of microcontroller we are using and what port it is connected to on the computer. To do this:
- From the Arduino IDE menu bar, select Tools --> Board: "current_board_name" --> Arduino SAMD (32-bits ARM Cortext-M0+) Boards --> Arduino NANO 33 IoT
- From the Arduino IDE menu bar, select Tools --> Port --> port_name (Arduino NANO 33 IoT)
The specific port name may vary. You will only see options if the computer detects that the microcontroller is connected.
Watch the video below for a demonstration of the steps above.
Explore the File Editor
The Arduino IDE always starts up with a File Editor, a screen to edit files, opened to an empty sketch template. Arduino programs are called sketches. The File Editor has a toolbar with six buttons which are typically used as follows:

- New - creates a new sketch. When you start the IDE, it usually creates a new sketch.
- Save - saves the sketch. If this is a new sketch, you will be prompted for a place to save the sketch and a filename. Sketch filenames end in ".ino". The file extension will be added by the IDE automatically. The IDE does not auto-save, so if you are working on a long program, be sure to hit the Save button periodically.
- Open - if you have an existing sketch you want to work with, you can open it from here or from the Sketchbook, which is available via File-->Sketchbook.
- Verify - this checks your code for errors. If there are errors, the error messages will appear in the area at the bottom called the console. If there are no errors, the code will be compiled, meaning turned into a format that the microcontroller will understand.
- Upload - this will compile your code (if not already compiled) and upload it to the connected microcontroller. Any errors in the process will appear in the console.
- Serial Monitor - this opens up the Serial Monitor, which is an area that can be used for status information from the microcontroller while it is attached to your computer and running a program.
Understand the Sketch Template
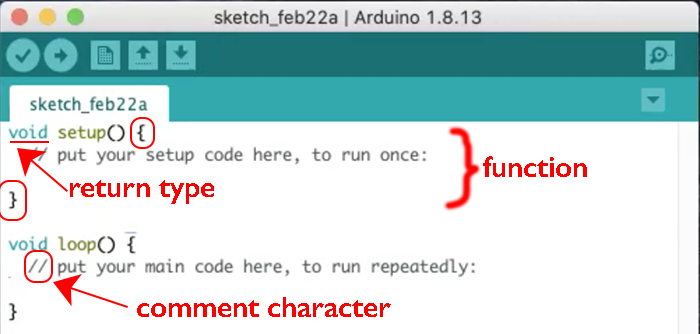
The sketch template includes the two functions that must be included in every Arduino sketch. The setup function is run after each time the Arduino starts up or restarts. Once the setup function is completed, the loop function runs continuously, meaning that once it is completed, it starts to run again from its beginning.
There are different programming languages that code can be written in. Arduino sketches are written in a programming language called C++. Each programming language has its own rules, called syntax, for how the lines of code must be written. We'll review a few of the basic principles here.
C++ is case-sensitive, so a name setup would be different from a name Setup. Each line of C++ code ends in a semicolon. In addition to lines of code, people may put comments in the code. Comment lines are ignored by the compiler, so they aren't translated into machine language. Their purpose is to make the code more human-readable and understandable. There are two types of comment characters in C++. The two forward slash comment character used in the sketch template means that everything on the line after the two forward slashes is a comment. Notice how the IDE color-codes different parts of the code. Comments are in gray by default.
Functions are lines of code that work together to do something and can be reused. For example, a function might implement an algorithm to figure out the fastest design from different sets of parameters. Functions may also send and receive data, such as telling a display what text to show and how. Each function has a name, like setup, and the code for the function is written between a set of open and close parenthesis.
Functions can return values that may be used by other bits of code. For example, a function may return a number representing the average value of a series of numbers, or more complicated data structures. In C++, the type of the returned value is the first part of the function definition, followed by the function's name. A type of void means that the function does not return a value to be used elsewhere in the program.
Whew! That was a whirlwind tour of coding. It's ok if you didn't understand it all. Now let's do something!
Running an example program
Now that we've told the IDE what kind of microcontroller we are working with and how to communicate with it, let's try out a test program.
The Arduino IDE comes with a lot of example code. Open up the Blink example, which can be found in the menubar under File --> Examples --> 01.Basics --> Blink. Be careful not to type anything into the file, or you may inadvertently introduce an error. If the File Editor window is small, just grab a corner and drag to make it bigger.
Click "Verify". You should get a "Done compiling." status message in the status bar. Then click "Upload". You should get a "Done uploading." status message. If this is successful, you should then see the built-in LED near pin D13 on the Nano blink one second on and one second off.
Watch the video below for a demonstration of how to open the example program, Verify, and Upload it to the microcontroller.
Watch the video below for a demonstration of what you should see on your microcontroller once the program is loaded.
If you have problems, please ask for help! Also, at this point, we do not expect you to understand any of the program. The goal right now is just to be able to run pre-written programs.