PS1: Model/View and Event Handling
Due at 10:00pm, Wednesday, February 22, 2017, by uploading your
submission to Stellar.
You must complete the self-assessment form before you hand in the assignment.
You should make sure that your problem set renders correctly on Chrome (which we'll be using for evaluating your projects) and in either Firefox or Safari.
Candy Crush Pset Sequence
This series of three problem sets asks you to build the game Candy Crush.
You will be using the set of core technologies that drive most modern web applications, namely
HTML, CSS, and Javascript.
In this first problem set, you will build a simple Candy Crush Game UI with standard HTML elements, such as buttons, text fields, labels, and tables. In the second problem set, you will improve the UI using more sophisticated drawing elements, such as canvas, images, and strokes. In the third problem set, we will add better user input by enabling users to drag candies across the board.
Candy Crush Gameplay
In case you haven't played Candy Crush before, take a moment to play Candy Crush to get a feel for the game. The rules are summarized as follows:
- The game field consists of candies of different colors arranged in a grid view.
- Whenever three or more candies of the same color form either a horizontal line or a vertical line, the following happens:
- the player gains points
- the candies are removed from the grid thereby creating holes in the game field
- the candies on top of the removed candies move down thereby filling the holes
- new random candies are added from the top to fill the open slots on the board.
- The player can flip two candies if the move results in a valid horizontal or vertical row with three or more candies of the same color.
You don't have to implement the rules, since we provide an implemented model that includes the rules as methods you can call.
Useful References
To do this assignment, you'll need to know how to:
- write HTML: create correct HTML pages that display in modern browsers
- use HTML form elements (like
<button>,<input>) to create a web application - use CSS to layout and style HTML elements
- use Javascript and jQuery to add event handlers and bindings to respond to user input
Here are useful video tutorials on HTML/CSS/Javascript/jQuery/jQueryUI picked by the course staff:
- Introduction to styling with CSS
- CSS Absolute and Relative Positioning Tutorial
- Making Divs Side by Side using CSS
- jQuery - Introduction to Selectors
- jQuery - ID Selector
- jQuery - Click Event Handler
- jQuery - addClass()
- HTML Dog (a fairly good guide for both HTML and CSS)
- CSS Tutorial (a tutorial for learning CSS)
- How jQuery Works (a beginning tutorial on jQuery, the Javascript library we are using for this assignment)
- jQuery Documentation (the official documentation for jQuery is an excellent resource)
- O'Reilly Safari has several e-books on HTML, CSS, and Javascript that are free for MIT students to read (MIT certificate required). Dynamic HTML: The Definitive Reference, 3rd Edition is a good one to start with.
Provided Resources
We provide you with candycrush-skeleton.zip, a zip file containing the code you will be editing for this problem set. It contains the following files and folders:
- index.html: a skeleton file for your user interface. Start coding here.
- mainLayout.css: a stylesheet file for index.html
- board.js: a javascript file containing the Board class
- rules.js: a javascript file containing the Rules class
- candy.js: a javascript file containing the Candy class
- graphics: a folder containing all the graphics files (we will use them in ps2)
Feel free to change these files as you see fit. You will write most of your code into index.html, including your javascript. You will likely not need to edit board.js, rules.js, nor candy.js. You may use additional outside JavaScript libraries, but be sure to cite them directly in the code (include a link to the library's webpage).
The UI
1- Basic Layout (25%)
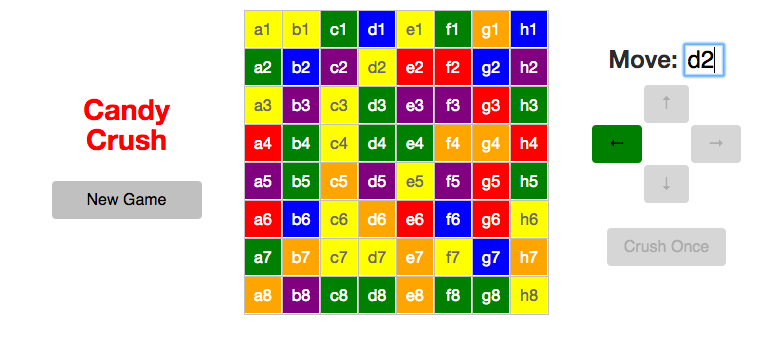
First, build an interface that looks like Figure 1. In particular:
- There should be spacing of at least 10px between the left column buttons, the candy crush grid, and the right column buttons.
- A three-column layout should be used for all elements on the screen. A template of this is provided in index.html, using bootstrap elements. Bootstrap is a CSS framework that aids in formatting. Modify the template to make the middle column 50% of the page.
- The first column should contain two elements:
- The game title (bold and colored)
- A New Game button
- The buttons should be
<input>elements. Because we have included Bootstrap you can addclass="btn"to your buttons to get modern style buttons.
- The second column should contain the game board:
- The game board should have a fixed size of 320x320 pixels (to encourage a mobile friendly layout). It should have 8 rows and each row should have 8 squares.
- You should construct the game board using a
<table>, with each "candy" being a cell in the table (<td>). You will likely want to write javascript code to automate the construction of this table. - In this pset, the "candies" will be colored boxes. Each candy has a different background color. In psets 2 and 3, you will use candy images instead of the colored boxes.
- To generate the candies, you should call the
rules.prepareNewGamemethod in rules.js. This function generates a new valid game board. To add a candy to the board, it generates calls to the add event listener, which you will need to implement inindex.html - For the purposes of this assignment, we will develop a convention to name each candy by row (1-8) and column (a-h). Annotate each square with its textual coordinates (a1, b3, etc.), ensure these are centered in the square. Ensure the textual annotation is readable - a good choice is white text, except for the yellow candy in which case you will want to use a darker color, like gray.
- The third column should contain a panel to allow the user to move candies:
- Include the label "Move:" and a text field in which the player can enter the candy that should be moved (e.g. a1 for the top left candy). You don't have to add the click events yet, you will do this in the next step.
- Below the text box, include a grid of four arrow buttons, one for up, down, left, right.
- Below the grid, add a button called "Crush Once"
- In pset 3, you will implement functionality to drag candies to move them. In psets 1 and 2, however, you will only move candies with button triggers and a text box.
2- Adding Basic Behavior (25%)
Now add basic user interaction:
- When the New Game button is clicked, a new game board is generated.
- When the user clicks on the up/down/left/right buttons, the text from the textfield should be read by your program and the corresponding candy moved, if the move is valid according to the rules.
- To test if the move is valid, call the
rules.isMoveTypeValidmethod. If the move is valid, callboard.flipCandieswhich will actually flip the candies. TheflipCandiesmethod issues a move event, so you will also need to implement the "move" event listener. You may find theboard.getCandyInDirectionmethod useful. You should not crush the candies in this step. You will add candy crushing in step 4. - Assume valid user input for now, we will implement input checking in the next step.
- After the user has clicked one of the buttons, the text field should be cleared and the focus should be automatically returned to the text field, so that the user can start typing as soon as the last move was executed.
More Information on how Board.js and Rules.js interact:
The Board is the "dumb" data object that just holds state, and Rules is the "smart" object that holds no state but knows how everything moves. Since all state changes go through the board, any code wishing to be aware of board changes can listen to Board events. The Rules object has all the complex methods. The Rules object holds a Board, and the Board does not know about Rules.
3- Adding Basic Input Check (25%)
In this step, you will add basic functionality to verify user input and improve usability by preventing invalid user input. To do so:
- The up/down/left/right buttons should only be enabled once the user has typed something into the text field that is a valid entry (e.g. a5 is but ZZZ8 not, an empty text field also does not contain valid input). You may optionally consider uppercase letters (A-H) to be valid input characters, but this is not required. If the entry is not valid, the buttons should be disabled and cannot be clicked.
- Only enable the buttons that represent a valid move based on the game rules: when flipping does not result in a row of three or more candies of the same color, the corresponding up/down/left/right buttons should be disabled as well. You will want to call the
rules.isMoveTypeValidmethod inrules.jsto determine the validity of each of the four potential move directions. - To make enabled buttons even more visible to the user, change their background color to something other than gray, and restore to default when disabled.
- These checks are best performed once the user has entered at least two characters in the text field.
4- Crush Once Button (25%)
In this version of Candy Crush, candy crushing won't happen automatically. To crush candies (i.e. remove them) users may press the Crush Once button which causes a single round of crushing.
- The Crush Once button should only crush immediately crushable candies. You need to click it multiple times to crush a chain of crushes.
- When you press the Crush Once button, it should do two things that the user can see: it should remove the crushed candies, and then it should repopulate the board. These should be performed sequentially, and there should be 500ms from when the candies are removed, and when the candies are shifted down.
- You'll likely find the following methods useful:
rules.removeCrushes(which takes the output ofrules.getCandyCrushes()),setTimeout, andrules.moveCandiesDown(). You'll need to implement the remove listener inindex.html, which is called by these methods. - You DO NOT need to implement an animation to move the candies down smoothly in this step. You are simply removing them, waiting 0.5 seconds, and repopulating the board. You'll implement a smooth crush animation in pset 2.
- The Crush Once button should be validated just like the arrows. When there is nothing to crush, it should be disabled. When there is something to crush, it should be enabled, and the arrow buttons should also be disabled. As with the arrow buttons, the Crush Once button should change to some color other than gray when enabled, and be restored to default when disabled.
- Importantly, it should be impossible to enter an illegal move through the UI. In particular, during the 500ms delay, you should not allow users to move candies until after the crush has finished.
Further (Optional) Improvements
In pset 2 and 3, you will be implementing more functionality to the game including removing crushed candies and keeping track of score. If you'd like to learn more and go further now, here are some ideas for improvements:
- Improve input checking by making the text field non-case sensitive (a1 and A1 both work) and ignores whitespace.
- Let the player enter a name into a text field or let the player select a name from a dropdown menu of previous player. Display the player name in a label.
- Trigger the New Game button and Crush Once button with keystrokes (perhaps n and spacebar).
- Make your page mobile-friendly! Check to ensure the layout renders correctly on a number of screensizes, including wide and narrow desktop browsers and your smartphone, which is about 360px wide. The Web Inspector in Google Chrome has a nice feature to simulate view of a variety of devices. Google it if you can't find it! Consider making your page responsive, for example by automatically switch to portrait layout for small screen sizes.
What to Hand In
You must complete the self-assessment form before you hand in the assignment.
Package your completed assignment as a zip file that contains all of your HTML, JS, and CSS files. Failure to include all necessary files for running your program will result in a loss of points from your final grade. (Please test by unzipping your zip file into a new directory, say, your /tmp directory and then opening your page to see if it still works.)
List your collaborators in the comment at the top of index.html, or explicitly say that you discussed the assignment with nobody. Collaborators are any people you discussed this assignment with, as well as any third-party libraries/example code you used. This is an individual assignment, so be aware of the course's collaboration policy.
Here's a checklist of things you should confirm before you hand in:
- Complete the self assessment.
- Make sure that the page renders correctly on Chrome (which we'll be using for evaluating your projects) and in either Firefox or Safari.
- Make a fresh folder and unpack your zip file into it.
- Make sure your collaborators are named in index.html.
- Make sure all assets (images, jQuery source, JS files, CSS files, etc.) used by your code are found in the fresh folder and load successfully.
Submit your zip file on Stellar.
- The first column should contain two elements: