PS2: Output
Due at 10:00pm, Wednesday, March 15, 2017
by uploading submission to Stellar.
You must complete the self-assessment form before you hand in the assignment.
You should make sure that your problem set renders correctly on Chrome (which we'll be using for evaluating your projects) and in either Firefox or Safari.
This assignment explores the following topics related to GUI output:
- the object approach
- the stroke approach (also called vector graphics)
- the pixel approach
- animated feedback
In this second problem set, you will improve the Candy Crush UI using more sophisticated drawing elements, such as canvas, images, and strokes.
Useful References
You may need to use HTML5 Canvas on this assignment, and these references may be helpful:
- HTML5 Canvas: Introduction
- HTML5 Canvas: Draw Lines and Filled Shapes
- HTML5 Canvas: Animation Basics
- Mozilla Canvas Tutorial
If you want to review HTML/CSS/Javascript/jQuery/jQueryUI, here are useful video tutorials picked by the course staff:
- HTML Tables and Layouts
- HTML Forms
- Introduction to Styling with CSS
- CSS Absolute and Relative Positioning Tutorial
- Making Divs Side by Side Using CSS
- jQuery - Introduction to Selectors
- jQuery - ID Selector
- jQuery - Click Event Handler
- jQuery - addClass()
- jQuery UI Datepicker
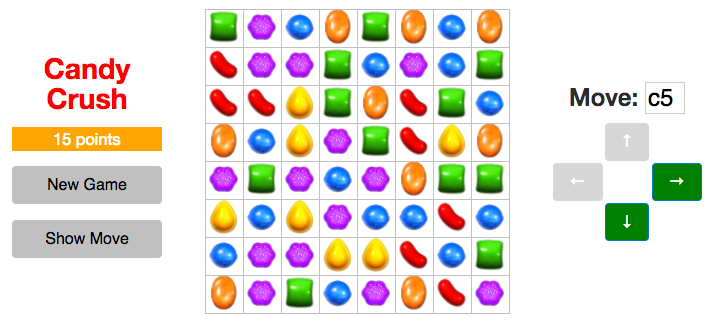
The UI
In this pset, you will update your UI to appear as in Figure 1.
Provided Resources
You will build onto your code from ps1. You will now use the images in the graphics folder for rendering the candies. As a reminder, the candycrush-skeleton code is located here: candycrush-skeleton.zip
Problem 1: Resizing the Board (20%)
You already created a 320x320 pixel candy board in pset 1. You will now add dynamic resizing to the board.
The board size should now be determined by the BOARD_SIZE variable in the code. This size defaults to 8x8, but you can change it to any value n by adding ?size=n to
the end of the URL, e.g. index.html?size=16. The size n is constrained to be at minimum 3 and at maximum 20. No matter how many squares are in the candy-board, it should always be 320x320 pixels.
You can use either canvas (the stroke approach) or HTML elements (the object approach) to solve this problem. A canvas approach is recommended, however, as future aspects of this pset require a canvas rather than table layout.
Ensure that all pset1 functionality continues to function as expected regardless of the size of the board. You may need to modify your text input verification, to enable b3, d11, etc. to all be valid input, provided the board size is large enough.
Problem 2: Candy Images (20%)
Display all the candies on the board using HTML img elements (the object approach). Six pictures are provided for you (red-candy.png, blue-candy.png, orange-candy.png, purple-candy.png, yellow-candy.png, green-candy.png, found in the graphics folder). Feel free to replace them with different pictures.
Be sure that as the board scales to different sizes, so do the candies. They should also be centered on their respective squares regardless of board size.
Remove the candy coordinate labels from pset 1. To facilitate user interaction, the user should now be able to click on a candy and have the move textbox populated with the clicked candy's coordinate (e.g. 'b3').
Once again, ensure that all pset1 functionality continues to function as expected.
You must use a canvas (the stroke approach) to solve this problem. If you haven't already, you'll need to replace your table from pset 1 with a canvas.
Problem 3: Keeping Track of Score (20%)
Add a score label to your interface to display the player's score. Score is updated in board.js, which issues a "scoreUpdate" event whenever it is updated. Implement the "scoreUpdate" listener in index.html to update the UI appropriately.
Ensure that a new game begins with a score of 0 (players do not get points for crushes that happen by luck initially). This is handled correctly in rules.prepareNewGame, so your implementation might be incorrect if a new game does not reset the score to zero.
Change the background color of the player's score to the color of candies that was successfully crushed last. Note that this is not necessarily the color that the player's last move crushed, because the move may have led to additional cascading crushes. You'll find the candy info embedded in the "scoreUpdate" event useful.
Problem 4: Show Suggested Move (20%)
Add a Show Move button to the left column of your interface. When the player gets stuck and doesn't find a valid move, the user may press this button to receive a visual indication of a random move.
Indicate visually to the user the candy which the user should move by drawing a clearly visible arrow from the candy that should be moved to the location of its new possible square, appearing above all candies. You will likely find the rules.getRandomValidMove() function useful.
You must draw this arrow using the stroke approach, on the canvas. As an example, take a look at Exercise 4 of the Javascript/jQuery lab.
Remove the arrow once the user clicks any of the buttons (New Game, Show Move, or the arrow buttons). At any given time, a maximum of one arrow should appear on the board.
Problem 5: Flipping & Crushing Animation (20%)
In pset 1, you implemented a simple "animation" (based on a timeout) to visually indicate candy crushing with the "Crush Once" button. In this problem, you will replace the "Crush Once" functionality with a smooth animation to provide visual feedback of candies being moved and crushed.
In this problem, you will implement two smooth animations:
- Candy Flipping: When two candies are moved (by the click of an arrow button), the two candies should be animated such that they smoothly swap locations.
- Candy Crushing: After two candies have swapped, the candies to be crushed should be removed, and the candies from above should fall down smoothly to fill the holes. If this produces more crush opportunities, the same smooth animation to remove & fall candies down should occur.
Shown below is an example of these two animations, which smoothly drops the candies down.
To accomplish this animation, you'll need to update your "move" event listener to smoothly flip candies and animate the candies falling down. You'll also need to update your "add" event for adding new candies to the board from above, in which case you'll want to drop them in smoothly. To do this, if info.fromRow and info.fromCol are not null, then you'll want to perform a smooth animation to drop the candies in. You may wish to update your "remove" event, to fade out candies.
You may implement these animations a variety of ways. We recommend you look at jQuery animate. You can also check out CSS3 Animations. Ensure your animations are smooth, perhaps by checking out easing functions. Feel free to experiment, and find something that is cool, creative, and unique.
Solutions that do not animate the candies (aka solutions that simply make candies appear and disappear rather than smoothly animating their motion) will only receive partial credit.
Be sure to remove the Crush Once button from pset 1. Smooth crushing should occur automatically now, whenever a candy is flipped. As crushing occurs, the move buttons should be disabled so that the user cannot interfere with the crushing!
Going Further
In pset 3, you will implement drag and drop functionality. If you'd like to learn more and go further now, here are some ideas for improvements:
- Improve your candy crushing animations - play the Candy Crush mobile app for inspiration!
- Add sound effects when candies are crushed - the mobile app also has great examples of playful sound effects.
- Improve the look & feel of the UI (i.e. buttons should darken upon mouseover).
- Let the player enter a name into a text field or let the player select a name from a dropdown menu of previous players. Display the player name in a label.
- Add high score tracking - you can use cookies to remember the best score across multiple games.
What to Hand In
You must complete the self-assessment form before you hand in the assignment.
Package your completed assignment as a zip file that contains all of your files Failure to include all necessary files for running your program will result in a loss of points from your final grade. (Please test by unzipping your zip file into, say, your /tmp directory, and then opening your page to see if it still works.)
List your collaborators in the comment at the top of index.html, or explicitly say that you discussed the assignment with nobody. Collaborators are any people you discussed this assignment with. This is an individual assignment, so be aware of the course's collaboration policy.
Here's a checklist of things you should confirm before you hand in:
- Complete the self assessment.
- Make sure your collaborators are named in index.html.
- Make sure that the page renders correctly on Chrome (which we'll be using for evaluating your projects) and in either Firefox or Safari.
- Make a fresh folder and unpack your zip file into it.
- Make sure necessary assets (images, JS files, CSS files, etc.) used by your code are found in the fresh folder and load successfully.
Submit your zip file on Stellar.