The Cargo Book
![]()
Cargo is the Rust package manager. Cargo downloads your Rust project’s dependencies, compiles your project, makes packages, and upload them to crates.io, the Rust community’s package registry.
Sections
To get started with Cargo, install Cargo (and Rust) and set up your first crate.
The guide will give you all you need to know about how to use Cargo to develop Rust projects.
The reference covers the details of various areas of Cargo.
Getting Started
To get started with Cargo, install Cargo (and Rust) and set up your first crate.
Installation
Install Stable Rust and Cargo
The easiest way to get Cargo is to get the current stable release of Rust by
using the rustup script:
$ curl -sSf https://static.rust-lang.org/rustup.sh | sh
After this, you can use the rustup command to also install beta or nightly
channels for Rust and Cargo.
Install Nightly Cargo
To install just Cargo, the current recommended installation method is through the official nightly builds. Note that Cargo will also require that Rust is already installed on the system.
| Platform | 64-bit | 32-bit |
|---|---|---|
| Linux binaries | tar.gz | tar.gz |
| MacOS binaries | tar.gz | tar.gz |
| Windows binaries | tar.gz | tar.gz |
Build and Install Cargo from Source
Alternatively, you can build Cargo from source.
First Steps with Cargo
To start a new project with Cargo, use cargo new:
$ cargo new hello_world --bin
We’re passing --bin because we’re making a binary program: if we
were making a library, we’d pass --lib.
Let’s check out what Cargo has generated for us:
$ cd hello_world
$ tree .
.
├── Cargo.toml
└── src
    └── main.rs

1 directory, 2 files
This is all we need to get started. First, let’s check out Cargo.toml:
[package]
name = "hello_world"
version = "0.1.0"
authors = ["Your Name <you@example.com>"]
This is called a manifest, and it contains all of the metadata that Cargo needs to compile your project.
Here’s what’s in src/main.rs:
fn main() {
    println!("Hello, world!");
}
Cargo generated a “hello world” for us. Let’s compile it:
$ cargo build
   Compiling hello_world v0.1.0 (file:///path/to/project/hello_world)
And then run it:
$ ./target/debug/hello_world
Hello, world!
We can also use cargo run to compile and then run it, all in one step:
$ cargo run
     Fresh hello_world v0.1.0 (file:///path/to/project/hello_world)
   Running `target/hello_world`
Hello, world!
Going further
For more details on using Cargo, check out the Cargo Guide
Cargo Guide
This guide will give you all that you need to know about how to use Cargo to develop Rust projects.
- Why Cargo Exists
- Creating a New Project
- Working on an Existing Cargo Project
- Dependencies
- Project Layout
- Cargo.toml vs Cargo.lock
- Tests
- Continuous Integration
- Build Cache
Why Cargo Exists
Cargo is a tool that allows Rust projects to declare their various dependencies and ensure that you’ll always get a repeatable build.
To accomplish this goal, Cargo does four things:
- Introduces two metadata files with various bits of project information.
- Fetches and builds your project’s dependencies.
- Invokes
rustcor another build tool with the correct parameters to build your project. - Introduces conventions to make working with Rust projects easier.
Creating a New Project
To start a new project with Cargo, use cargo new:
$ cargo new hello_world --bin
We’re passing --bin because we’re making a binary program: if we
were making a library, we’d pass --lib. This also initializes a new git
repository by default. If you don't want it to do that, pass --vcs none.
Let’s check out what Cargo has generated for us:
$ cd hello_world
$ tree .
.
├── Cargo.toml
└── src
    └── main.rs

1 directory, 2 files
Let’s take a closer look at Cargo.toml:
[package]
name = "hello_world"
version = "0.1.0"
authors = ["Your Name <you@example.com>"]
This is called a manifest, and it contains all of the metadata that Cargo needs to compile your project.
Here’s what’s in src/main.rs:
fn main() {
    println!("Hello, world!");
}
Cargo generated a “hello world” for us. Let’s compile it:
$ cargo build
   Compiling hello_world v0.1.0 (file:///path/to/project/hello_world)
And then run it:
$ ./target/debug/hello_world
Hello, world!
We can also use cargo run to compile and then run it, all in one step (You
won't see the Compiling line if you have not made any changes since you last
compiled):
$ cargo run
   Compiling hello_world v0.1.0 (file:///path/to/project/hello_world)
     Running `target/debug/hello_world`
Hello, world!
You’ll now notice a new file, Cargo.lock. It contains information about our
dependencies. Since we don’t have any yet, it’s not very interesting.
Once you’re ready for release, you can use cargo build --release to compile
your files with optimizations turned on:
$ cargo build --release
   Compiling hello_world v0.1.0 (file:///path/to/project/hello_world)
cargo build --release puts the resulting binary in target/release instead of
target/debug.
Compiling in debug mode is the default for development-- compilation time is shorter since the compiler doesn't do optimizations, but the code will run slower. Release mode takes longer to compile, but the code will run faster.
Working on an Existing Cargo Project
If you download an existing project that uses Cargo, it’s really easy to get going.
First, get the project from somewhere. In this example, we’ll use rand
cloned from its repository on GitHub:
$ git clone https://github.com/rust-lang-nursery/rand.git
$ cd rand
To build, use cargo build:
$ cargo build
   Compiling rand v0.1.0 (file:///path/to/project/rand)
This will fetch all of the dependencies and then build them, along with the project.
Dependencies
crates.io is the Rust community's central package registry that serves as a
location to discover and download packages. cargo is configured to use it by
default to find requested packages.
To depend on a library hosted on crates.io, add it to your Cargo.toml.
Adding a dependency
If your Cargo.toml doesn't already have a [dependencies] section, add that,
then list the crate name and version that you would like to use. This example
adds a dependency of the time crate:
[dependencies]
time = "0.1.12"
The version string is a semver version requirement. The specifying dependencies docs have more information about the options you have here.
If we also wanted to add a dependency on the regex crate, we would not need
to add [dependencies] for each crate listed. Here's what your whole
Cargo.toml file would look like with dependencies on the time and regex
crates:
[package]
name = "hello_world"
version = "0.1.0"
authors = ["Your Name <you@example.com>"]

[dependencies]
time = "0.1.12"
regex = "0.1.41"
Re-run cargo build, and Cargo will fetch the new dependencies and all of
their dependencies, compile them all, and update the Cargo.lock:
$ cargo build
      Updating registry `https://github.com/rust-lang/crates.io-index`
   Downloading memchr v0.1.5
   Downloading libc v0.1.10
   Downloading regex-syntax v0.2.1
   Downloading memchr v0.1.5
   Downloading aho-corasick v0.3.0
   Downloading regex v0.1.41
     Compiling memchr v0.1.5
     Compiling libc v0.1.10
     Compiling regex-syntax v0.2.1
     Compiling memchr v0.1.5
     Compiling aho-corasick v0.3.0
     Compiling regex v0.1.41
     Compiling hello_world v0.1.0 (file:///path/to/project/hello_world)
Our Cargo.lock contains the exact information about which revision of all of
these dependencies we used.
Now, if regex gets updated, we will still build with the same revision until
we choose to cargo update.
You can now use the regex library using extern crate in main.rs.
extern crate regex;

use regex::Regex;

fn main() {
    let re = Regex::new(r"^\d{4}-\d{2}-\d{2}$").unwrap();
    println!("Did our date match? {}", re.is_match("2014-01-01"));
}
Running it will show:
$ cargo run
   Running `target/hello_world`
Did our date match? true
Project Layout
Cargo uses conventions for file placement to make it easy to dive into a new Cargo project:
.
├── Cargo.lock
├── Cargo.toml
├── benches
│   └── large-input.rs
├── examples
│   └── simple.rs
├── src
│   ├── bin
│   │   └── another_executable.rs
│   ├── lib.rs
│   └── main.rs
└── tests
    └── some-integration-tests.rs
Cargo.tomlandCargo.lockare stored in the root of your project (package root).- Source code goes in the
srcdirectory. - The default library file is
src/lib.rs. - The default executable file is
src/main.rs. - Other executables can be placed in
src/bin/*.rs. - Integration tests go in the
testsdirectory (unit tests go in each file they're testing). - Examples go in the
examplesdirectory. - Benchmarks go in the
benchesdirectory.
These are explained in more detail in the manifest description.
Cargo.toml vs Cargo.lock
Cargo.toml and Cargo.lock serve two different purposes. Before we talk
about them, here’s a summary:
Cargo.tomlis about describing your dependencies in a broad sense, and is written by you.Cargo.lockcontains exact information about your dependencies. It is maintained by Cargo and should not be manually edited.
If you’re building a library that other projects will depend on, put
Cargo.lock in your .gitignore. If you’re building an executable like a
command-line tool or an application, check Cargo.lock into git. If you're
curious about why that is, see "Why do binaries have Cargo.lock in version
control, but not libraries?" in the
FAQ.
Let’s dig in a little bit more.
Cargo.toml is a manifest file in which we can specify a bunch of
different metadata about our project. For example, we can say that we depend
on another project:
[package]
name = "hello_world"
version = "0.1.0"
authors = ["Your Name <you@example.com>"]

[dependencies]
rand = { git = "https://github.com/rust-lang-nursery/rand.git" }
This project has a single dependency, on the rand library. We’ve stated in
this case that we’re relying on a particular Git repository that lives on
GitHub. Since we haven’t specified any other information, Cargo assumes that
we intend to use the latest commit on the master branch to build our project.
Sound good? Well, there’s one problem: If you build this project today, and
then you send a copy to me, and I build this project tomorrow, something bad
could happen. There could be more commits to rand in the meantime, and my
build would include new commits while yours would not. Therefore, we would
get different builds. This would be bad because we want reproducible builds.
We could fix this problem by putting a rev line in our Cargo.toml:
[dependencies]
rand = { git = "https://github.com/rust-lang-nursery/rand.git", rev = "9f35b8e" }
Now our builds will be the same. But there’s a big drawback: now we have to manually think about SHA-1s every time we want to update our library. This is both tedious and error prone.
Enter the Cargo.lock. Because of its existence, we don’t need to manually
keep track of the exact revisions: Cargo will do it for us. When we have a
manifest like this:
[package]
name = "hello_world"
version = "0.1.0"
authors = ["Your Name <you@example.com>"]

[dependencies]
rand = { git = "https://github.com/rust-lang-nursery/rand.git" }
Cargo will take the latest commit and write that information out into our
Cargo.lock when we build for the first time. That file will look like this:
[[package]]
name = "hello_world"
version = "0.1.0"
dependencies = [
 "rand 0.1.0 (git+https://github.com/rust-lang-nursery/rand.git#9f35b8e439eeedd60b9414c58f389bdc6a3284f9)",
]

[[package]]
name = "rand"
version = "0.1.0"
source = "git+https://github.com/rust-lang-nursery/rand.git#9f35b8e439eeedd60b9414c58f389bdc6a3284f9"
You can see that there’s a lot more information here, including the exact
revision we used to build. Now when you give your project to someone else,
they’ll use the exact same SHA, even though we didn’t specify it in our
Cargo.toml.
When we’re ready to opt in to a new version of the library, Cargo can re-calculate the dependencies and update things for us:
$ cargo update           # updates all dependencies
$ cargo update -p rand   # updates just “rand”
This will write out a new Cargo.lock with the new version information. Note
that the argument to cargo update is actually a
Package ID Specification and rand is just a short
specification.
Tests
Cargo can run your tests with the cargo test command. Cargo looks for tests
to run in two places: in each of your src files and any tests in tests/.
Tests in your src files should be unit tests, and tests in tests/ should be
integration-style tests. As such, you’ll need to import your crates into
the files in tests.
Here's an example of running cargo test in our project, which currently has
no tests:
$ cargo test
   Compiling rand v0.1.0 (https://github.com/rust-lang-nursery/rand.git#9f35b8e)
   Compiling hello_world v0.1.0 (file:///path/to/project/hello_world)
     Running target/test/hello_world-9c2b65bbb79eabce

running 0 tests

test result: ok. 0 passed; 0 failed; 0 ignored; 0 measured; 0 filtered out
If our project had tests, we would see more output with the correct number of tests.
You can also run a specific test by passing a filter:
$ cargo test foo
This will run any test with foo in its name.
cargo test runs additional checks as well. For example, it will compile any
examples you’ve included and will also test the examples in your
documentation. Please see the testing guide in the Rust
documentation for more details.
Continuous Integration
Travis CI
To test your project on Travis CI, here is a sample .travis.yml file:
language: rust
rust:
  - stable
  - beta
  - nightly
matrix:
  allow_failures:
    - rust: nightly
This will test all three release channels, but any breakage in nightly will not fail your overall build. Please see the Travis CI Rust documentation for more information.
Build cache
Cargo shares build artifacts among all the packages of a single workspace. Today, Cargo does not share build results across different workspaces, but a similar result can be achieved by using a third party tool, sccache.
To setup sccache, install it with cargo install sccache and set
RUSTC_WRAPPER environmental variable to sccache before invoking Cargo.
If you use bash, it makes sense to add export RUSTC_WRAPPER=sccache to
.bashrc. Refer to sccache documentation for more details.
Cargo Reference
The reference covers the details of various areas of Cargo.
- Specifying Dependencies
- The Manifest Format
- Configuration
- Environment Variables
- Build Scripts
- Publishing on crates.io
- Package ID Specifications
- Source Replacement
- External Tools
Specifying Dependencies
Your crates can depend on other libraries from crates.io, git repositories, or
subdirectories on your local file system. You can also temporarily override the
location of a dependency— for example, to be able to test out a bug fix in the
dependency that you are working on locally. You can have different
dependencies for different platforms, and dependencies that are only used during
development. Let's take a look at how to do each of these.
Specifying dependencies from crates.io
Cargo is configured to look for dependencies on crates.io by default. Only
the name and a version string are required in this case. In the cargo
guide, we specified a dependency on the time crate:
[dependencies]
time = "0.1.12"
The string "0.1.12" is a semver version requirement. Since this
string does not have any operators in it, it is interpreted the same way as
if we had specified "^0.1.12", which is called a caret requirement.
Caret requirements
Caret requirements allow SemVer compatible updates to a specified version.
An update is allowed if the new version number does not modify the left-most
non-zero digit in the major, minor, patch grouping. In this case, if we ran
cargo update -p time, cargo would update us to version 0.1.13 if it was
available, but would not update us to 0.2.0. If instead we had specified the
version string as ^1.0, cargo would update to 1.1 but not 2.0. The version
0.0.x is not considered compatible with any other version.
Here are some more examples of caret requirements and the versions that would be allowed with them:
^1.2.3 := >=1.2.3 <2.0.0
^1.2 := >=1.2.0 <2.0.0
^1 := >=1.0.0 <2.0.0
^0.2.3 := >=0.2.3 <0.3.0
^0.0.3 := >=0.0.3 <0.0.4
^0.0 := >=0.0.0 <0.1.0
^0 := >=0.0.0 <1.0.0
This compatibility convention is different from SemVer in the way it treats
versions before 1.0.0. While SemVer says there is no compatibility before
1.0.0, Cargo considers 0.x.y to be compatible with 0.x.z, where y ≥ z
and x > 0.
Tilde requirements
Tilde requirements specify a minimal version with some ability to update. If you specify a major, minor, and patch version or only a major and minor version, only patch-level changes are allowed. If you only specify a major version, then minor- and patch-level changes are allowed.
~1.2.3 is an example of a tilde requirement.
~1.2.3 := >=1.2.3 <1.3.0
~1.2 := >=1.2.0 <1.3.0
~1 := >=1.0.0 <2.0.0
Wildcard requirements
Wildcard requirements allow for any version where the wildcard is positioned.
*, 1.* and 1.2.* are examples of wildcard requirements.
* := >=0.0.0
1.* := >=1.0.0 <2.0.0
1.2.* := >=1.2.0 <1.3.0
Inequality requirements
Inequality requirements allow manually specifying a version range or an exact version to depend on.
Here are some examples of inequality requirements:
>= 1.2.0
> 1
< 2
= 1.2.3
Multiple requirements
Multiple version requirements can also be separated with a comma, e.g. >= 1.2, < 1.5.
Specifying dependencies from git repositories
To depend on a library located in a git repository, the minimum information
you need to specify is the location of the repository with the git key:
[dependencies]
rand = { git = "https://github.com/rust-lang-nursery/rand" }
Cargo will fetch the git repository at this location then look for a
Cargo.toml for the requested crate anywhere inside the git repository
(not necessarily at the root).
Since we haven’t specified any other information, Cargo assumes that
we intend to use the latest commit on the master branch to build our project.
You can combine the git key with the rev, tag, or branch keys to
specify something else. Here's an example of specifying that you want to use
the latest commit on a branch named next:
[dependencies]
rand = { git = "https://github.com/rust-lang-nursery/rand", branch = "next" }
Specifying path dependencies
Over time, our hello_world project from the guide has
grown significantly in size! It’s gotten to the point that we probably want to
split out a separate crate for others to use. To do this Cargo supports path
dependencies which are typically sub-crates that live within one repository.
Let’s start off by making a new crate inside of our hello_world project:
# inside of hello_world/
$ cargo new hello_utils
This will create a new folder hello_utils inside of which a Cargo.toml and
src folder are ready to be configured. In order to tell Cargo about this, open
up hello_world/Cargo.toml and add hello_utils to your dependencies:
[dependencies]
hello_utils = { path = "hello_utils" }
This tells Cargo that we depend on a crate called hello_utils which is found
in the hello_utils folder (relative to the Cargo.toml it’s written in).
And that’s it! The next cargo build will automatically build hello_utils and
all of its own dependencies, and others can also start using the crate as well.
However, crates that use dependencies specified with only a path are not
permitted on crates.io. If we wanted to publish our hello_world crate, we
would need to publish a version of hello_utils to crates.io
and specify its version in the dependencies line as well:
[dependencies]
hello_utils = { path = "hello_utils", version = "0.1.0" }
Overriding dependencies
There are a number of methods in Cargo to support overriding dependencies and otherwise controlling the dependency graph. These options are typically, though, only available at the workspace level and aren't propagated through dependencies. In other words, "applications" have the ability to override dependencies but "libraries" do not.
The desire to override a dependency or otherwise alter some dependencies can arise through a number of scenarios. Most of them, however, boil down to the ability to work with a crate before it's been published to crates.io. For example:
- A crate you're working on is also used in a much larger application you're working on, and you'd like to test a bug fix to the library inside of the larger application.
- An upstream crate you don't work on has a new feature or a bug fix on the master branch of its git repository which you'd like to test out.
- You're about to publish a new major version of your crate, but you'd like to do integration testing across an entire project to ensure the new major version works.
- You've submitted a fix to an upstream crate for a bug you found, but you'd like to immediately have your application start depending on the fixed version of the crate to avoid blocking on the bug fix getting merged.
These scenarios are currently all solved with the [patch] manifest
section. Historically some of these scenarios have been solved
with the [replace] section, but we'll document the [patch]
section here.
Testing a bugfix
Let's say you're working with the [uuid] crate but while you're working on it
you discover a bug. You are, however, quite enterprising so you decide to also
try out to fix the bug! Originally your manifest will look like:
[package]
name = "my-library"
version = "0.1.0"
authors = ["..."]

[dependencies]
uuid = "1.0"
First thing we'll do is to clone the uuid repository
locally via:
$ git clone https://github.com/rust-lang-nursery/uuid
Next we'll edit the manifest of my-library to contain:
[patch.crates-io]
uuid = { path = "../path/to/uuid" }
Here we declare that we're patching the source crates-io with a new
dependency. This will effectively add the local checked out version of uuid to
the crates.io registry for our local project.
Next up we need to ensure that our lock file is updated to use this new version
of uuid so our project uses the locally checked out copy instead of one from
crates.io. The way [patch] works is that it'll load the dependency at
../path/to/uuid and then whenever crates.io is queried for versions of uuid
it'll also return the local version.
This means that the version number of the local checkout is significant and will
affect whether the patch is used. Our manifest declared uuid = "1.0" which
means we'll only resolve to >= 1.0.0, < 2.0.0, and Cargo's greedy resolution
algorithm also means that we'll resolve to the maximum version within that
range. Typically this doesn't matter as the version of the git repository will
already be greater or match the maximum version published on crates.io, but it's
important to keep this in mind!
In any case, typically all you need to do now is:
$ cargo build
   Compiling uuid v1.0.0 (file://.../uuid)
   Compiling my-library v0.1.0 (file://.../my-library)
    Finished dev [unoptimized + debuginfo] target(s) in 0.32 secs
And that's it! You're now building with the local version of uuid (note the
file:// in the build output). If you don't see the file:// version getting
built then you may need to run cargo update -p uuid --precise $version where
$version is the version of the locally checked out copy of uuid.
Once you've fixed the bug you originally found the next thing you'll want to do
is to likely submit that as a pull request to the uuid crate itself. Once
you've done this then you can also update the [patch] section. The listing
inside of [patch] is just like the [dependencies] section, so once your pull
request is merged you could change your path dependency to:
[patch.crates-io]
uuid = { git = 'https://github.com/rust-lang-nursery/uuid' }
Working with an unpublished minor version
Let's now shift gears a bit from bug fixes to adding features. While working on
my-library you discover that a whole new feature is needed in the uuid
crate. You've implemented this feature, tested it locally above with [patch],
and submitted a pull request. Let's go over how you continue to use and test it
before it's actually published.
Let's also say that the current version of uuid on crates.io is 1.0.0, but
since then the master branch of the git repository has updated to 1.0.1. This
branch includes your new feature you submitted previously. To use this
repository we'll edit our Cargo.toml to look like
[package]
name = "my-library"
version = "0.1.0"
authors = ["..."]

[dependencies]
uuid = "1.0.1"

[patch.crates-io]
uuid = { git = 'https://github.com/rust-lang-nursery/uuid' }
Note that our local dependency on uuid has been updated to 1.0.1 as it's
what we'll actually require once the crate is published. This version doesn't
exist on crates.io, though, so we provide it with the [patch] section of the
manifest.
Now when our library is built it'll fetch uuid from the git repository and
resolve to 1.0.1 inside the repository instead of trying to download a version
from crates.io. Once 1.0.1 is published on crates.io the [patch] section can
be deleted.
It's also worth nothing that [patch] applies transitively. Let's say you use
my-library in a larger project, such as:
[package]
name = "my-binary"
version = "0.1.0"
authors = ["..."]

[dependencies]
my-library = { git = 'https://example.com/git/my-library' }
uuid = "1.0"

[patch.crates-io]
uuid = { git = 'https://github.com/rust-lang-nursery/uuid' }
Remember that [patch] is applicable transitively but can only be defined at
the top level so we consumers of my-library have to repeat the [patch] section
if necessary. Here, though, the new uuid crate applies to both our dependency on
uuid and the my-library -> uuid dependency. The uuid crate will be resolved to
one version for this entire crate graph, 1.0.1, and it'll be pulled from the git
repository.
Overriding repository URL
In case the dependency you want to override isn't loaded from crates.io, you'll have to change a bit how you use [patch]:
[patch."https://github.com/your/repository"]
my-library = { path = "../my-library/path" }
And that's it!
Prepublishing a breaking change
As a final scenario, let's take a look at working with a new major version of a
crate, typically accompanied with breaking changes. Sticking with our previous
crates, this means that we're going to be creating version 2.0.0 of the uuid
crate. After we've submitted all changes upstream we can update our manifest for
my-library to look like:
[dependencies]
uuid = "2.0"

[patch.crates-io]
uuid = { git = "https://github.com/rust-lang-nursery/uuid", branch = "2.0.0" }
And that's it! Like with the previous example the 2.0.0 version doesn't actually
exist on crates.io but we can still put it in through a git dependency through
the usage of the [patch] section. As a thought exercise let's take another
look at the my-binary manifest from above again as well:
[package]
name = "my-binary"
version = "0.1.0"
authors = ["..."]

[dependencies]
my-library = { git = 'https://example.com/git/my-library' }
uuid = "1.0"

[patch.crates-io]
uuid = { git = 'https://github.com/rust-lang-nursery/uuid', version = '2.0.0' }
Note that this will actually resolve to two versions of the uuid crate. The
my-binary crate will continue to use the 1.x.y series of the uuid crate but
the my-library crate will use the 2.0.0 version of uuid. This will allow you
to gradually roll out breaking changes to a crate through a dependency graph
without being force to update everything all at once.
Overriding with local dependencies
Sometimes you're only temporarily working on a crate and you don't want to have
to modify Cargo.toml like with the [patch] section above. For this use
case Cargo offers a much more limited version of overrides called path
overrides.
Path overrides are specified through .cargo/config instead of Cargo.toml,
and you can find more documentation about this configuration.
Inside of .cargo/config you'll specify a key called paths:
paths = ["/path/to/uuid"]
This array should be filled with directories that contain a Cargo.toml. In
this instance, we’re just adding uuid, so it will be the only one that’s
overridden. This path can be either absolute or relative to the directory that
contains the .cargo folder.
Path overrides are more restricted than the [patch] section, however, in
that they cannot change the structure of the dependency graph. When a
path replacement is used then the previous set of dependencies
must all match exactly to the new Cargo.toml specification. For example this
means that path overrides cannot be used to test out adding a dependency to a
crate, instead [patch] must be used in that situation. As a result usage of a
path override is typically isolated to quick bug fixes rather than larger
changes.
Note: using a local configuration to override paths will only work for crates that have been published to crates.io. You cannot use this feature to tell Cargo how to find local unpublished crates.
Platform specific dependencies
Platform-specific dependencies take the same format, but are listed under a
target section. Normally Rust-like #[cfg] syntax will be used to define
these sections:
[target.'cfg(windows)'.dependencies]
winhttp = "0.4.0"

[target.'cfg(unix)'.dependencies]
openssl = "1.0.1"

[target.'cfg(target_arch = "x86")'.dependencies]
native = { path = "native/i686" }

[target.'cfg(target_arch = "x86_64")'.dependencies]
native = { path = "native/x86_64" }
Like with Rust, the syntax here supports the not, any, and all operators
to combine various cfg name/value pairs. Note that the cfg syntax has only
been available since Cargo 0.9.0 (Rust 1.8.0).
In addition to #[cfg] syntax, Cargo also supports listing out the full target
the dependencies would apply to:
[target.x86_64-pc-windows-gnu.dependencies]
winhttp = "0.4.0"

[target.i686-unknown-linux-gnu.dependencies]
openssl = "1.0.1"
If you’re using a custom target specification, quote the full path and file name:
[target."x86_64/windows.json".dependencies]
winhttp = "0.4.0"

[target."i686/linux.json".dependencies]
openssl = "1.0.1"
native = { path = "native/i686" }

[target."x86_64/linux.json".dependencies]
openssl = "1.0.1"
native = { path = "native/x86_64" }
Development dependencies
You can add a [dev-dependencies] section to your Cargo.toml whose format
is equivalent to [dependencies]:
[dev-dependencies]
tempdir = "0.3"
Dev-dependencies are not used when compiling a package for building, but are used for compiling tests, examples, and benchmarks.
These dependencies are not propagated to other packages which depend on this package.
You can also have target-specific development dependencies by using
dev-dependencies in the target section header instead of dependencies. For
example:
[target.'cfg(unix)'.dev-dependencies]
mio = "0.0.1"
Build dependencies
You can depend on other Cargo-based crates for use in your build scripts.
Dependencies are declared through the build-dependencies section of the
manifest:
[build-dependencies]
gcc = "0.3"
The build script does not have access to the dependencies listed
in the dependencies or dev-dependencies section. Build
dependencies will likewise not be available to the package itself
unless listed under the dependencies section as well. A package
itself and its build script are built separately, so their
dependencies need not coincide. Cargo is kept simpler and cleaner by
using independent dependencies for independent purposes.
Choosing features
If a package you depend on offers conditional features, you can specify which to use:
[dependencies.awesome]
version = "1.3.5"
default-features = false # do not include the default features, and optionally
                         # cherry-pick individual features
features = ["secure-password", "civet"]
More information about features can be found in the manifest documentation.
The Manifest Format
The Cargo.toml file for each package is called its manifest. Every manifest
file consists of one or more sections.
The [package] section
The first section in a Cargo.toml is [package].
[package]
name = "hello_world" # the name of the package
version = "0.1.0"    # the current version, obeying semver
authors = ["you@example.com"]
All three of these fields are mandatory.
The version field
Cargo bakes in the concept of Semantic Versioning, so make sure you follow some basic rules:
- Before you reach 1.0.0, anything goes, but if you make breaking changes, increment the minor version. In Rust, breaking changes include adding fields to structs or variants to enums.
- After 1.0.0, only make breaking changes when you increment the major version. Don’t break the build.
- After 1.0.0, don’t add any new public API (no new
pubanything) in tiny versions. Always increment the minor version if you add any newpubstructs, traits, fields, types, functions, methods or anything else. - Use version numbers with three numeric parts such as 1.0.0 rather than 1.0.
The build field (optional)
This field specifies a file in the project root which is a build script for building native code. More information can be found in the build script guide.
[package]
# ...
build = "build.rs"
The documentation field (optional)
This field specifies a URL to a website hosting the crate's documentation. If no URL is specified in the manifest file, crates.io will automatically link your crate to the corresponding docs.rs page.
Documentation links from specific hosts are blacklisted. Hosts are added to the blacklist if they are known to not be hosting documentation and are possibly of malicious intent e.g. ad tracking networks. URLs from the following hosts are blacklisted:
- rust-ci.org
Documentation URLs from blacklisted hosts will not appear on crates.io, and may be replaced by docs.rs links.
The exclude and include fields (optional)
You can explicitly specify to Cargo that a set of globs should be
ignored or included for the purposes of packaging and rebuilding a package. The
globs specified in the exclude field identify a set of files that are not
included when a package is published as well as ignored for the purposes of
detecting when to rebuild a package, and the globs in include specify files
that are explicitly included.
If a VCS is being used for a package, the exclude field will be seeded with
the VCS’ ignore settings (.gitignore for git for example).
[package]
# ...
exclude = ["build/**/*.o", "doc/**/*.html"]
[package]
# ...
include = ["src/**/*", "Cargo.toml"]
The options are mutually exclusive: setting include will override an
exclude. Note that include must be an exhaustive list of files as otherwise
necessary source files may not be included.
Migrating to gitignore-like pattern matching
The current interpretation of these configs is based on UNIX Globs, as
implemented in the glob crate. We want
Cargo's include and exclude configs to work as similar to gitignore as
possible. The gitignore specification is
also based on Globs, but has a bunch of additional features that enable easier
pattern writing and more control. Therefore, we are migrating the interpretation
for the rules of these configs to use the ignore
crate, and treat them each rule as a single
line in a gitignore file. See the tracking
issue for more details on the
migration.
The publish field (optional)
The publish field can be used to prevent a package from being published to a
package registry (like crates.io) by mistake.
[package]
# ...
publish = false
The workspace field (optional)
The workspace field can be used to configure the workspace that this package
will be a member of. If not specified this will be inferred as the first
Cargo.toml with [workspace] upwards in the filesystem.
[package]
# ...
workspace = "path/to/workspace/root"
For more information, see the documentation for the workspace table below.
Package metadata
There are a number of optional metadata fields also accepted under the
[package] section:
[package]
# ...

# A short blurb about the package. This is not rendered in any format when
# uploaded to crates.io (aka this is not markdown).
description = "..."

# These URLs point to more information about the package. These are
# intended to be webviews of the relevant data, not necessarily compatible
# with VCS tools and the like.
documentation = "..."
homepage = "..."
repository = "..."

# This points to a file under the package root (relative to this `Cargo.toml`).
# The contents of this file are stored and indexed in the registry.
# crates.io will render this file and place the result on the crate's page.
readme = "..."

# This is a list of up to five keywords that describe this crate. Keywords
# are searchable on crates.io, and you may choose any words that would
# help someone find this crate.
keywords = ["...", "..."]

# This is a list of up to five categories where this crate would fit.
# Categories are a fixed list available at crates.io/category_slugs, and
# they must match exactly.
categories = ["...", "..."]

# This is an SPDX 2.1 license expression for this package.  Currently
# crates.io will validate the license provided against a whitelist of
# known license and exception identifiers from the SPDX license list
# 2.4.  Parentheses are not currently supported.
#
# Multiple licenses can be separated with a `/`, although that usage
# is deprecated.  Instead, use a license expression with AND and OR
# operators to get more explicit semantics.
license = "..."

# If a project is using a nonstandard license, then this key may be specified in
# lieu of the above key and must point to a file relative to this manifest
# (similar to the readme key).
license-file = "..."

# Optional specification of badges to be displayed on crates.io.
#
# - The badges pertaining to build status that are currently available are
#   Appveyor, CircleCI, GitLab, and TravisCI.
# - Available badges pertaining to code test coverage are Codecov and
#   Coveralls.
# - There are also maintenance-related badges based on isitmaintained.com
#   which state the issue resolution time, percent of open issues, and future
#   maintenance intentions.
#
# If a `repository` key is required, this refers to a repository in
# `user/repo` format.
[badges]

# Appveyor: `repository` is required. `branch` is optional; default is `master`
# `service` is optional; valid values are `github` (default), `bitbucket`, and
# `gitlab`; `id` is optional; you can specify the appveyor project id if you
# want to use that instead. `project_name` is optional; use when the repository
# name differs from the appveyor project name.
appveyor = { repository = "...", branch = "master", service = "github" }

# Circle CI: `repository` is required. `branch` is optional; default is `master`
circle-ci = { repository = "...", branch = "master" }

# GitLab: `repository` is required. `branch` is optional; default is `master`
gitlab = { repository = "...", branch = "master" }

# Travis CI: `repository` in format "<user>/<project>" is required.
# `branch` is optional; default is `master`
travis-ci = { repository = "...", branch = "master" }

# Codecov: `repository` is required. `branch` is optional; default is `master`
# `service` is optional; valid values are `github` (default), `bitbucket`, and
# `gitlab`.
codecov = { repository = "...", branch = "master", service = "github" }

# Coveralls: `repository` is required. `branch` is optional; default is `master`
# `service` is optional; valid values are `github` (default) and `bitbucket`.
coveralls = { repository = "...", branch = "master", service = "github" }

# Is it maintained resolution time: `repository` is required.
is-it-maintained-issue-resolution = { repository = "..." }

# Is it maintained percentage of open issues: `repository` is required.
is-it-maintained-open-issues = { repository = "..." }

# Maintenance: `status` is required Available options are `actively-developed`,
# `passively-maintained`, `as-is`, `none`, `experimental`, `looking-for-maintainer`
# and `deprecated`.
maintenance = { status = "..." }
The crates.io registry will render the description, display the license, link to the three URLs and categorize by the keywords. These keys provide useful information to users of the registry and also influence the search ranking of a crate. It is highly discouraged to omit everything in a published crate.
SPDX 2.1 license expressions are documented here. The current version of the license list is available here, and version 2.4 is available here.
The metadata table (optional)
Cargo by default will warn about unused keys in Cargo.toml to assist in
detecting typos and such. The package.metadata table, however, is completely
ignored by Cargo and will not be warned about. This section can be used for
tools which would like to store project configuration in Cargo.toml. For
example:
[package]
name = "..."
# ...

# Metadata used when generating an Android APK, for example.
[package.metadata.android]
package-name = "my-awesome-android-app"
assets = "path/to/static"
Dependency sections
See the specifying dependencies page for
information on the [dependencies], [dev-dependencies],
[build-dependencies], and target-specific [target.*.dependencies] sections.
The [profile.*] sections
Cargo supports custom configuration of how rustc is invoked through profiles at the top level. Any manifest may declare a profile, but only the top level project’s profiles are actually read. All dependencies’ profiles will be overridden. This is done so the top-level project has control over how its dependencies are compiled.
There are five currently supported profile names, all of which have the same configuration available to them. Listed below is the configuration available, along with the defaults for each profile.
# The development profile, used for `cargo build`.
[profile.dev]
opt-level = 0      # controls the `--opt-level` the compiler builds with.
                   # 0-1 is good for debugging. 2 is well-optimized. Max is 3.
debug = true       # include debug information (debug symbols). Equivalent to
                   # `-C debuginfo=2` compiler flag.
rpath = false      # controls whether compiler should set loader paths.
                   # If true, passes `-C rpath` flag to the compiler.
lto = false        # Link Time Optimization usually reduces size of binaries
                   # and static libraries. Increases compilation time.
                   # If true, passes `-C lto` flag to the compiler, and if a
                   # string is specified like 'thin' then `-C lto=thin` will
                   # be passed
debug-assertions = true # controls whether debug assertions are enabled
                   # (e.g. debug_assert!() and arithmetic overflow checks)
codegen-units = 1  # if > 1 enables parallel code generation which improves
                   # compile times, but prevents some optimizations.
                   # Passes `-C codegen-units`.
panic = 'unwind'   # panic strategy (`-C panic=...`), can also be 'abort'
incremental = true # whether or not incremental compilation is enabled
overflow-checks = true # use overflow checks for integer arithmetic.
                   # Passes the `-C overflow-checks=...` flag to the compiler.

# The release profile, used for `cargo build --release`.
[profile.release]
opt-level = 3
debug = false
rpath = false
lto = false
debug-assertions = false
codegen-units = 1
panic = 'unwind'
incremental = false
overflow-checks = false

# The testing profile, used for `cargo test`.
[profile.test]
opt-level = 0
debug = 2
rpath = false
lto = false
debug-assertions = true
codegen-units = 1
panic = 'unwind'
incremental = true
overflow-checks = true

# The benchmarking profile, used for `cargo bench` and `cargo test --release`.
[profile.bench]
opt-level = 3
debug = false
rpath = false
lto = false
debug-assertions = false
codegen-units = 1
panic = 'unwind'
incremental = false
overflow-checks = false

# The documentation profile, used for `cargo doc`.
[profile.doc]
opt-level = 0
debug = 2
rpath = false
lto = false
debug-assertions = true
codegen-units = 1
panic = 'unwind'
incremental = true
overflow-checks = true
The [features] section
Cargo supports features to allow expression of:
- conditional compilation options (usable through
cfgattributes); - optional dependencies, which enhance a package, but are not required; and
- clusters of optional dependencies, such as
postgres, that would include thepostgrespackage, thepostgres-macrospackage, and possibly other packages (such as development-time mocking libraries, debugging tools, etc.).
A feature of a package is either an optional dependency, or a set of other features. The format for specifying features is:
[package]
name = "awesome"

[features]
# The default set of optional packages. Most people will want to use these
# packages, but they are strictly optional. Note that `session` is not a package
# but rather another feature listed in this manifest.
default = ["jquery", "uglifier", "session"]

# A feature with no dependencies is used mainly for conditional compilation,
# like `#[cfg(feature = "go-faster")]`.
go-faster = []

# The `secure-password` feature depends on the bcrypt package. This aliasing
# will allow people to talk about the feature in a higher-level way and allow
# this package to add more requirements to the feature in the future.
secure-password = ["bcrypt"]

# Features can be used to reexport features of other packages. The `session`
# feature of package `awesome` will ensure that the `session` feature of the
# package `cookie` is also enabled.
session = ["cookie/session"]

[dependencies]
# These packages are mandatory and form the core of this package’s distribution.
cookie = "1.2.0"
oauth = "1.1.0"
route-recognizer = "=2.1.0"

# A list of all of the optional dependencies, some of which are included in the
# above `features`. They can be opted into by apps.
jquery = { version = "1.0.2", optional = true }
uglifier = { version = "1.5.3", optional = true }
bcrypt = { version = "*", optional = true }
civet = { version = "*", optional = true }
To use the package awesome:
[dependencies.awesome]
version = "1.3.5"
default-features = false # do not include the default features, and optionally
                         # cherry-pick individual features
features = ["secure-password", "civet"]
Rules
The usage of features is subject to a few rules:
- Feature names must not conflict with other package names in the manifest. This
is because they are opted into via
features = [...], which only has a single namespace. - With the exception of the
defaultfeature, all features are opt-in. To opt out of the default feature, usedefault-features = falseand cherry-pick individual features. - Feature groups are not allowed to cyclically depend on one another.
- Dev-dependencies cannot be optional.
- Features groups can only reference optional dependencies.
- When a feature is selected, Cargo will call
rustcwith--cfg feature="${feature_name}". If a feature group is included, it and all of its individual features will be included. This can be tested in code via#[cfg(feature = "foo")].
Note that it is explicitly allowed for features to not actually activate any optional dependencies. This allows packages to internally enable/disable features without requiring a new dependency.
Usage in end products
One major use-case for this feature is specifying optional features in end-products. For example, the Servo project may want to include optional features that people can enable or disable when they build it.
In that case, Servo will describe features in its Cargo.toml and they can be
enabled using command-line flags:
$ cargo build --release --features "shumway pdf"
Default features could be excluded using --no-default-features.
Usage in packages
In most cases, the concept of optional dependency in a library is best expressed as a separate package that the top-level application depends on.
However, high-level packages, like Iron or Piston, may want the ability to curate a number of packages for easy installation. The current Cargo system allows them to curate a number of mandatory dependencies into a single package for easy installation.
In some cases, packages may want to provide additional curation for optional dependencies:
- grouping a number of low-level optional dependencies together into a single high-level feature;
- specifying packages that are recommended (or suggested) to be included by users of the package; and
- including a feature (like
secure-passwordin the motivating example) that will only work if an optional dependency is available, and would be difficult to implement as a separate package (for example, it may be overly difficult to design an IO package to be completely decoupled from OpenSSL, with opt-in via the inclusion of a separate package).
In almost all cases, it is an antipattern to use these features outside of high-level packages that are designed for curation. If a feature is optional, it can almost certainly be expressed as a separate package.
The [workspace] section
Projects can define a workspace which is a set of crates that will all share the
same Cargo.lock and output directory. The [workspace] table can be defined
as:
[workspace]

# Optional key, inferred from path dependencies if not present.
# Additional non-path dependencies that should be included must be given here.
# In particular, for a virtual manifest, all members have to be listed.
members = ["path/to/member1", "path/to/member2", "path/to/member3/*"]

# Optional key, empty if not present.
exclude = ["path1", "path/to/dir2"]
Workspaces were added to Cargo as part of RFC 1525 and have a number of properties:
- A workspace can contain multiple crates where one of them is the root crate.
- The root crate's
Cargo.tomlcontains the[workspace]table, but is not required to have other configuration. - Whenever any crate in the workspace is compiled, output is placed in the
workspace root. i.e. next to the root crate's
Cargo.toml. - The lock file for all crates in the workspace resides in the workspace root.
- The
[patch],[replace]and[profile.*]sections inCargo.tomlare only recognized in the root crate's manifest, and ignored in member crates' manifests.
The root crate of a workspace, indicated by the presence of [workspace] in
its manifest, is responsible for defining the entire workspace. All path
dependencies residing in the workspace directory become members. You can add
additional packages to the workspace by listing them in the members key. Note
that members of the workspaces listed explicitly will also have their path
dependencies included in the workspace. Sometimes a project may have a lot of
workspace members and it can be onerous to keep up to date. The path dependency
can also use globs to match multiple paths. Finally, the exclude
key can be used to blacklist paths from being included in a workspace. This can
be useful if some path dependencies aren't desired to be in the workspace at
all.
The package.workspace manifest key (described above) is used in member crates
to point at a workspace's root crate. If this key is omitted then it is inferred
to be the first crate whose manifest contains [workspace] upwards in the
filesystem.
A crate may either specify package.workspace or specify [workspace]. That
is, a crate cannot both be a root crate in a workspace (contain [workspace])
and also be a member crate of another workspace (contain package.workspace).
Most of the time workspaces will not need to be dealt with as cargo new and
cargo init will handle workspace configuration automatically.
Virtual Manifest
In workspace manifests, if the package table is present, the workspace root
crate will be treated as a normal package, as well as a workspace. If the
package table is not present in a workspace manifest, it is called a virtual
manifest.
Package selection
In a workspace, package-related cargo commands like cargo build apply to
packages selected by -p / --package or --all command-line parameters.
When neither is specified, the optional default-members configuration is used:
[workspace]
members = ["path/to/member1", "path/to/member2", "path/to/member3/*"]
default-members = ["path/to/member2", "path/to/member3/foo"]
When specified, default-members must expand to a subset of members.
When default-members is not specified, the default is the root manifest
if it is a package, or every member manifest (as if --all were specified
on the command-line) for virtual workspaces.
#TODO: move this to a more appropriate place
The project layout
If your project is an executable, name the main source file src/main.rs. If it
is a library, name the main source file src/lib.rs.
Cargo will also treat any files located in src/bin/*.rs as executables. If your
executable consists of more than just one source file, you might also use a directory
inside src/bin containing a main.rs file which will be treated as an executable
with a name of the parent directory.
Do note, however, once you add a [[bin]] section (see
below), Cargo will no longer automatically build files
located in src/bin/*.rs. Instead you must create a [[bin]] section for
each file you want to build.
Your project can optionally contain folders named examples, tests, and
benches, which Cargo will treat as containing examples,
integration tests, and benchmarks respectively. Analogous to bin targets, they
may be composed of single files or directories with a main.rs file.
▾ src/           # directory containing source files
  lib.rs         # the main entry point for libraries and packages
  main.rs        # the main entry point for projects producing executables
  ▾ bin/         # (optional) directory containing additional executables
    *.rs
  ▾ */           # (optional) directories containing multi-file executables
    main.rs
▾ examples/      # (optional) examples
  *.rs
▾ */             # (optional) directories containing multi-file examples
  main.rs
▾ tests/         # (optional) integration tests
  *.rs
▾ */             # (optional) directories containing multi-file tests
  main.rs
▾ benches/       # (optional) benchmarks
  *.rs
▾ */             # (optional) directories containing multi-file benchmarks
  main.rs
To structure your code after you've created the files and folders for your project, you should remember to use Rust's module system, which you can read about in the book.
Examples
Files located under examples are example uses of the functionality provided by
the library. When compiled, they are placed in the target/examples directory.
They can compile either as executables (with a main() function) or libraries
and pull in the library by using extern crate <library-name>. They are
compiled when you run your tests to protect them from bitrotting.
You can run individual executable examples with the command cargo run --example <example-name>.
Specify crate-type to make an example be compiled as a library (additional
information about crate types is available in
the Cargo reference):
[[example]]
name = "foo"
crate-type = ["staticlib"]
You can build individual library examples with the command cargo build --example <example-name>.
Tests
When you run cargo test, Cargo will:
- compile and run your library’s unit tests, which are in the files reachable
from
lib.rs(naturally, any sections marked with#[cfg(test)]will be considered at this stage); - compile and run your library’s documentation tests, which are embedded inside of documentation blocks;
- compile and run your library’s integration tests; and
- compile your library’s examples.
Integration tests
Each file in tests/*.rs is an integration test. When you run cargo test,
Cargo will compile each of these files as a separate crate. The crate can link
to your library by using extern crate <library-name>, like any other code that
depends on it.
Cargo will not automatically compile files inside subdirectories of tests, but
an integration test can import modules from these directories as usual. For
example, if you want several integration tests to share some code, you can put
the shared code in tests/common/mod.rs and then put mod common; in each of
the test files.
Configuring a target
All of the [[bin]], [lib], [[bench]], [[test]], and [[example]]
sections support similar configuration for specifying how a target should be
built. The double-bracket sections like [[bin]] are array-of-table of
TOML, which means you can
write more than one [[bin]] section to make several executables in your crate.
The example below uses [lib], but it also applies to all other sections
as well. All values listed are the defaults for that option unless otherwise
specified.
[package]
# ...

[lib]
# The name of a target is the name of the library that will be generated. This
# is defaulted to the name of the package or project, with any dashes replaced
# with underscores. (Rust `extern crate` declarations reference this name;
# therefore the value must be a valid Rust identifier to be usable.)
name = "foo"

# This field points at where the crate is located, relative to the `Cargo.toml`.
path = "src/lib.rs"

# A flag for enabling unit tests for this target. This is used by `cargo test`.
test = true

# A flag for enabling documentation tests for this target. This is only relevant
# for libraries, it has no effect on other sections. This is used by
# `cargo test`.
doctest = true

# A flag for enabling benchmarks for this target. This is used by `cargo bench`.
bench = true

# A flag for enabling documentation of this target. This is used by `cargo doc`.
doc = true

# If the target is meant to be a compiler plugin, this field must be set to true
# for Cargo to correctly compile it and make it available for all dependencies.
plugin = false

# If the target is meant to be a "macros 1.1" procedural macro, this field must
# be set to true.
proc-macro = false

# If set to false, `cargo test` will omit the `--test` flag to rustc, which
# stops it from generating a test harness. This is useful when the binary being
# built manages the test runner itself.
harness = true
The required-features field (optional)
The required-features field specifies which features the target needs in order
to be built. If any of the required features are not selected, the target will
be skipped. This is only relevant for the [[bin]], [[bench]], [[test]],
and [[example]] sections, it has no effect on [lib].
[features]
# ...
postgres = []
sqlite = []
tools = []

[[bin]]
# ...
required-features = ["postgres", "tools"]
Building dynamic or static libraries
If your project produces a library, you can specify which kind of library to
build by explicitly listing the library in your Cargo.toml:
# ...

[lib]
name = "..."
crate-type = ["dylib"] # could be `staticlib` as well
The available options are dylib, rlib, staticlib, cdylib, and
proc-macro. You should only use this option in a project. Cargo will always
compile packages (dependencies) based on the requirements of the project that
includes them.
You can read more about the different crate types in the Rust Reference Manual
The [patch] Section
This section of Cargo.toml can be used to override dependencies with
other copies. The syntax is similar to the [dependencies] section:
[patch.crates-io]
foo = { git = 'https://github.com/example/foo' }
bar = { path = 'my/local/bar' }

[dependencies.baz]
git = 'https://github.com/example/baz'

[patch.'https://github.com/example/baz']
baz = { git = 'https://github.com/example/patched-baz', branch = 'my-branch' }
The [patch] table is made of dependency-like sub-tables. Each key after
[patch] is a URL of the source that's being patched, or crates-io if
you're modifying the https://crates.io registry. In the example above
crates-io could be replaced with a git URL such as
https://github.com/rust-lang-nursery/log; the second [patch]
section in the example uses this to specify a source called baz.
Each entry in these tables is a normal dependency specification, the same as
found in the [dependencies] section of the manifest. The dependencies listed
in the [patch] section are resolved and used to patch the source at the
URL specified. The above manifest snippet patches the crates-io source (e.g.
crates.io itself) with the foo crate and bar crate. It also
patches the https://github.com/example/baz source with a my-branch that
comes from elsewhere.
Sources can be patched with versions of crates that do not exist, and they can also be patched with versions of crates that already exist. If a source is patched with a crate version that already exists in the source, then the source's original crate is replaced.
More information about overriding dependencies can be found in the overriding
dependencies section of the documentation and RFC 1969 for the
technical specification of this feature. (Note that the [patch] feature will
first become available in Rust 1.21, set to be released on 2017-10-12.)
The [replace] Section
This section of Cargo.toml can be used to override dependencies with
other copies. The syntax is similar to the [dependencies] section:
[replace]
"foo:0.1.0" = { git = 'https://github.com/example/foo' }
"bar:1.0.2" = { path = 'my/local/bar' }
Each key in the [replace] table is a package id
specification which allows arbitrarily choosing a node in the
dependency graph to override. The value of each key is the same as the
[dependencies] syntax for specifying dependencies, except that you can't
specify features. Note that when a crate is overridden the copy it's overridden
with must have both the same name and version, but it can come from a different
source (e.g. git or a local path).
More information about overriding dependencies can be found in the overriding dependencies section of the documentation.
Configuration
This document will explain how Cargo’s configuration system works, as well as available keys or configuration. For configuration of a project through its manifest, see the manifest format.
Hierarchical structure
Cargo allows local configuration for a particular project as well as global
configuration, like git. Cargo extends this to a hierarchical strategy.
If, for example, Cargo were invoked in /projects/foo/bar/baz, then the
following configuration files would be probed for and unified in this order:
/projects/foo/bar/baz/.cargo/config/projects/foo/bar/.cargo/config/projects/foo/.cargo/config/projects/.cargo/config/.cargo/config$HOME/.cargo/config
With this structure, you can specify configuration per-project, and even possibly check it into version control. You can also specify personal defaults with a configuration file in your home directory.
Configuration format
All configuration is currently in the TOML format (like the manifest), with simple key-value pairs inside of sections (tables) which all get merged together.
Configuration keys
All of the following keys are optional, and their defaults are listed as their value unless otherwise noted.
Key values that specify a tool may be given as an absolute path, a relative path
or as a pathless tool name. Absolute paths and pathless tool names are used as
given. Relative paths are resolved relative to the parent directory of the
.cargo directory of the config file that the value resides within.
# An array of paths to local repositories which are to be used as overrides for
# dependencies. For more information see the Specifying Dependencies guide.
paths = ["/path/to/override"]

[cargo-new]
# This is your name/email to place in the `authors` section of a new Cargo.toml
# that is generated. If not present, then `git` will be probed, and if that is
# not present then `$USER` and `$EMAIL` will be used.
name = "..."
email = "..."

# By default `cargo new` will initialize a new Git repository. This key can be
# set to `hg` to create a Mercurial repository, or `none` to disable this
# behavior.
vcs = "none"

# For the following sections, $triple refers to any valid target triple, not the
# literal string "$triple", and it will apply whenever that target triple is
# being compiled to. 'cfg(...)' refers to the Rust-like `#[cfg]` syntax for
# conditional compilation.
[target.$triple]
# This is the linker which is passed to rustc (via `-C linker=`) when the `$triple`
# is being compiled for. By default this flag is not passed to the compiler.
linker = ".."
# Same but for the library archiver which is passed to rustc via `-C ar=`.
ar = ".."
# If a runner is provided, compiled targets for the `$triple` will be executed
# by invoking the specified runner executable with actual target as first argument.
# This applies to `cargo run`, `cargo test` and `cargo bench` commands.
# By default compiled targets are executed directly.
runner = ".."
# custom flags to pass to all compiler invocations that target $triple
# this value overrides build.rustflags when both are present
rustflags = ["..", ".."]
# Whether or not to enable incremental compilation
incremental = true

[target.'cfg(...)']
# Similar for the $triple configuration, but using the `cfg` syntax.
# If several `cfg` and $triple targets are candidates, then the rustflags
# are concatenated. The `cfg` syntax only applies to rustflags, and not to
# linker.
rustflags = ["..", ".."]

# Configuration keys related to the registry
[registry]
index = "..."   # URL of the registry index (defaults to the central repository)
token = "..."   # Access token (found on the central repo’s website)

[http]
proxy = "host:port" # HTTP proxy to use for HTTP requests (defaults to none)
                    # in libcurl format, e.g. "socks5h://host:port"
timeout = 60000     # Timeout for each HTTP request, in milliseconds
cainfo = "cert.pem" # Path to Certificate Authority (CA) bundle (optional)
check-revoke = true # Indicates whether SSL certs are checked for revocation

[build]
jobs = 1                  # number of parallel jobs, defaults to # of CPUs
rustc = "rustc"           # the rust compiler tool
rustdoc = "rustdoc"       # the doc generator tool
target = "triple"         # build for the target triple
target-dir = "target"     # path of where to place all generated artifacts
rustflags = ["..", ".."]  # custom flags to pass to all compiler invocations

[term]
verbose = false        # whether cargo provides verbose output
color = 'auto'         # whether cargo colorizes output

# Network configuration
[net]
retry = 2 # number of times a network call will automatically retried

# Alias cargo commands. The first 3 aliases are built in. If your
# command requires grouped whitespace use the list format.
[alias]
b = "build"
t = "test"
r = "run"
rr = "run --release"
space_example = ["run", "--release", "--", "\"command list\""]
Environment variables
Cargo can also be configured through environment variables in addition to the
TOML syntax above. For each configuration key above of the form foo.bar the
environment variable CARGO_FOO_BAR can also be used to define the value. For
example the build.jobs key can also be defined by CARGO_BUILD_JOBS.
Environment variables will take precedent over TOML configuration, and currently only integer, boolean, and string keys are supported to be defined by environment variables.
In addition to the system above, Cargo recognizes a few other specific environment variables.
Environment Variables
Cargo sets and reads a number of environment variables which your code can detect or override. Here is a list of the variables Cargo sets, organized by when it interacts with them:
Environment variables Cargo reads
You can override these environment variables to change Cargo's behavior on your system:
CARGO_HOME- Cargo maintains a local cache of the registry index and of git checkouts of crates. By default these are stored under$HOME/.cargo, but this variable overrides the location of this directory. Once a crate is cached it is not removed by the clean command.CARGO_TARGET_DIR- Location of where to place all generated artifacts, relative to the current working directory.RUSTC- Instead of runningrustc, Cargo will execute this specified compiler instead.RUSTC_WRAPPER- Instead of simply runningrustc, Cargo will execute this specified wrapper instead, passing as its commandline arguments the rustc invocation, with the first argument being rustc.RUSTDOC- Instead of runningrustdoc, Cargo will execute this specifiedrustdocinstance instead.RUSTDOCFLAGS- A space-separated list of custom flags to pass to allrustdocinvocations that Cargo performs. In contrast withcargo rustdoc, this is useful for passing a flag to allrustdocinstances.RUSTFLAGS- A space-separated list of custom flags to pass to all compiler invocations that Cargo performs. In contrast withcargo rustc, this is useful for passing a flag to all compiler instances.CARGO_INCREMENTAL- If this is set to 1 then Cargo will force incremental compilation to be enabled for the current compilation, and when set to 0 it will force disabling it. If this env var isn't present then cargo's defaults will otherwise be used.
Note that Cargo will also read environment variables for .cargo/config
configuration values, as described in that documentation
Environment variables Cargo sets for crates
Cargo exposes these environment variables to your crate when it is compiled. Note that this applies for test binaries as well. To get the value of any of these variables in a Rust program, do this:
# #![allow(unused_variables)]
#fn main() {
let version = env!("CARGO_PKG_VERSION");
#}
version will now contain the value of CARGO_PKG_VERSION.
CARGO- Path to thecargobinary performing the build.CARGO_MANIFEST_DIR- The directory containing the manifest of your package.CARGO_PKG_VERSION- The full version of your package.CARGO_PKG_VERSION_MAJOR- The major version of your package.CARGO_PKG_VERSION_MINOR- The minor version of your package.CARGO_PKG_VERSION_PATCH- The patch version of your package.CARGO_PKG_VERSION_PRE- The pre-release version of your package.CARGO_PKG_AUTHORS- Colon separated list of authors from the manifest of your package.CARGO_PKG_NAME- The name of your package.CARGO_PKG_DESCRIPTION- The description of your package.CARGO_PKG_HOMEPAGE- The home page of your package.OUT_DIR- If the package has a build script, this is set to the folder where the build script should place its output. See below for more information.
Environment variables Cargo sets for build scripts
Cargo sets several environment variables when build scripts are run. Because these variables
are not yet set when the build script is compiled, the above example using env! won't work
and instead you'll need to retrieve the values when the build script is run:
# #![allow(unused_variables)]
#fn main() {
use std::env;
let out_dir = env::var("OUT_DIR").unwrap();
#}
out_dir will now contain the value of OUT_DIR.
CARGO- Path to thecargobinary performing the build.CARGO_MANIFEST_DIR- The directory containing the manifest for the package being built (the package containing the build script). Also note that this is the value of the current working directory of the build script when it starts.CARGO_MANIFEST_LINKS- the manifestlinksvalue.CARGO_FEATURE_<name>- For each activated feature of the package being built, this environment variable will be present where<name>is the name of the feature uppercased and having-translated to_.CARGO_CFG_<cfg>- For each configuration option of the package being built, this environment variable will contain the value of the configuration, where<cfg>is the name of the configuration uppercased and having-translated to_. Boolean configurations are present if they are set, and not present otherwise. Configurations with multiple values are joined to a single variable with the values delimited by,.OUT_DIR- the folder in which all output should be placed. This folder is inside the build directory for the package being built, and it is unique for the package in question.TARGET- the target triple that is being compiled for. Native code should be compiled for this triple. Some more information about target triples can be found in clang’s own documentation.HOST- the host triple of the rust compiler.NUM_JOBS- the parallelism specified as the top-level parallelism. This can be useful to pass a-jparameter to a system likemake. Note that care should be taken when interpreting this environment variable. For historical purposes this is still provided but recent versions of Cargo, for example, do not need to runmake -jas it'll automatically happen. Cargo implements its own jobserver and will allow build scripts to inherit this information, so programs compatible with GNU make jobservers will already have appropriately configured parallelism.OPT_LEVEL,DEBUG- values of the corresponding variables for the profile currently being built.PROFILE-releasefor release builds,debugfor other builds.DEP_<name>_<key>- For more information about this set of environment variables, see build script documentation aboutlinks.RUSTC,RUSTDOC- the compiler and documentation generator that Cargo has resolved to use, passed to the build script so it might use it as well.
Environment variables Cargo sets for 3rd party subcommands
Cargo exposes this environment variable to 3rd party subcommands
(ie. programs named cargo-foobar placed in $PATH):
CARGO- Path to thecargobinary performing the build.
Build Scripts
Some packages need to compile third-party non-Rust code, for example C libraries. Other packages need to link to C libraries which can either be located on the system or possibly need to be built from source. Others still need facilities for functionality such as code generation before building (think parser generators).
Cargo does not aim to replace other tools that are well-optimized for
these tasks, but it does integrate with them with the build configuration
option.
[package]
# ...
build = "build.rs"
The Rust file designated by the build command (relative to the package root)
will be compiled and invoked before anything else is compiled in the package,
allowing your Rust code to depend on the built or generated artifacts.
By default Cargo looks up for "build.rs" file in a package root (even if you
do not specify a value for build). Use build = "custom_build_name.rs" to specify
a custom build name or build = false to disable automatic detection of the build script.
Some example use cases of the build command are:
- Building a bundled C library.
- Finding a C library on the host system.
- Generating a Rust module from a specification.
- Performing any platform-specific configuration needed for the crate.
Each of these use cases will be detailed in full below to give examples of how the build command works.
Inputs to the Build Script
When the build script is run, there are a number of inputs to the build script, all passed in the form of environment variables.
In addition to environment variables, the build script’s current directory is the source directory of the build script’s package.
Outputs of the Build Script
All the lines printed to stdout by a build script are written to a file like
target/debug/build/<pkg>/output (the precise location may depend on your
configuration). If you would like to see such output directly in your terminal,
invoke cargo as 'very verbose' with the -vv flag. Note that if neither the
build script nor project source files are modified, subsequent calls to
cargo with -vv will not print output to the terminal because a
new build is not executed. Run cargo clean before each cargo invocation
if you want to ensure that output is always displayed on your terminal.
Any line that starts with cargo: is interpreted directly by Cargo.
This line must be of the form cargo:key=value, like the examples below:
# specially recognized by Cargo
cargo:rustc-link-lib=static=foo
cargo:rustc-link-search=native=/path/to/foo
cargo:rustc-cfg=foo
cargo:rustc-env=FOO=bar
# arbitrary user-defined metadata
cargo:root=/path/to/foo
cargo:libdir=/path/to/foo/lib
cargo:include=/path/to/foo/include
On the other hand, lines printed to stderr are written to a file like
target/debug/build/<pkg>/stderr but are not interpreted by cargo.
There are a few special keys that Cargo recognizes, some affecting how the crate is built:
-
rustc-link-lib=[KIND=]NAMEindicates that the specified value is a library name and should be passed to the compiler as a-lflag. The optionalKINDcan be one ofstatic,dylib(the default), orframework, seerustc --helpfor more details. -
rustc-link-search=[KIND=]PATHindicates the specified value is a library search path and should be passed to the compiler as a-Lflag. The optionalKINDcan be one ofdependency,crate,native,frameworkorall(the default), seerustc --helpfor more details. -
rustc-flags=FLAGSis a set of flags passed to the compiler, only-land-Lflags are supported. -
rustc-cfg=FEATUREindicates that the specified feature will be passed as a--cfgflag to the compiler. This is often useful for performing compile-time detection of various features. -
rustc-env=VAR=VALUEindicates that the specified environment variable will be added to the environment which the compiler is run within. The value can be then retrieved by theenv!macro in the compiled crate. This is useful for embedding additional metadata in crate's code, such as the hash of Git HEAD or the unique identifier of a continuous integration server. -
rerun-if-changed=PATHis a path to a file or directory which indicates that the build script should be re-run if it changes (detected by a more-recent last-modified timestamp on the file). Normally build scripts are re-run if any file inside the crate root changes, but this can be used to scope changes to just a small set of files. (If this path points to a directory the entire directory will not be traversed for changes -- only changes to the timestamp of the directory itself (which corresponds to some types of changes within the directory, depending on platform) will trigger a rebuild. To request a re-run on any changes within an entire directory, print a line for the directory and another line for everything inside it, recursively.) Note that if the build script itself (or one of its dependencies) changes, then it's rebuilt and rerun unconditionally, socargo:rerun-if-changed=build.rsis almost always redundant (unless you want to ignore changes in all other files except forbuild.rs). -
rerun-if-env-changed=VARis the name of an environment variable which indicates that if the environment variable's value changes the build script should be rerun. This basically behaves the same asrerun-if-changedexcept that it works with environment variables instead. Note that the environment variables here are intended for global environment variables likeCCand such, it's not necessary to use this for env vars likeTARGETthat Cargo sets. Also note that ifrerun-if-env-changedis printed out then Cargo will only rerun the build script if those environment variables change or if files printed out byrerun-if-changedchange. -
warning=MESSAGEis a message that will be printed to the main console after a build script has finished running. Warnings are only shown for path dependencies (that is, those you're working on locally), so for example warnings printed out in crates.io crates are not emitted by default.
Any other element is a user-defined metadata that will be passed to
dependents. More information about this can be found in the links
section.
Build Dependencies
Build scripts are also allowed to have dependencies on other Cargo-based crates.
Dependencies are declared through the build-dependencies section of the
manifest.
[build-dependencies]
foo = { git = "https://github.com/your-packages/foo" }
The build script does not have access to the dependencies listed in the
dependencies or dev-dependencies section (they’re not built yet!). All build
dependencies will also not be available to the package itself unless explicitly
stated as so.
The links Manifest Key
In addition to the manifest key build, Cargo also supports a links manifest
key to declare the name of a native library that is being linked to:
[package]
# ...
links = "foo"
build = "build.rs"
This manifest states that the package links to the libfoo native library, and
it also has a build script for locating and/or building the library. Cargo
requires that a build command is specified if a links entry is also
specified.
The purpose of this manifest key is to give Cargo an understanding about the set of native dependencies that a package has, as well as providing a principled system of passing metadata between package build scripts.
Primarily, Cargo requires that there is at most one package per links value.
In other words, it’s forbidden to have two packages link to the same native
library. Note, however, that there are conventions in place to
alleviate this.
As mentioned above in the output format, each build script can generate an
arbitrary set of metadata in the form of key-value pairs. This metadata is
passed to the build scripts of dependent packages. For example, if libbar
depends on libfoo, then if libfoo generates key=value as part of its
metadata, then the build script of libbar will have the environment variables
DEP_FOO_KEY=value.
Note that metadata is only passed to immediate dependents, not transitive dependents. The motivation for this metadata passing is outlined in the linking to system libraries case study below.
Overriding Build Scripts
If a manifest contains a links key, then Cargo supports overriding the build
script specified with a custom library. The purpose of this functionality is to
prevent running the build script in question altogether and instead supply the
metadata ahead of time.
To override a build script, place the following configuration in any acceptable Cargo configuration location.
[target.x86_64-unknown-linux-gnu.foo]
rustc-link-search = ["/path/to/foo"]
rustc-link-lib = ["foo"]
root = "/path/to/foo"
key = "value"
This section states that for the target x86_64-unknown-linux-gnu the library
named foo has the metadata specified. This metadata is the same as the
metadata generated as if the build script had run, providing a number of
key/value pairs where the rustc-flags, rustc-link-search, and
rustc-link-lib keys are slightly special.
With this configuration, if a package declares that it links to foo then the
build script will not be compiled or run, and the metadata specified will
instead be used.
Case study: Code generation
Some Cargo packages need to have code generated just before they are compiled for various reasons. Here we’ll walk through a simple example which generates a library call as part of the build script.
First, let’s take a look at the directory structure of this package:
.
├── Cargo.toml
├── build.rs
└── src
    └── main.rs

1 directory, 3 files
Here we can see that we have a build.rs build script and our binary in
main.rs. Next, let’s take a look at the manifest:
# Cargo.toml

[package]
name = "hello-from-generated-code"
version = "0.1.0"
authors = ["you@example.com"]
build = "build.rs"
Here we can see we’ve got a build script specified which we’ll use to generate some code. Let’s see what’s inside the build script:
// build.rs

use std::env;
use std::fs::File;
use std::io::Write;
use std::path::Path;

fn main() {
    let out_dir = env::var("OUT_DIR").unwrap();
    let dest_path = Path::new(&out_dir).join("hello.rs");
    let mut f = File::create(&dest_path).unwrap();

    f.write_all(b"
        pub fn message() -> &'static str {
            \"Hello, World!\"
        }
    ").unwrap();
}
There’s a couple of points of note here:
- The script uses the
OUT_DIRenvironment variable to discover where the output files should be located. It can use the process’ current working directory to find where the input files should be located, but in this case we don’t have any input files. - This script is relatively simple as it just writes out a small generated file. One could imagine that other more fanciful operations could take place such as generating a Rust module from a C header file or another language definition, for example.
Next, let’s peek at the library itself:
// src/main.rs

include!(concat!(env!("OUT_DIR"), "/hello.rs"));

fn main() {
    println!("{}", message());
}
This is where the real magic happens. The library is using the rustc-defined
include! macro in combination with the concat! and env! macros to include
the generated file (hello.rs) into the crate’s compilation.
Using the structure shown here, crates can include any number of generated files from the build script itself.
Case study: Building some native code
Sometimes it’s necessary to build some native C or C++ code as part of a package. This is another excellent use case of leveraging the build script to build a native library before the Rust crate itself. As an example, we’ll create a Rust library which calls into C to print “Hello, World!”.
Like above, let’s first take a look at the project layout:
.
├── Cargo.toml
├── build.rs
└── src
    ├── hello.c
    └── main.rs

1 directory, 4 files
Pretty similar to before! Next, the manifest:
# Cargo.toml

[package]
name = "hello-world-from-c"
version = "0.1.0"
authors = ["you@example.com"]
build = "build.rs"
For now we’re not going to use any build dependencies, so let’s take a look at the build script now:
// build.rs

use std::process::Command;
use std::env;
use std::path::Path;

fn main() {
    let out_dir = env::var("OUT_DIR").unwrap();

    // note that there are a number of downsides to this approach, the comments
    // below detail how to improve the portability of these commands.
    Command::new("gcc").args(&["src/hello.c", "-c", "-fPIC", "-o"])
                       .arg(&format!("{}/hello.o", out_dir))
                       .status().unwrap();
    Command::new("ar").args(&["crus", "libhello.a", "hello.o"])
                      .current_dir(&Path::new(&out_dir))
                      .status().unwrap();

    println!("cargo:rustc-link-search=native={}", out_dir);
    println!("cargo:rustc-link-lib=static=hello");
}
This build script starts out by compiling our C file into an object file (by
invoking gcc) and then converting this object file into a static library (by
invoking ar). The final step is feedback to Cargo itself to say that our
output was in out_dir and the compiler should link the crate to libhello.a
statically via the -l static=hello flag.
Note that there are a number of drawbacks to this hardcoded approach:
- The
gcccommand itself is not portable across platforms. For example it’s unlikely that Windows platforms havegcc, and not even all Unix platforms may havegcc. Thearcommand is also in a similar situation. - These commands do not take cross-compilation into account. If we’re cross
compiling for a platform such as Android it’s unlikely that
gccwill produce an ARM executable.
Not to fear, though, this is where a build-dependencies entry would help! The
Cargo ecosystem has a number of packages to make this sort of task much easier,
portable, and standardized. For example, the build script could be written as:
// build.rs

// Bring in a dependency on an externally maintained `cc` package which manages
// invoking the C compiler.
extern crate cc;

fn main() {
    cc::Build::new()
        .file("src/hello.c")
        .compile("hello");
}
Add a build time dependency on the cc crate with the following addition to
your Cargo.toml:
[build-dependencies]
gcc = "1.0"
The cc crate abstracts a range of build
script requirements for C code:
- It invokes the appropriate compiler (MSVC for windows,
gccfor MinGW,ccfor Unix platforms, etc.). - It takes the
TARGETvariable into account by passing appropriate flags to the compiler being used. - Other environment variables, such as
OPT_LEVEL,DEBUG, etc., are all handled automatically. - The stdout output and
OUT_DIRlocations are also handled by thecclibrary.
Here we can start to see some of the major benefits of farming as much functionality as possible out to common build dependencies rather than duplicating logic across all build scripts!
Back to the case study though, let’s take a quick look at the contents of the
src directory:
// src/hello.c

#include <stdio.h>

void hello() {
    printf("Hello, World!\n");
}
// src/main.rs

// Note the lack of the `#[link]` attribute. We’re delegating the responsibility
// of selecting what to link to over to the build script rather than hardcoding
// it in the source file.
extern { fn hello(); }

fn main() {
    unsafe { hello(); }
}
And there we go! This should complete our example of building some C code from a Cargo package using the build script itself. This also shows why using a build dependency can be crucial in many situations and even much more concise!
We’ve also seen a brief example of how a build script can use a crate as a dependency purely for the build process and not for the crate itself at runtime.
Case study: Linking to system libraries
The final case study here will be investigating how a Cargo library links to a system library and how the build script is leveraged to support this use case.
Quite frequently a Rust crate wants to link to a native library often provided on the system to bind its functionality or just use it as part of an implementation detail. This is quite a nuanced problem when it comes to performing this in a platform-agnostic fashion, and the purpose of a build script is again to farm out as much of this as possible to make this as easy as possible for consumers.
As an example to follow, let’s take a look at one of Cargo’s own dependencies, libgit2. The C library has a number of constraints:
- It has an optional dependency on OpenSSL on Unix to implement the https transport.
- It has an optional dependency on libssh2 on all platforms to implement the ssh transport.
- It is often not installed on all systems by default.
- It can be built from source using
cmake.
To visualize what’s going on here, let’s take a look at the manifest for the relevant Cargo package that links to the native C library.
[package]
name = "libgit2-sys"
version = "0.1.0"
authors = ["..."]
links = "git2"
build = "build.rs"

[dependencies]
libssh2-sys = { git = "https://github.com/alexcrichton/ssh2-rs" }

[target.'cfg(unix)'.dependencies]
openssl-sys = { git = "https://github.com/alexcrichton/openssl-sys" }

# ...
As the above manifests show, we’ve got a build script specified, but it’s
worth noting that this example has a links entry which indicates that the
crate (libgit2-sys) links to the git2 native library.
Here we also see that we chose to have the Rust crate have an unconditional
dependency on libssh2 via the libssh2-sys crate, as well as a
platform-specific dependency on openssl-sys for *nix (other variants elided
for now). It may seem a little counterintuitive to express C dependencies in
the Cargo manifest, but this is actually using one of Cargo’s conventions in
this space.
*-sys Packages
To alleviate linking to system libraries, Cargo has a convention of package
naming and functionality. Any package named foo-sys will provide two major
pieces of functionality:
- The library crate will link to the native library
libfoo. This will often probe the current system forlibfoobefore resorting to building from source. - The library crate will provide declarations for functions in
libfoo, but it does not provide bindings or higher-level abstractions.
The set of *-sys packages provides a common set of dependencies for linking
to native libraries. There are a number of benefits earned from having this
convention of native-library-related packages:
- Common dependencies on
foo-sysalleviates the above rule about one package per value oflinks. - A common dependency allows centralizing logic on discovering
libfooitself (or building it from source). - These dependencies are easily overridable.
Building libgit2
Now that we’ve got libgit2’s dependencies sorted out, we need to actually write
the build script. We’re not going to look at specific snippets of code here and
instead only take a look at the high-level details of the build script of
libgit2-sys. This is not recommending all packages follow this strategy, but
rather just outlining one specific strategy.
The first step of the build script should do is to query whether libgit2 is
already installed on the host system. To do this we’ll leverage the preexisting
tool pkg-config (when its available). We’ll also use a build-dependencies
section to refactor out all the pkg-config related code (or someone’s already
done that!).
If pkg-config failed to find libgit2, or if pkg-config just wasn’t
installed, the next step is to build libgit2 from bundled source code
(distributed as part of libgit2-sys itself). There are a few nuances when
doing so that we need to take into account, however:
-
The build system of libgit2,
cmake, needs to be able to find libgit2’s optional dependency of libssh2. We’re sure we’ve already built it (it’s a Cargo dependency), we just need to communicate this information. To do this we leverage the metadata format to communicate information between build scripts. In this example the libssh2 package printed outcargo:root=...to tell us where libssh2 is installed at, and we can then pass this along to cmake with theCMAKE_PREFIX_PATHenvironment variable. -
We’ll need to handle some
CFLAGSvalues when compiling C code (and tellcmakeabout this). Some flags we may want to pass are-m64for 64-bit code,-m32for 32-bit code, or-fPICfor 64-bit code as well. -
Finally, we’ll invoke
cmaketo place all output into theOUT_DIRenvironment variable, and then we’ll print the necessary metadata to instruct rustc how to link to libgit2.
Most of the functionality of this build script is easily refactorable into common dependencies, so our build script isn’t quite as intimidating as this descriptions! In reality it’s expected that build scripts are quite succinct by farming logic such as above to build dependencies.
Publishing on crates.io
Once you've got a library that you'd like to share with the world, it's time to publish it on crates.io! Publishing a crate is when a specific version is uploaded to be hosted on crates.io.
Take care when publishing a crate, because a publish is permanent. The version can never be overwritten, and the code cannot be deleted. There is no limit to the number of versions which can be published, however.
Before your first publish
First thing’s first, you’ll need an account on crates.io to acquire
an API token. To do so, visit the home page and log in via a GitHub
account (required for now). After this, visit your Account
Settings page and run the cargo login command
specified.
$ cargo login abcdefghijklmnopqrstuvwxyz012345
This command will inform Cargo of your API token and store it locally in your
~/.cargo/credentials (previously it was ~/.cargo/config). Note that this
token is a secret and should not be shared with anyone else. If it leaks for
any reason, you should regenerate it immediately.
Before publishing a new crate
Keep in mind that crate names on crates.io are allocated on a first-come-first- serve basis. Once a crate name is taken, it cannot be used for another crate.
Packaging a crate
The next step is to package up your crate into a format that can be uploaded to
crates.io. For this we’ll use the cargo package subcommand. This will take
our entire crate and package it all up into a *.crate file in the
target/package directory.
$ cargo package
As an added bonus, the *.crate will be verified independently of the current
source tree. After the *.crate is created, it’s unpacked into
target/package and then built from scratch to ensure that all necessary files
are there for the build to succeed. This behavior can be disabled with the
--no-verify flag.
Now’s a good time to take a look at the *.crate file to make sure you didn’t
accidentally package up that 2GB video asset, or large data files used for code
generation, integration tests, or benchmarking. There is currently a 10MB
upload size limit on *.crate files. So, if the size of tests and benches
directories and their dependencies are up to a couple of MBs, you can keep them
in your package; otherwise, better to exclude them.
Cargo will automatically ignore files ignored by your version control system
when packaging, but if you want to specify an extra set of files to ignore you
can use the exclude key in the manifest:
[package]
# ...
exclude = [
    "public/assets/*",
    "videos/*",
]
The syntax of each element in this array is what
rust-lang/glob accepts. If you’d rather
roll with a whitelist instead of a blacklist, Cargo also supports an include
key, which if set, overrides the exclude key:
[package]
# ...
include = [
    "**/*.rs",
    "Cargo.toml",
]
Uploading the crate
Now that we’ve got a *.crate file ready to go, it can be uploaded to
crates.io with the cargo publish command. And that’s it, you’ve now published
your first crate!
$ cargo publish
If you’d like to skip the cargo package step, the cargo publish subcommand
will automatically package up the local crate if a copy isn’t found already.
Be sure to check out the metadata you can specify to ensure your crate can be discovered more easily!
Publishing a new version of an existing crate
In order to release a new version, change the version value specified in your
Cargo.toml manifest. Keep in mind the semver
rules. Then optionally run cargo package if
you want to inspect the *.crate file for the new version before publishing,
and run cargo publish to upload the new version.
Managing a crates.io-based crate
Management of crates is primarily done through the command line cargo tool
rather than the crates.io web interface. For this, there are a few subcommands
to manage a crate.
cargo yank
Occasions may arise where you publish a version of a crate that actually ends up being broken for one reason or another (syntax error, forgot to include a file, etc.). For situations such as this, Cargo supports a “yank” of a version of a crate.
$ cargo yank --vers 1.0.1
$ cargo yank --vers 1.0.1 --undo
A yank does not delete any code. This feature is not intended for deleting accidentally uploaded secrets, for example. If that happens, you must reset those secrets immediately.
The semantics of a yanked version are that no new dependencies can be created
against that version, but all existing dependencies continue to work. One of the
major goals of crates.io is to act as a permanent archive of crates that does
not change over time, and allowing deletion of a version would go against this
goal. Essentially a yank means that all projects with a Cargo.lock will not
break, while any future Cargo.lock files generated will not list the yanked
version.
cargo owner
A crate is often developed by more than one person, or the primary maintainer may change over time! The owner of a crate is the only person allowed to publish new versions of the crate, but an owner may designate additional owners.
$ cargo owner --add my-buddy
$ cargo owner --remove my-buddy
$ cargo owner --add github:rust-lang:owners
$ cargo owner --remove github:rust-lang:owners
The owner IDs given to these commands must be GitHub user names or GitHub teams.
If a user name is given to --add, that user becomes a “named” owner, with
full rights to the crate. In addition to being able to publish or yank versions
of the crate, they have the ability to add or remove owners, including the
owner that made them an owner. Needless to say, you shouldn’t make people you
don’t fully trust into a named owner. In order to become a named owner, a user
must have logged into crates.io previously.
If a team name is given to --add, that team becomes a “team” owner, with
restricted right to the crate. While they have permission to publish or yank
versions of the crate, they do not have the ability to add or remove owners.
In addition to being more convenient for managing groups of owners, teams are
just a bit more secure against owners becoming malicious.
The syntax for teams is currently github:org:team (see examples above).
In order to add a team as an owner one must be a member of that team. No
such restriction applies to removing a team as an owner.
GitHub permissions
Team membership is not something GitHub provides simple public access to, and it is likely for you to encounter the following message when working with them:
It looks like you don’t have permission to query a necessary property from GitHub to complete this request. You may need to re-authenticate on crates.io to grant permission to read GitHub org memberships. Just go to https://crates.io/login
This is basically a catch-all for “you tried to query a team, and one of the five levels of membership access control denied this”. That is not an exaggeration. GitHub’s support for team access control is Enterprise Grade.
The most likely cause of this is simply that you last logged in before this
feature was added. We originally requested no permissions from GitHub when
authenticating users, because we didn’t actually ever use the user’s token for
anything other than logging them in. However to query team membership on your
behalf, we now require
the read:org scope.
You are free to deny us this scope, and everything that worked before teams were introduced will keep working. However you will never be able to add a team as an owner, or publish a crate as a team owner. If you ever attempt to do this, you will get the error above. You may also see this error if you ever try to publish a crate that you don’t own at all, but otherwise happens to have a team.
If you ever change your mind, or just aren’t sure if crates.io has sufficient permission, you can always go to https://crates.io/login, which will prompt you for permission if crates.io doesn’t have all the scopes it would like to.
An additional barrier to querying GitHub is that the organization may be actively denying third party access. To check this, you can go to:
https://github.com/organizations/:org/settings/oauth_application_policy
where :org is the name of the organization (e.g. rust-lang). You may see
something like:
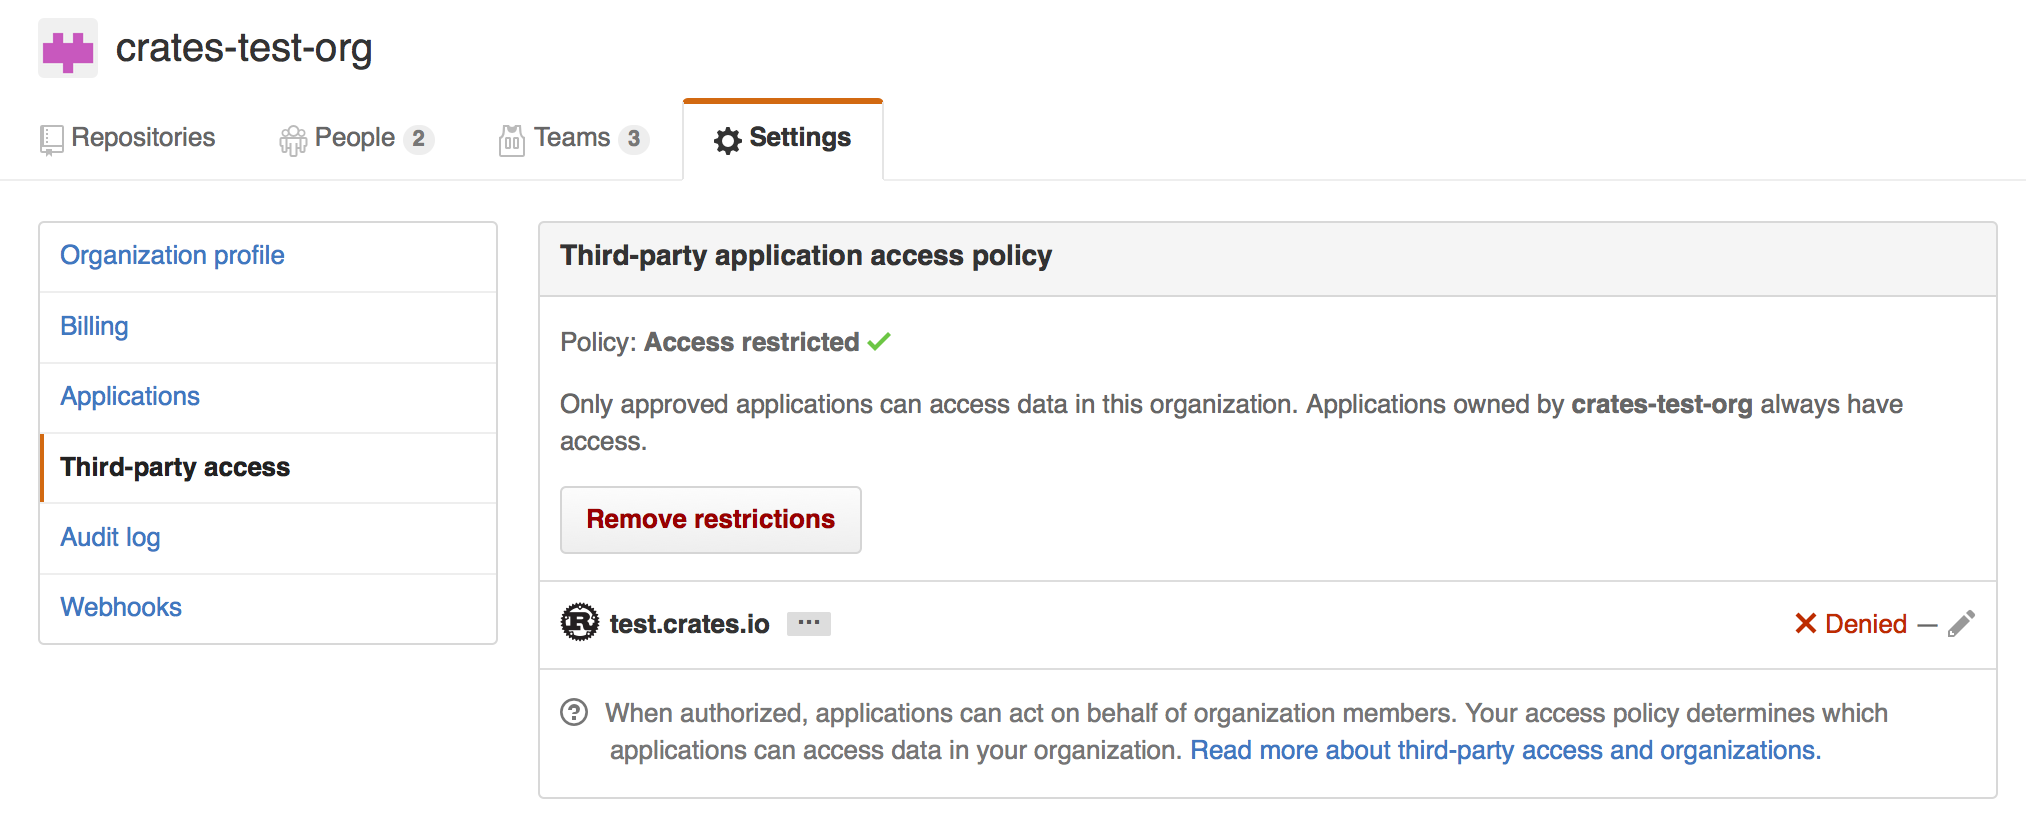
Where you may choose to explicitly remove crates.io from your organization’s blacklist, or simply press the “Remove Restrictions” button to allow all third party applications to access this data.
Alternatively, when crates.io requested the read:org scope, you could have
explicitly whitelisted crates.io querying the org in question by pressing
the “Grant Access” button next to its name:
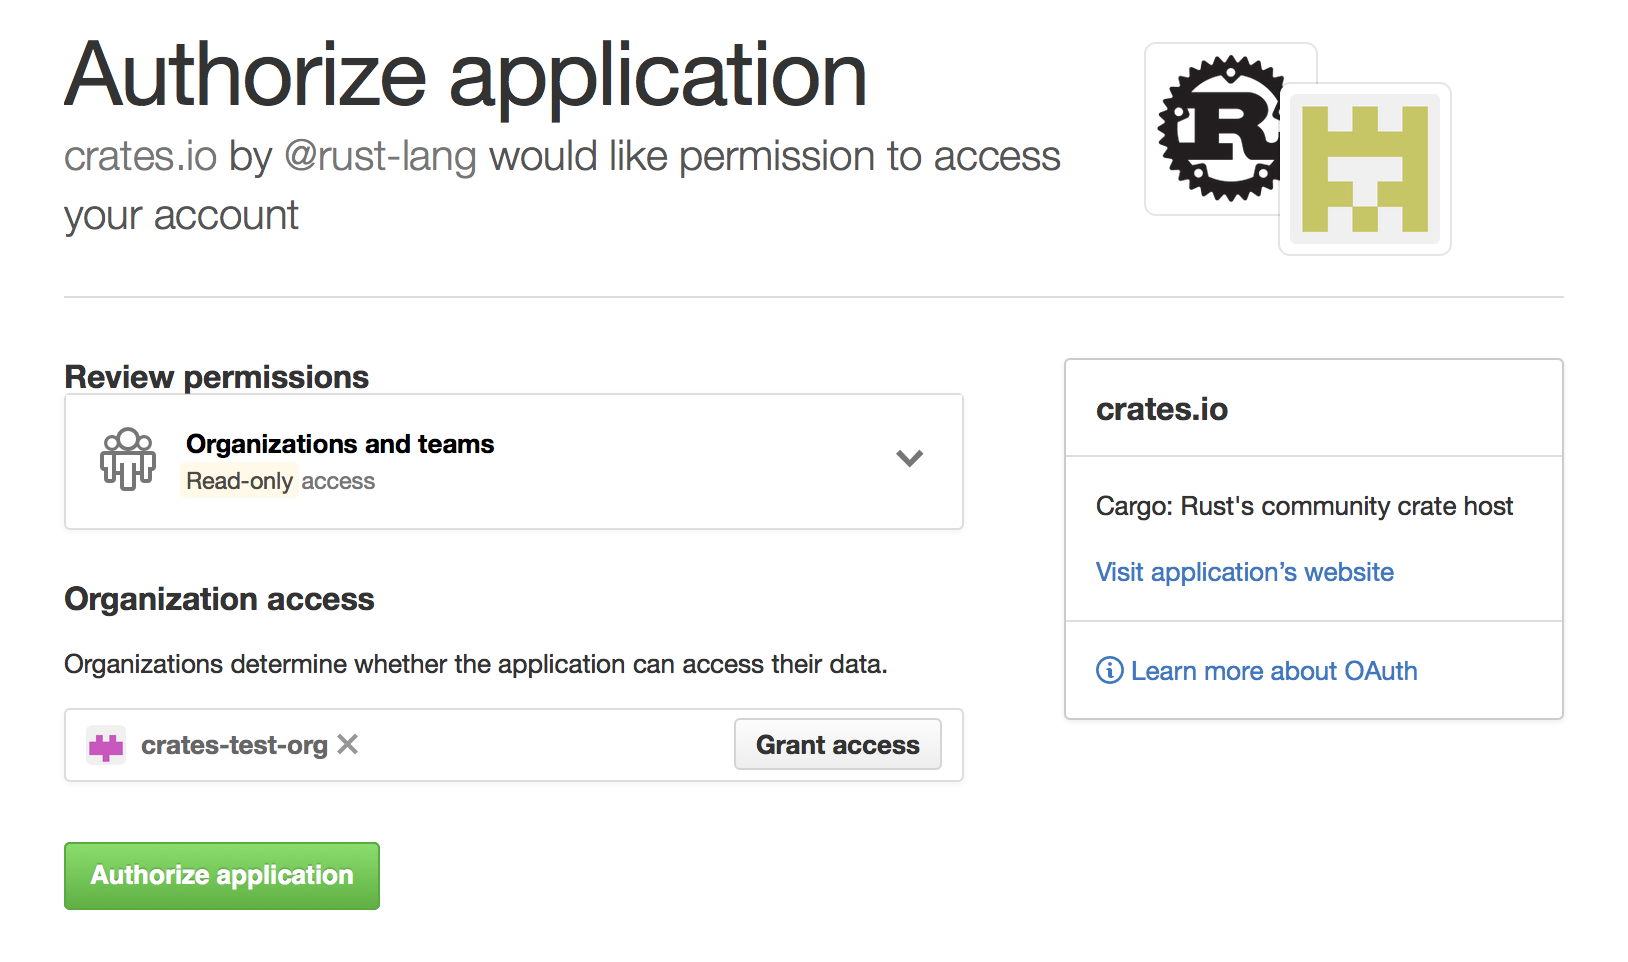
Package ID Specifications
Package ID specifications
Subcommands of Cargo frequently need to refer to a particular package within a dependency graph for various operations like updating, cleaning, building, etc. To solve this problem, Cargo supports Package ID Specifications. A specification is a string which is used to uniquely refer to one package within a graph of packages.
Specification grammar
The formal grammar for a Package Id Specification is:
pkgid := pkgname
       | [ proto "://" ] hostname-and-path [ "#" ( pkgname | semver ) ]
pkgname := name [ ":" semver ]

proto := "http" | "git" | ...
Here, brackets indicate that the contents are optional.
Example specifications
These could all be references to a package foo version 1.2.3 from the
registry at crates.io
| pkgid | name | version | url |
|---|---|---|---|
foo | foo | * | * |
foo:1.2.3 | foo | 1.2.3 | * |
crates.io/foo | foo | * | *://crates.io/foo |
crates.io/foo#1.2.3 | foo | 1.2.3 | *://crates.io/foo |
crates.io/bar#foo:1.2.3 | foo | 1.2.3 | *://crates.io/bar |
http://crates.io/foo#1.2.3 | foo | 1.2.3 | http://crates.io/foo |
Brevity of specifications
The goal of this is to enable both succinct and exhaustive syntaxes for referring to packages in a dependency graph. Ambiguous references may refer to one or more packages. Most commands generate an error if more than one package could be referred to with the same specification.
Source Replacement
Cargo supports the ability to replace one source with another to express
strategies along the lines of mirrors or vendoring dependencies. Configuration
is currently done through the .cargo/config configuration mechanism,
like so:
# The `source` table is where all keys related to source-replacement
# are stored.
[source]

# Under the `source` table are a number of other tables whose keys are a
# name for the relevant source. For example this section defines a new
# source, called `my-awesome-source`, which comes from a directory
# located at `vendor` relative to the directory containing this `.cargo/config`
# file
[source.my-awesome-source]
directory = "vendor"

# Git sources can optionally specify a branch/tag/rev as well
git = "https://example.com/path/to/repo"
# branch = "master"
# tag = "v1.0.1"
# rev = "313f44e8"

# The crates.io default source for crates is available under the name
# "crates-io", and here we use the `replace-with` key to indicate that it's
# replaced with our source above.
[source.crates-io]
replace-with = "my-awesome-source"
With this configuration Cargo attempts to look up all crates in the directory "vendor" rather than querying the online registry at crates.io. Using source replacement Cargo can express:
-
Vendoring - custom sources can be defined which represent crates on the local filesystem. These sources are subsets of the source that they're replacing and can be checked into projects if necessary.
-
Mirroring - sources can be replaced with an equivalent version which acts as a cache for crates.io itself.
Cargo has a core assumption about source replacement that the source code is
exactly the same from both sources. In our above example Cargo assumes that all
of the crates coming from my-awesome-source are the exact same as the copies
from crates-io. Note that this also means that my-awesome-source is not
allowed to have crates which are not present in the crates-io source.
As a consequence, source replacement is not appropriate for situations such as
patching a dependency or a private registry. Cargo supports patching
dependencies through the usage of the [replace] key, and
private registry support is planned for a future version of Cargo.
Configuration
Configuration of replacement sources is done through .cargo/config
and the full set of available keys are:
# Each source has its own table where the key is the name of the source
[source.the-source-name]

# Indicate that `the-source-name` will be replaced with `another-source`,
# defined elsewhere
replace-with = "another-source"

# Available kinds of sources that can be specified (described below)
registry = "https://example.com/path/to/index"
local-registry = "path/to/registry"
directory = "path/to/vendor"
The crates-io represents the crates.io online registry (default source of
crates) and can be replaced with:
[source.crates-io]
replace-with = 'another-source'
Registry Sources
A "registry source" is one that is the same as crates.io itself. That is, it has an index served in a git repository which matches the format of the crates.io index. That repository then has configuration indicating where to download crates from.
Currently there is not an already-available project for setting up a mirror of crates.io. Stay tuned though!
Local Registry Sources
A "local registry source" is intended to be a subset of another registry
source, but available on the local filesystem (aka vendoring). Local registries
are downloaded ahead of time, typically sync'd with a Cargo.lock, and are
made up of a set of *.crate files and an index like the normal registry is.
The primary way to manage and crate local registry sources is through the
cargo-local-registry subcommand, available on
crates.io and can be installed with cargo install cargo-local-registry.
Local registries are contained within one directory and contain a number of
*.crate files downloaded from crates.io as well as an index directory with
the same format as the crates.io-index project (populated with just entries for
the crates that are present).
Directory Sources
A "directory source" is similar to a local registry source where it contains a
number of crates available on the local filesystem, suitable for vendoring
dependencies. Also like local registries, directory sources can primarily be
managed by an external subcommand, cargo-vendor, which can be
installed with cargo install cargo-vendor.
Directory sources are distinct from local registries though in that they contain
the unpacked version of *.crate files, making it more suitable in some
situations to check everything into source control. A directory source is just a
directory containing a number of other directories which contain the source code
for crates (the unpacked version of *.crate files). Currently no restriction
is placed on the name of each directory.
Each crate in a directory source also has an associated metadata file indicating the checksum of each file in the crate to protect against accidental modifications.
External tools
One of the goals of Cargo is simple integration with third-party tools, like IDEs and other build systems. To make integration easier, Cargo has several facilities:
-
a
cargo metadatacommand, which outputs project structure and dependencies information in JSON, -
a
--message-formatflag, which outputs information about a particular build, and -
support for custom subcommands.
Information about project structure
You can use cargo metadata command to get information about project structure
and dependencies. The output of the command looks like this:
{
  // Integer version number of the format.
  "version": integer,

  // List of packages for this workspace, including dependencies.
  "packages": [
    {
      // Opaque package identifier.
      "id": PackageId,

      "name": string,

      "version": string,

      "source": SourceId,

      // A list of declared dependencies, see `resolve` field for actual dependencies.
      "dependencies": [ Dependency ],

      "targets: [ Target ],

      // Path to Cargo.toml
      "manifest_path": string,
    }
  ],

  "workspace_members": [ PackageId ],

  // Dependencies graph.
  "resolve": {
     "nodes": [
       {
         "id": PackageId,
         "dependencies": [ PackageId ]
       }
     ]
  }
}
The format is stable and versioned. When calling cargo metadata, you should
pass --format-version flag explicitly to avoid forward incompatibility
hazard.
If you are using Rust, there is cargo_metadata crate.
Information about build
When passing --message-format=json, Cargo will output the following
information during the build:
-
compiler errors and warnings,
-
produced artifacts,
-
results of the build scripts (for example, native dependencies).
The output goes to stdout in the JSON object per line format. The reason field
distinguishes different kinds of messages.
Information about dependencies in the Makefile-compatible format is stored in
the .d files alongside the artifacts.
Custom subcommands
Cargo is designed to be extensible with new subcommands without having to modify
Cargo itself. This is achieved by translating a cargo invocation of the form
cargo (?<command>[^ ]+) into an invocation of an external tool
cargo-${command} that then needs to be present in one of the user's $PATH
directories.
Custom subcommand may use CARGO environment variable to call back to
Cargo. Alternatively, it can link to cargo crate as a library, but this
approach has drawbacks:
-
Cargo as a library is unstable, API changes without deprecation,
-
versions of Cargo library and Cargo binary may be different.
Frequently Asked Questions
Is the plan to use GitHub as a package repository?
No. The plan for Cargo is to use crates.io, like npm or Rubygems do with npmjs.org and rubygems.org.
We plan to support git repositories as a source of packages forever, because they can be used for early development and temporary patches, even when people use the registry as the primary source of packages.
Why build crates.io rather than use GitHub as a registry?
We think that it’s very important to support multiple ways to download packages, including downloading from GitHub and copying packages into your project itself.
That said, we think that crates.io offers a number of important benefits, and will likely become the primary way that people download packages in Cargo.
For precedent, both Node.js’s npm and Ruby’s bundler support both a central registry model as well as a Git-based model, and most packages are downloaded through the registry in those ecosystems, with an important minority of packages making use of git-based packages.
Some of the advantages that make a central registry popular in other languages include:
- Discoverability. A central registry provides an easy place to look for existing packages. Combined with tagging, this also makes it possible for a registry to provide ecosystem-wide information, such as a list of the most popular or most-depended-on packages.
- Speed. A central registry makes it possible to easily fetch just the metadata for packages quickly and efficiently, and then to efficiently download just the published package, and not other bloat that happens to exist in the repository. This adds up to a significant improvement in the speed of dependency resolution and fetching. As dependency graphs scale up, downloading all of the git repositories bogs down fast. Also remember that not everybody has a high-speed, low-latency Internet connection.
Will Cargo work with C code (or other languages)?
Yes!
Cargo handles compiling Rust code, but we know that many Rust projects link against C code. We also know that there are decades of tooling built up around compiling languages other than Rust.
Our solution: Cargo allows a package to specify a script
(written in Rust) to run before invoking rustc. Rust is leveraged to
implement platform-specific configuration and refactor out common build
functionality among packages.
Can Cargo be used inside of make (or ninja, or ...)
Indeed. While we intend Cargo to be useful as a standalone way to compile Rust projects at the top-level, we know that some people will want to invoke Cargo from other build tools.
We have designed Cargo to work well in those contexts, paying attention to things like error codes and machine-readable output modes. We still have some work to do on those fronts, but using Cargo in the context of conventional scripts is something we designed for from the beginning and will continue to prioritize.
Does Cargo handle multi-platform projects or cross-compilation?
Rust itself provides facilities for configuring sections of code based
on the platform. Cargo also supports platform-specific
dependencies, and we plan to support more per-platform
configuration in Cargo.toml in the future.
In the longer-term, we’re looking at ways to conveniently cross-compile projects using Cargo.
Does Cargo support environments, like production or test?
We support environments through the use of profiles to support:
- environment-specific flags (like
-g --opt-level=0for development and--opt-level=3for production). - environment-specific dependencies (like
hamcrestfor test assertions). - environment-specific
#[cfg] - a
cargo testcommand
Does Cargo work on Windows?
Yes!
All commits to Cargo are required to pass the local test suite on Windows. If, however, you find a Windows issue, we consider it a bug, so please file an issue.
Why do binaries have Cargo.lock in version control, but not libraries?
The purpose of a Cargo.lock is to describe the state of the world at the time
of a successful build. It is then used to provide deterministic builds across
whatever machine is building the project by ensuring that the exact same
dependencies are being compiled.
This property is most desirable from applications and projects which are at the
very end of the dependency chain (binaries). As a result, it is recommended that
all binaries check in their Cargo.lock.
For libraries the situation is somewhat different. A library is not only used by
the library developers, but also any downstream consumers of the library. Users
dependent on the library will not inspect the library’s Cargo.lock (even if it
exists). This is precisely because a library should not be deterministically
recompiled for all users of the library.
If a library ends up being used transitively by several dependencies, it’s
likely that just a single copy of the library is desired (based on semver
compatibility). If all libraries were to check in their Cargo.lock, then
multiple copies of the library would be used, and perhaps even a version
conflict.
In other words, libraries specify semver requirements for their dependencies but cannot see the full picture. Only end products like binaries have a full picture to decide what versions of dependencies should be used.
Can libraries use * as a version for their dependencies?
As of January 22nd, 2016, crates.io rejects all packages (not just libraries) with wildcard dependency constraints.
While libraries can, strictly speaking, they should not. A version requirement
of * says “This will work with every version ever,” which is never going
to be true. Libraries should always specify the range that they do work with,
even if it’s something as general as “every 1.x.y version.”
Why Cargo.toml?
As one of the most frequent interactions with Cargo, the question of why the
configuration file is named Cargo.toml arises from time to time. The leading
capital-C was chosen to ensure that the manifest was grouped with other
similar configuration files in directory listings. Sorting files often puts
capital letters before lowercase letters, ensuring files like Makefile and
Cargo.toml are placed together. The trailing .toml was chosen to emphasize
the fact that the file is in the TOML configuration
format.
Cargo does not allow other names such as cargo.toml or Cargofile to
emphasize the ease of how a Cargo repository can be identified. An option of
many possible names has historically led to confusion where one case was handled
but others were accidentally forgotten.
How can Cargo work offline?
Cargo is often used in situations with limited or no network access such as airplanes, CI environments, or embedded in large production deployments. Users are often surprised when Cargo attempts to fetch resources from the network, and hence the request for Cargo to work offline comes up frequently.
Cargo, at its heart, will not attempt to access the network unless told to do so. That is, if no crates comes from crates.io, a git repository, or some other network location, Cargo will never attempt to make a network connection. As a result, if Cargo attempts to touch the network, then it's because it needs to fetch a required resource.
Cargo is also quite aggressive about caching information to minimize the amount
of network activity. It will guarantee, for example, that if cargo build (or
an equivalent) is run to completion then the next cargo build is guaranteed to
not touch the network so long as Cargo.toml has not been modified in the
meantime. This avoidance of the network boils down to a Cargo.lock existing
and a populated cache of the crates reflected in the lock file. If either of
these components are missing, then they're required for the build to succeed and
must be fetched remotely.
As of Rust 1.11.0 Cargo understands a new flag, --frozen, which is an
assertion that it shouldn't touch the network. When passed, Cargo will
immediately return an error if it would otherwise attempt a network request.
The error should include contextual information about why the network request is
being made in the first place to help debug as well. Note that this flag does
not change the behavior of Cargo, it simply asserts that Cargo shouldn't touch
the network as a previous command has been run to ensure that network activity
shouldn't be necessary.
For more information about vendoring, see documentation on source replacement.