Introduction
Definition of Life
Motivation
Preliminary
Steps
Present Life
Past Life
Geological Survey
Sample Collection
Spectroscopic Analysis
Organic Analysis
Biology Experiments
Thin Section
Isotope Analysis
Experimental Design
Detection of Proteins, Carbohydrates, Lipids and Nucleic Acids
Life
on earth is based on the four basic complex molecules, proteins,
carbohydrates, lipids and nucleic acids. Under the assumption that
any possible life on Mars will have characteristics similar to life on
earth, it is reasonable to begin
our search for life on Mars by looking for the presence of these complex
molecules. Once we have
evidence that these molecules exist on Mars we can prepare the ground for
more extensive tests and analysis.
Sample Preparation
The first step in the detection of these molecules is sample prepaparation. Before carrying out any tests, the Martian soil samples have to be treated carefully in several steps. The sample preparation method is based on the assumption that the collected samples will be in the form of rocks and stones.
-
Crush the soil and rock samples ensuring that any kind of lumps and big chunks completely disintegrate.
-
Add distilled water to bring the sample to a fixed volume and centrifuge the suspension at approximately 1000 rpm. This will lead to the formation of two distinct layers which can be separated easily. Proteins, carbohydrates, and nucleic acids, being water soluble, will be retained in the supernatant. Lipids, being insoluble, will settle down with the soil particles.
Lipids
Separation of lipids: Add any organic solvent, for instance a mixture of methanol and chloroform, to the layer of particles that have settled down. Centrifuge the resulting suspension again and separate the two layers that form. Lipids, being soluble in the organic solvent, will now become part of the organic layer. This solution can be used to carry out tests for the detection of lipids.
Test for lipids: Spread a small amount of this solution on a piece of absorbent paper and let it dry for about ten to fifteen minutes. Methanol being a very volatile compound will evaporate. If lipids are present in the solution, a transparent streak will appear on the paper.
In the case of lipids, we can also carry out the detection tests using the soil samples directly. The samples are first frozen and thawed. Then they are dried and ground to a fine powder in an agate pestle. To isolate lipids that might be present we extract them three times with methanol/dichloromethane (3:1), dichloromethane/methanol (10:1), and dichloromethane/methanol (10:1) using an ultrasonic homogenizer. The extracts are isolated by a centrifuge, washed with 50 mL of 0.15-M HCl to remove salts contained in the sediments. Testing for lipids is simple enough after we separate them. Add ethanol to the solution and shake it thoroughly. If lipids are present, the solution turns cloudy.
The
second layer from the first centrifuge process, the water supernatant,
contains nucleic acids, proteins, and carbohydrates. Divide it into three portions to carry out separate tests for the molecules
we want to detect.
Separation of Nucleic Acids
Take
a small sample of the original solution and add sodium hydroxide to it.
This will lyse the cells and release
the DNA present in it. Detergent
(alkaline) solubilized proteins and membranes are precipitated
with sodium acetate and the lysate is cleared first by filtration of precipitate through cheese cloth and then by centrifugation. The DNA-containing supernatant is
transferred to a new tube and the DNA is precipitated by the addition of
polyethylene glycoland collected by centrifugation. The DNA pellet is
resuspended in a buffer containing cesium chloride and ethidium bromide
and subjected to ultracentrifugation overnight.
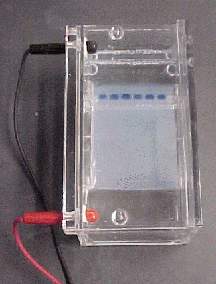
To test for the presence of DNA, we perform UV spectroscopy at the absorbance range for DNA at 260 nm. If the solution shows any absorption in this range, we can safely assert that it contains DNA. Gel electrophoresis, a process outlined below, can also be used to detect DNA. Agarose gel electrophoresis is a method that uses an electric current to separate DNA by size and conformation. Nucleic acids have a negative charge, owing to the negatively charged phosphate backbone, and thus will be attracted to a positive charge when placed in an electric field (see image of gel box at right). Size is a primary factor that determines how far a given molecule of DNA will move through a gel (larger molecules tend to be retarded in the gel and not move very far whereas smaller molecules can make their way through the gel matrix and travel farther). Conformation, however, is another factor. Some nucleic acids, despite being huge, are "super-coiled" (tightly packed by proteins or enzymes), and thus they are more compact and can move farther than they would if not coiled.
Agarose, the physical matrix that comprises these gels, is comparable to jello in many ways. It begins as a powder, is mixed with a liquid buffer solution, boiled to liquefy, and then allowed to harden in a tray with a "comb" that makes wells into which DNA samples can be loaded (in this this case the samples suspected of containing DNA). The percent agarose of a given gel will influence how quickly DNA can travel through it. We can use gels that are 1% agarose (i.e., 1 gram of solid agarose per 100 ml liquid buffer).
Some additional reagents needed for gel electrophoresis include loading dyes and markers. The purpose of the former is two-fold. First it allows us to visually track the progress of the gel (the DNA in the gel is "invisible" without staining and UV light, described later). Second, dyes assist with the "weighing down" of the DNA during and just after loading (before it enters the gel matrix). We utilize a 5X dye that contains sucrose, SDS, bromophenol blue, and xylene cyanol. The sucrose is the component that "weighs down" the DNA. The SDS is added to halt any prior enzyme reactions (e.g. restriction enzymes, PCR components, etc.). The bromophenole blue migrates with 0.3-0.5 kb fragments and the xylene cyanol migrates with 4-5 kb fragments; both serve as "tracking dyes." Following the run, the gel/nucleic acid must be stained with ethidium bromide (in our case, it is best to do this overnight) and viewed using a UV lamp.
It should be strongly
noted that there are several expensive pieces of equipment and toxic
reagents required for performing gel electrophoresis. Gel boxes average
$200 each, as do power sources (each of which can run
two gels). A dedicated fume hood and hazardous waste area is required for
handling ethidium bromide, the mutagenic/carcinogenic compound that is
used to stain DNA in the gel. Ethidium-bromide
stained
gels are finally visualized with an expensive UV transilluminator ($500+) and even more for an adaptable camera set
Required Reagents
-
Agarose (powder)
-
Loading dye (6X)
-
Parafilm wax paper (optional), pipettes
-
TAE Running Buffer (20X stock and 1X stock)
-
Gel electrophoresis box and power source
-
Ethidium Bromide (10 mg/ml solution)
-
UV trans-illuminator
-
Camera
Protocols
-
Tape the ends of a gel tray and place appropriate combs into the holders.
-
Prepare 50 ml of 1% agarose per gel box.
-
Heat mixture on high (watching all the while) with a stir-bar. Should take about 5 minutes. Cool to 50-60 degrees Celsius before pouring into the gel tray. A quicker and easier way to do this is to mix all the agarose with half the buffer, boil, and then add the remaining half of cold buffer.
-
Wait approximately 15 minutes for the gel to completely harden. Keep the comb in until later!
-
Place the hardened gel/tray into the gel box (there is only one easy way that the tray fits into the box). The correct placement of the gel/tray will orient the gel such that the wells are at the "negative" (black) end of the box. Check everything very carefully to make sure that the gel is oriented such that, when the power is turned on, the DNA will run to the positive end of the gel).
-
Cover the gel completely with 1X running TAE buffer (TAE is 40 mM Tris-HCl, 1 mM EDTA, pH 8). Carefully pull the comb out of the gel. If there are "bits" in the wells, clean them out by carefully pipetting the buffer into them to "blow out" the pieces.
-
Mix your sample with loading dye by adding appropriate amount of dye to sample.
-
Load carefully. Some tips: Withdraw only the sample into the pipette tip (any air bubbles could "blow out" your sample upon expulsion); using both hands, place the end of the tip with the sample just at the lip of the well (do not poke down into the well); expel only to the point that nearly all the sample is gone (pressing all the way will expel a burst of air into the well, dispersing the sample).
-
If loading marker, remember to use only 5 uL plus 1-2 uL dye.
-
When finished loading, connect the cover with leads to the box and power source, respectively, and turn on the gel. Typically, the gel should run until the purple dye is within one cm from the bottom of the gel. In general, it will require about an hour running at 100 V to achieve this.
-
Remove the gel to the ethidium bromide handling area. Stain the gel using no more than 5 uL of 10 mg/mL ethidium bromide solution added to about 200 mL running buffer.
-
Staining takes, typically, 30 minutes or more.
-
Following staining, carry the covered tupperware box to the UV transilluminator, and place the gel lightbox (using gloves and the dedicated "spatula"). Take as pictures only after the gel is properly stained. If there are DNA molecules present, they will appear as a band clearly visible in the photographs.
Test for proteins
Some of the tests used to detect protein are protein specific and will not be affected by the presence of the other two molecules. Hence the solution can be used directly to test for proteins. A very basic test for proteins is to add the reagent ninhydrin. If proteins are present, it will change color to blue.
We can also use electrophoresis to determine the presence of proteins. Electrophoresis of proteins can be carried out using a detergent such as sodium dodecyl sulphate (SDS). SDS binds to most proteins in amounts roughly proportional to the molecular weight of the protein. The bound SDS contributes a large net negative charge, rendering the intrinsic charge of the protein insignificant. After electrophoresis, the proteins are visualized by adding a dye such as Coomassie blue which binds to protein but not to the gel itself. Any proteins present will appear as a protein band. Not only will this test determine the presence of proteins, it will also enable us to know their relative molecular weights. Electrophoresis in the presence of SDS separates proteins almost exclusively on the basis of mass.
Test for carbohydrates
Use the third portion to test for carbohydrates. Heat it with sulphuric acid first to break down the larger molecules into smaller sugar molecules. After hydrolysis add Benedict's solution. This basically contains blue copper(II) sulphate solution which is converted to copper(I) sulphate by reducing sugars. Thus the presence of carbohydrates is indicated by a clear color change from blue to brick red.
We can also use thin layer chromatography to determine the presence of starch. For thin layer chromatography, we can use either cellulose or silica gel as the stationery phase and the solvent can be prepared by adding isopropanol to the solution we have, such that the concentration of water is only 10%. To visualize the separated components on the chromatograms we have to use a locating agent such as 4-aminobenzoic acid or aniline diphenylamine phosphate. Presence of carbohydrates is indicated by colored spots. The color that appears will depend on the specific carbohydrates present.
References
Iran
Blei, and George Ochain
Edward Stawnton West. Textbook of biochemistry.
David J. Holman, and Hagel Peck
Libert Stryer
Lehneyer, Nelson, and Cox. Principles of Biochemistry.
Links
-
http://www.gac.edu/cgi-bin/user/~cellab/phpl?chpts/chpt4/endnotes4.html#endnote4-6
-
http://www.gac.edu/cgi-bin/user/~cellab/phpl?chpts/chpt4/ex4-4.html
-
http://www.bioproducts.com/technical/proteinelectrophoresisinagarosegels.shtml