STISIM Drive - Dynamics Tab Box
This is one of the least
understood yet important areas of the simulator. Obviously since STISIM Drive
is an interactive driving simulator, there must be some dynamics associated
with the vehicle the driver is trying to control. The confusion generally
occurs with understanding the various dynamic parameters and trying to
determine how they will help you create the desired vehicle. The first thing to
realize is that there are numerous ground vehicle models that can be used to
simulate the driver's vehicle. These models range from the very simple (a
few parameters) to the extremely complex (several hundred parameters and
additional processors). The model that you use depends on the fidelity that is
required in the vehicle's response characteristics as well as the data that you
are trying to collect. If the final data relates to how well the driver
recognizes signs, or responds to unexpected obstacles or stays awake then a
simple dynamics model will suffice. However, if you are trying to simulate
anti-lock braking during limit performance, you will need a much more
sophisticated dynamics model.
Fortunately, STISIM Drive can use both a very simple linear dynamics model and a highly complex non-linear model, depending on the application. In general, the vast majority of STISIM Drive users will only need and should only use the simple dynamics model. This is the default configuration for the simulator and does not require any additional processing power (doesn't need an extra computer, it just sounds more high tech saying it the other way). In special cases, we do provide our complete vehicle dynamics package (known as VDANL Drive), but this does require a separate computer and some knowledge of vehicle dynamics.
In any event, when you click on the Dynamics tab, a tab box similar to the following will be displayed:
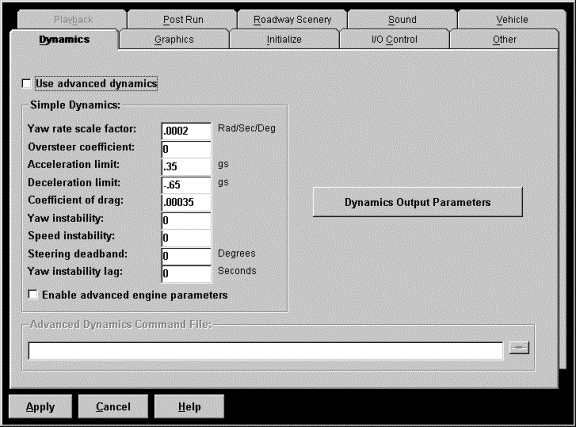
The first parameter to consider is whether or not you are using the advanced dynamics model. If you are not sure, then you are definitely using the simple dynamics and the check box next to the "Use advanced dynamics" label should be left blank. When the advanced dynamics model is not active (no check in the box), the simple dynamics parameters can be accessed otherwise the simple dynamics parameters can not be accessed and instead the "Advanced Dynamics Command File" option will be available.
The simple vehicle dynamics are comprised of 9 different parameters that control how the vehicle will steer, accelerate and brake. These parameters will dictate whether the simulated vehicle handles like a big truck or a sports car. These parameters deal with the actual dynamics of the vehicle and not with how the steering and pedals function. To calibrate the steering and pedals you need to access the I/O Control tab. The next few paragraphs will discuss each individual parameter and then will be followed by a short guide to setting the simple vehicle dynamics.
The first two parameters shown are the "Yaw rate scale factor" and the "Oversteer coefficient". These parameters directly effect how the vehicle responds to steering inputs. The yaw rate scale factor is the most important dynamics parameter that you will set because it controls steering sensitivity. This parameter controls how responsive the vehicle is when you use the steering wheel. The higher the number for this parameter, the more responsive the vehicle will be. When we say responsive we mean how quickly the vehicle begins turning and how far it turns relative to how far the steering wheel was turned. For sports cars, you want the steering to be very responsive, whereas for trucks, the steering should be very sluggish. It is hard to say what values should be used for this parameter because the way the vehicle responds is based on personal perception. When setting this parameter some added caution is necessary. If you set the value to high, then the vehicle will become unstable and the driver will be unable to control it.
While the yaw rate scale factor is the predominant factor in steering stability, the oversteer coefficient helps to improve the vehicle's response while corning at higher speeds. As a vehicle moves faster and faster, its steering characteristics will change. The vehicle will become less responsive when turning (you can not turn as sharply at higher speeds). This is known as oversteer/understeer. The oversteer coefficient becomes important when going around curves. If a car understeers (this is how they are designed), its steering sensitivity will decrease with increasing speed. If a vehicle is oversteering, then as it goes through the same curve at the same speed, the driver has to steer less and less in order to negotiate the curve and small steering changes can make the vehicle unstable.
The next three parameters shown all effect the longitudinal (starting and stopping) characteristics of the vehicle. These will control how fast the vehicle accelerates when the gas pedal is pressed (acceleration limit), how quickly the vehicle decelerates when the brake is pressed (deceleration limit) and the vehicles top end and coast down speeds (coefficient of drag). The acceleration limit values generally vary based on the weight of the vehicle and the horsepower of the engine. For a sports car acceleration values are generally from .2 to .4 g's, and deceleration between .7 and .9 g's. For a normal family sedan the values can range between .1 g's and .25 g's for acceleration and .6 to .8 g's deceleration. For heavy trucks, the acceleration values range from .025 to .075 g's and for deceleration, .25 to .45 g's. The coefficient of drag sets the overall drag on the vehicle and therefore determines the vehicle's maximum speed. This is because the drag of the vehicle increases with the square of the vehicles speed. Therefore at some point the drag will balance with the vehicle's acceleration and the vehicle's speed will no longer increase. This parameter also effects how fast the vehicle decelerates when coasting.
The next two parameters (yaw rate and speed instabilities) deal with adding some instability into the driving scenario. Because the simulator is a digital system, it is conceivable that if the steering and throttle inputs are held in the exact same position, then the vehicle will never deviate from its current path and it will obtain a specific speed and never change from it. However, in the real world, this is not the case because roadways are not perfectly flat and smooth. Therefore, to add a little realism to the driving task, we have included these instabilities in both the steering and speed signals. Set either of these parameters to a value of 0, means that no instability will be added to the system. Setting a value for the instability will make the car drift from its current path and if it continues undetected, the vehicle will eventually go off the road and crash. An instability value for the speed instability will cause the speed to fluctuate, slowly changing so that if the driver is supposed to keep a constant velocity, they will have to continually pay attention and adjust their throttle input.
The "Steering
deadband" parameter was included to simulate deadbands found in real
steering systems. A deadband is a region where even though the steering wheel
is being steered, no inputs are being recorded so the vehicle continues on its
current path. This also helps desensitize the steering a little bit. Once again
because it is a digital system, a little bit of steering without the deadband
will make the vehicle deviate from its current course. By placing a small
deadband around the center of the steering motion, we can effectively eliminate
all steering response around 0.
Finally, the yaw instability lag puts a delay into the steering system. This helps the dynamics simulate certain road conditions like ice because the steering input takes longer to get to the wheels and therefore the vehicle tends to be less responsive.
This brings us to our final simple dynamics parameter, enabling advanced engine parameters. By default the simulator is configured with an automatic transmission, however there is an option for a standard transmission. If you have a standard transmission or decide you can not live with the default transmission parameters and you want to live on the edge a little bit, you can modify them and use a set of your own. The parameters themselves are found in a file called Engine.Par which is found in the C:\STISIM\Data\Parameter_Files directory. To use this file, simply create your version of it, place it in the directory, and click on the "Enable advanced engine parameters" check box. STISIM Drive will bypass its automatic settings and use the ones in the file instead. The format of the Engine.Par file is as follows:
Transmission type (0 -
Automatic, 1 - Standard)
Number of forward gears
Engine idle torque parameter
Torque coefficient in the linear range
Torque coefficient in the non-linear range
Torque drop off with throttle
Shifting point from first to second gear (ft/sec)
.
.
Shifting point from maximum gear -1 to maximum gear
Gear ratio for first gear
.
.
Gear ratio for maximum gear
Control byte value for first gear
.
.
Control byte value for maximum gear
Control byte value for reverse
You should note that the control bytes can be obtained from the CalPot32 program and that any type of shifter can be used as long as the configuration provides a distinct digital output for each gear being used.
"How do I go about
setting up the dynamics?" is one of the most frequently asked questions on
our technical support line. There is nothing magical about doing it as long as
you have a basic understanding of the parameters involved. The steps required
to setup the dynamics are as follows:
1. Set the movement on the driver control inputs. The control inputs are the steering wheel, throttle pedal, brake pedal and on some systems the clutch. You must first calibrate the input signals using the CalPot32 program. CalPot32 allows you to get information on the controls without having to run the simulator. You then take the information obtained using CalPot32 and place it in the appropriate fields in the I/O Control tab. These values are different from one controller to the next, so it is important to make sure that you set yours up correctly. Once you have correctly entered the values for each of the I/O Control parameters, DO NOT CHANGE THEM. They only need to be set once for any given controller. Continuously changing these parameters causes most of the problems people have with the dynamics. Once the the I/O Control parameters have been set, you can then proceed to fine tune your dynamics.
2. Determine what type of vehicle you would like to simulate, and set the acceleration and deceleration characteristics.
3. Set the coefficient of drag. Setting this parameter is generally an iterative process. First make sure the maximum vehicle speed is set high enough to not cause problems (say 250). Next set a value for the drag (generally around .0001). Now, use the throttle pedal to accelerate the car and observe the maximum speed that you obtain. Next, adjust the drag coefficient so that the vehicle obtains the maximum speed desired. Larger values will cause the vehicle's maximum speed to decrease while smaller values increase maximum speed. Also, while you are trying to establish the maximum speed, release the throttle and see if the vehicle is decelerating to quickly. If it is, then you may have to compromise.
4. Set the speed instability factor. A value of 0 will mean the program does not add any fluctuation to the speed. Typical values for this parameter are on the order of .01. Higher values make it harder to control the speed, while lower values make the changes in speed much less apparent.
5. Next is setting up the lateral or steering dynamics. There are 3 parameters for accomplishing this task. First, set the yaw rate scale factor. Like the drag coefficient discussed above, setting this parameter is generally an iterative process. It is hard to definitively say what values should be used because the way the vehicle responds is based on personal perception, however, if you start with a value of .005 and work from there you should be able to determine a value fairly quickly. A larger number will make the vehicle turn more for a given steering input. Some additional caution must be taken with this parameter, if you set the value to high, then the vehicle will become overly sensitive and the driver will be unable to control it.
6. Now set the oversteer coefficient. A typical value would be .0003. A positive value is an understeering vehicle. You can check this value by driving fast through curves. If the vehicle is too responsive, raise the value, if you think the vehicle goes off the road too easily (instead of correctly negotiating the curve), lower the value.
7. Next, set the yaw instability and any deadband. The larger the yaw instability parameter is, the quicker the vehicle will begin to drift from its initial location. The lower the value, the less drift. Typical values start around 1. As a side note, if you are going to have curves or wind gusts in your scenario, you really don't have to set a value for this because the curves will force the driver to steer. Deadband values are generally no larger than 5 degrees (this is in both directions so the total deadband would actually be 10 degrees, 5 in each direction).
8. Set additional engine
parameters if you are not happy with the program's default values.
9. Finally, the yaw
instability lag delays the driver’s steering input, increasing the difficulty
in controlling the vehicle. A typical value for this parameter is around .5.
STISIM Drive allows the user to simulate a vehicle running on surfaces with low coefficients of friction. This is accomplished using the Road Surface Attribute (RSA) event. When surface friction coefficients (m) below .8 (STISIM Drive’s nominal value) are specified, some changes occur in the vehicle characteristics. The vehicle yaw rate scale factor is reduced by the ratio m / .8, which makes the vehicle less responsive. The vehicle oversteer factor is increased by the ratio .8 / m, which increases the speed effect on steering sensitivity. Furthermore, the maximum vehicle accelerations are decreased by the ratio m / .8 and the yaw instability increases. Finally, the yaw instability lag parameter is multiplied by the ratio (.8 - m) / .8. This increases the lag as friction decreases, thus increasing the difficulty in controlling the vehicle.
That wraps up our discussion on the parameters for using the simple dynamics. Now its time to discuss the more advanced dynamics. If the "Enable advanced dynamics" check box is active (has a check in it) then the "Advanced Dynamics Command File" option will also be active. The only way to run the advanced dynamics is to specify a command file that contains all of the information on the vehicle that will be used. The command file contains the vehicle's tire, suspension, geometric and other parameters. The command file is located on the dynamics computer and therefore you will need to include the entire network path when specifying the file that will be used. If you have mapped the hard drive from the dynamics computer so that it is a logical drive on the center system, this should be no problem. Use the browse feature (found to the right of the dialog box) to look at the mapped drive and choose the desired command file. If a mapped drive does not exist, use the browse button to display a Windows explorer box that will allow you to go across the network connection. When the desired file is found (on the STISIM_DYNAMICS computer, usually in C:\VDANL\Parameter_Files) the entire network path name will be included in the command file text box. Once you have this in the text box, if you keep your files in the same directory you can simply use the same path and type in the name of the new file to use. You will need to refer to the VDANL and VDANL Drive documentation for details about vehicle parameters, command files and such. The details of the advanced dynamics are much broader in scope than what this documentation is intended to provide.
This brings us to the final option in the dynamics tab box, the "Dynamics Output Parameters" button. Depending on the simulator configuration that you are using, STISIM Drive provides analog outputs for its steering feel system, a speedometer and a tachometer (tachometer only available on the advanced dynamics option). Clicking on the "Dynamics Output Parameters" button brings up a dialog window that allows you to fine tune these outputs. The dialog window that will be displayed will be similar to the following:
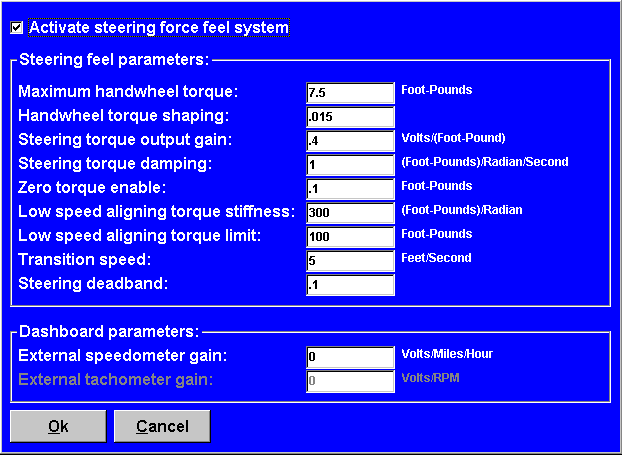
At the top of the dialog window is an option for activating the steering force feel system. This is simply used for turning the system on and off. On any run if you decide not to use the steering but still want to maintain your parameters, then turn the active steering off by clicking on this option to remove the check mark from the box. If the steering system will be active, then there are 9 parameters that you can use to fine tune the characteristics of the steering feel. It should be noted that the active steering system can only be used in conjunction with an optical encoder system (see I/O Control tab) and that it can be used with both the simple and advanced dynamics options.
The "Maximum handwheel torque" and "Handwheel torque shaping" parameters define the steering wheel torque to be a non-linear function of total tire aligning torque, and are used to simulate a power assisted steering system. "Maximum handwheel torque" sets a limit on the amount of torque that the steering model can generate. The steering feel algorithm will compute values of torque up to this amount and then limit the steering feel after that. If the steering feel seems to be too sensitive and begins to oscillate back and forth, reduce the value for this parameter. "Handwheel torque shaping" defines the "shape" of the steering torque function. Smaller values make the system feel like there is more power assist during on-center handling. To simulate a manual steering system, set the shaping coefficient to a value of 0.
The "Steering torque output gain" is the gain being applied to the output signal of the analog board. This value is used to increase or decrease the actual voltage that will go from the computer to the steering unit. It will have no effect on the amount of steering feel that should be applied, but it does effect the total amount of torque the motor will generate. Like the maximum handwheel torque parameter, setting this value too high can cause the system to become unstable. To help stabilize the system, some damping has been added in the forms of "Steering torque damping" and "Zero torque enable". The steering torque damping is essentially active viscous damping applied to the torque output command based on steering wheel rotational velocity. Increasing the damping can help eliminate small oscillations in the steering wheel feedback. The zero torque enable sets the minimum value of torque that can be output by the motor. Below this threshold, the torque is always set to zero because the motor is physically turned off.
Because steering feel is a function of the tire aligning moments, it is speed dependent and feels different at lower speeds (such as parking) than at higher speeds. For this reason, at speeds below the "Transition speed" an additional "low speed" effect is included in the steering feel model. The low speed effect is based on a torque stiffness provided by the "Low speed aligning torque stiffness" parameter. The torque that is generated acts along this slope until it reaches the "Low speed aligning torque limit" at which point it remains constant even though the steering is increased. This model is intended for zero speed and as the speed is increased the zero speed model is blended with the high speed model until it reaches the transition speed (generally 2 to 5 feet/second), above which the zero speed model has no effect. The "Steering deadband" parameter is a coefficient that is multiplied with the zero speed torque limit to help stabilize the low speed model by computing a minimum value of torque that will be used. Below this value the torque is always 0. The deadband coefficient ranges between 0 and 1 and typical values are around .1.
For systems that use an external speedometer and tachometer (tachometer is only with the advanced dynamics), you must provide a gain so that the values for speed and engine RPMs that the program computers are displayed correctly to the driver. You will need to calibrate these signals so that they are displayed correctly. For the speedometer, you can simply adjust the gain by placing the speedometer bar (see Vehicle tab box) on the screen and then adjusting the gain until the speedometer bar matches the display of your external speedometer. For the tachometer, you will have to save the tachometer output to a file and then adjust it and try again.
For information on setting up the hardware for the dynamic outputs, refer to the section on hardware configuration and setup.