Constellation Lights
Space Crisis; Who's driving this thing?
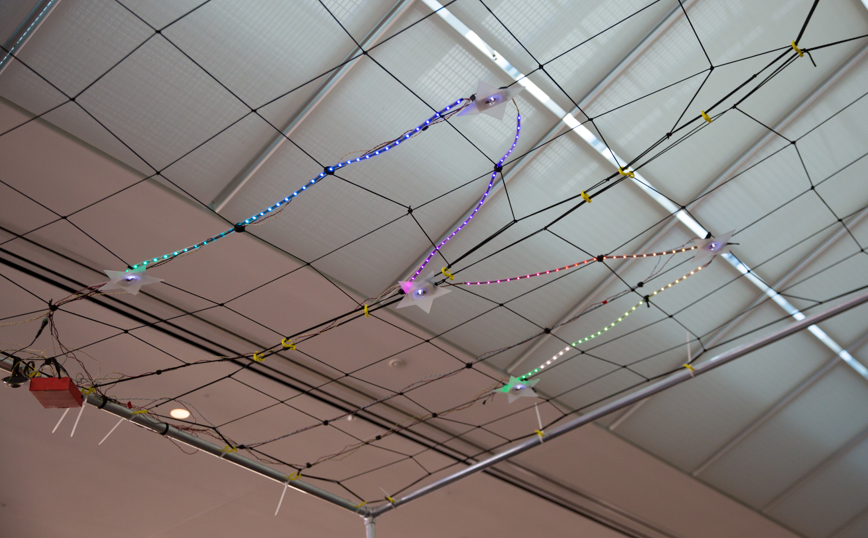
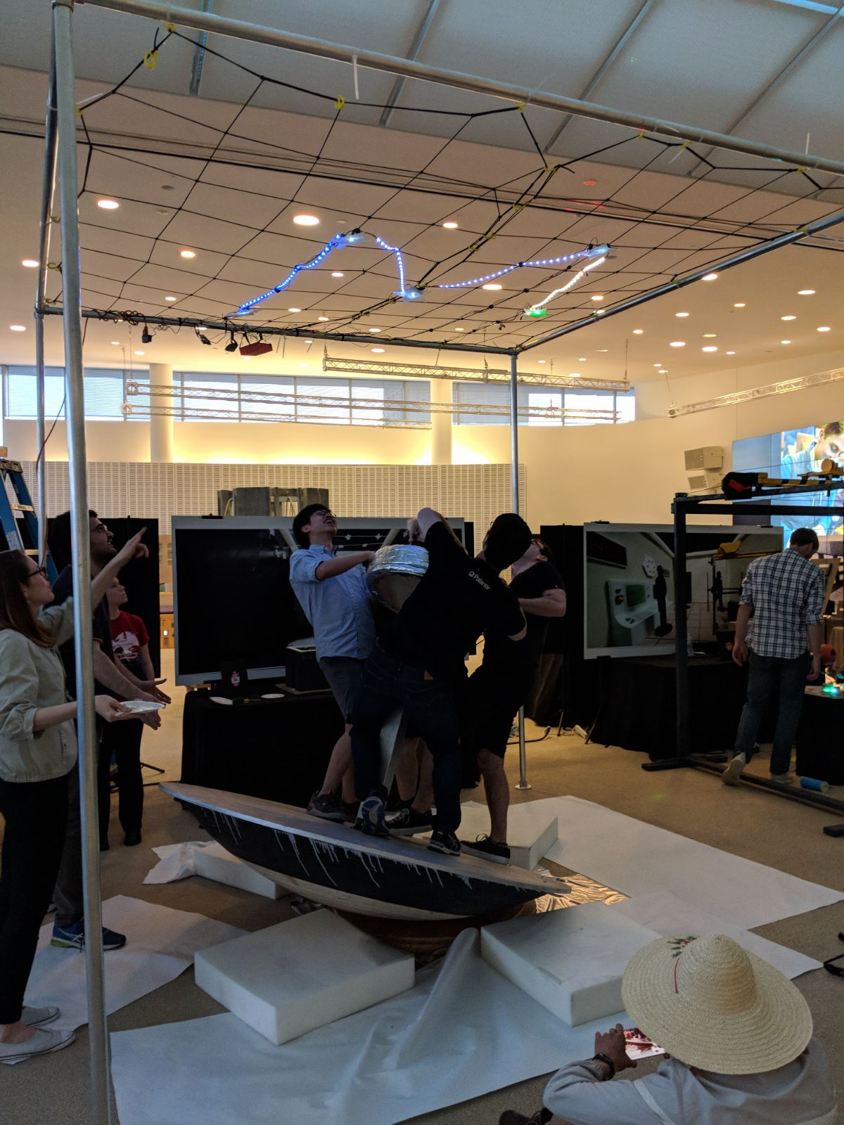
Game play in the room is controlled by components located on the ceiling. To implement the ceiling in the presentation, we strung an elastic cargo net across a 10ft tall aluminum frame. This was to mimic the porosity of a ceiling set up that 5Wits may implement in order to comply with sprinkler code, but still be able to put room features across the top of the room.
Components of the ceiling include:
- constellation lights and LED tracing lights
- microcontroller implementation of game play code and lights
- game sounds using microcontroller and speakers
Constellation lights and LEDs
The stars are made of laser cut acrylic stars mounted on a 3d-printed cartridge, which both holds the protoboard in place and acts as the hanger from which the stars are fastened to the mesh ceiling via repositionable velcro strips, allowing constellation customizing. The acrylic chosen is light diffusing, such that the entire star lights up from a single LED in the center. Through testing of a prototype clear star, we found that the ideal star would fit inside a 10 inch diameter circle. We made stars with both 4 and 5 points for some variety. A hold is cut in the center of each star for laser access to the photosensor.
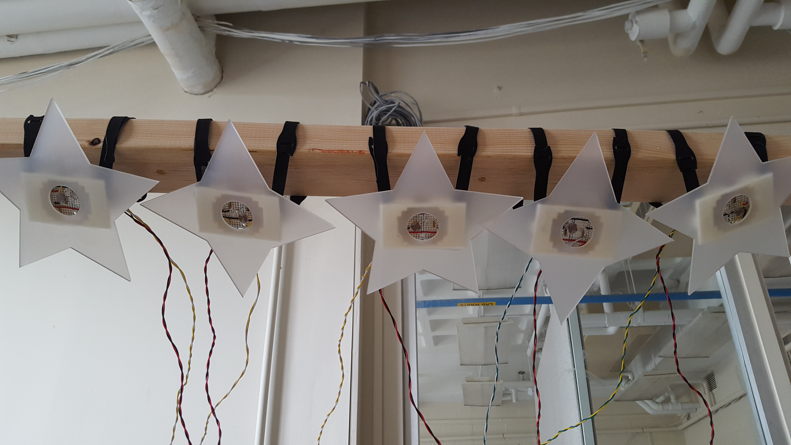

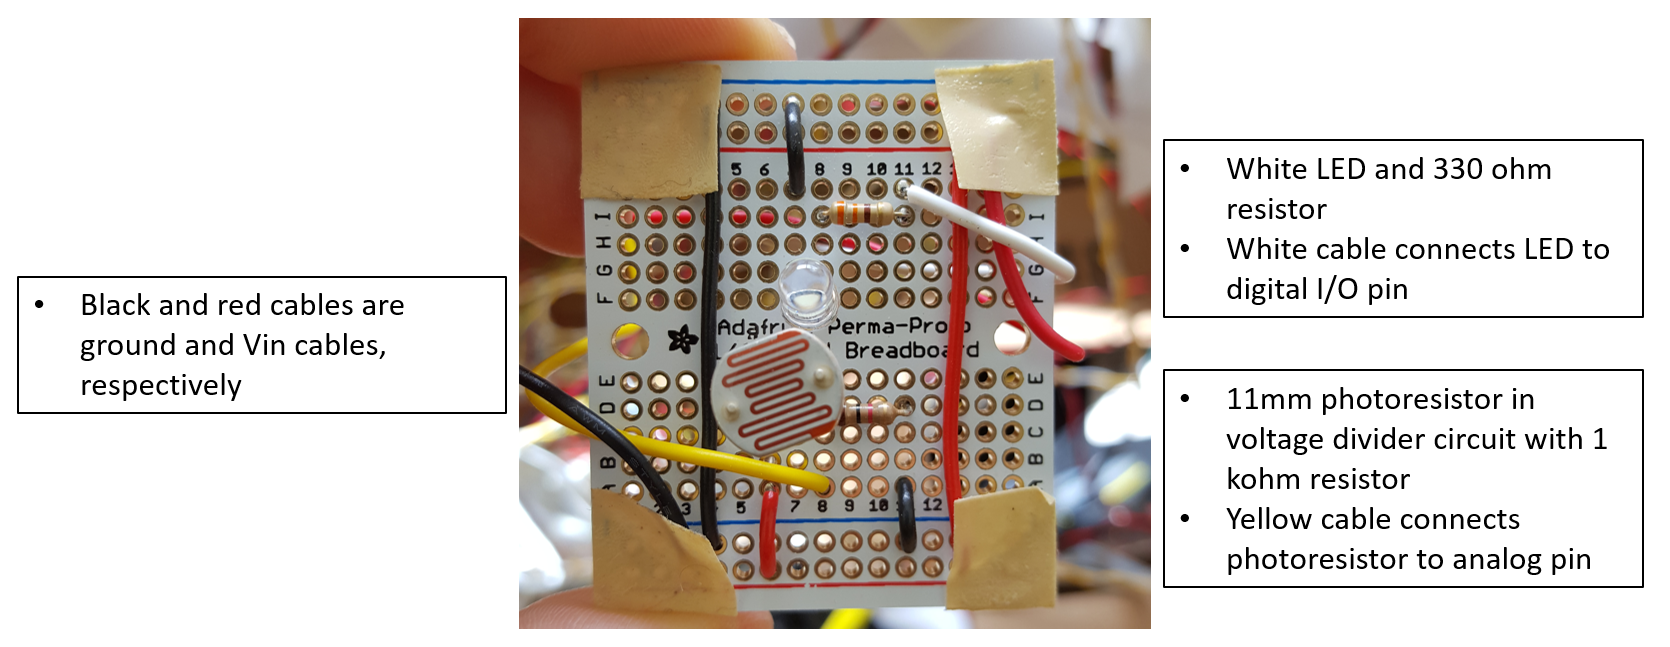
The electronics for each star are secured to a 1/4 size (1.7" x 2") protoboard. Each protoboard holds a white LED and a 11mm photosensor, both with additional resistors for their function. Four long wires emerge from each board, all to be connected to the Arduino Mega that controls the game play, lights and sound. Ground and Vin wires from each star are spliced together for connection to the Arduino.
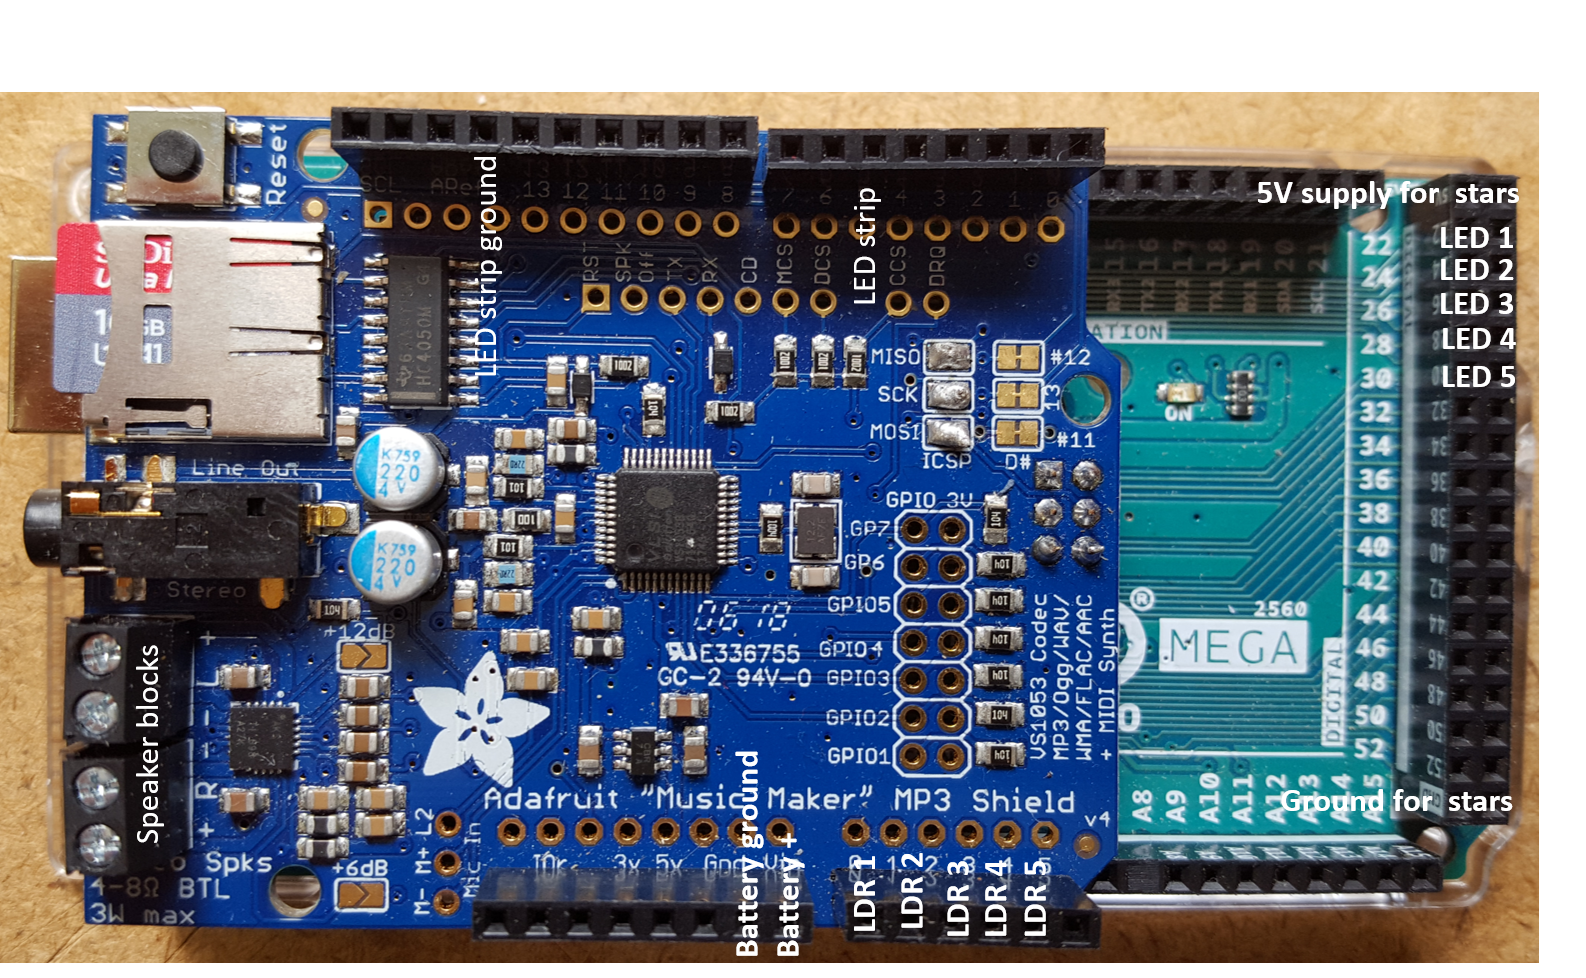
One long addressable LED strip (120 LEDs total) is strung between the stars to trace out the constellation during game play; it is also involved in some signals signaling a game won or lost. Due to their high power consumption, the LED strip is powered separately from the Arduino (but shares a common ground) by a 5V, 2A power supply. A 1000uF capacitor between the ground and Vin ports of the powersupply to buffer against power surges. For programmable control, the LED strip is also connected to the Arduino Mega through a digital I/O pin, a connection which includes a 330 ohm resistor to protect the first LED in the strip.
Microcontroller implementation of game play
All electronics are controlled by an Arduino Mega, which hangs from a box in a corner on the aluminum frame. The Arduino is powered by a 9V batter and was used due to the potential number of parts needed to control for the game. The game program includes a game loop, which resets after each game. The full code is available for download here.
Briefly, the code gives players three minutes to hit all the lights in the constellation. Through a voltage divider, the resistance of a star's photoresistor is monitored. Once the resistance goes above a set threshold (determined by the ambient lighting in the room), the star is "hit"; the star's LED stops blinking and a portion of the LED to the next star lights up, guiding players to the next target. This continues until either all stars are hit in the allotted time (which triggers a winning light sequence) or time runs out (all stars and LED strips go dark). This can be clearly seen from the video of the demo from final presentations.
Game sounds and speakers
Unfortunately, the game sounds were not very audible during the demo, but a lot of thought was put into how we could use sound as signals during the game and to add to the space theme. To implement this, we used a Music Maker MP3 board from Adafruit, which sits on top of the Arduino Mega. This board includes speaker outputs, to which we connected two 4 ohm, 6 watt speakers. These were used due to power constraints; more powerful speakers would have allowed for the sound to be more audible during game play. An SD card stores the MP3 files for the game and is installed in the SD card port on the Music Maker board for the duration of the game.
Game sounds were mixed using the free, open source software Audacity and using sound files found in open source format on the internet and recordings of Emily's voice. Notably, NASA has a library of space sounds from missions (radio waves that they translated into audio); these were used in some of the clips below. There are four distinct game sounds:
- A game introduction
- A game play track, which also serves as the three minute timer for the game
- A game winning track
- A game losing track
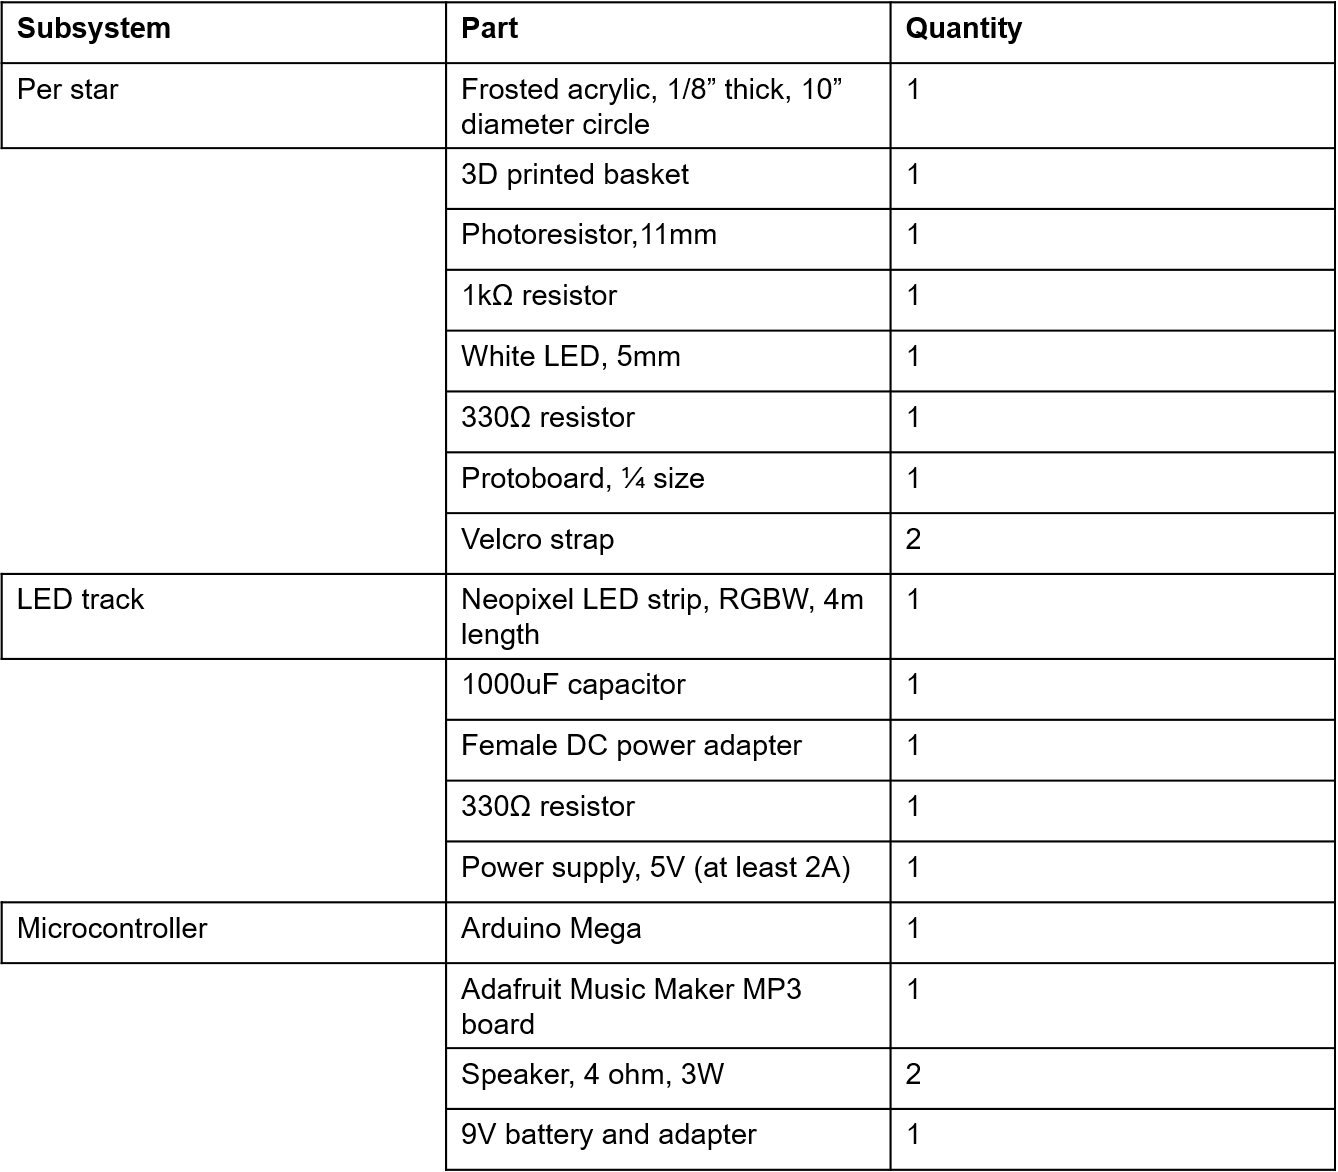
Bill of materials for current implementation
Improvements for future implementations
Based on observations of game play from the demo day, there are a few obvious improvements to the current implementation that would aid in game play:
- A denser mesh to string across the frame. This would allow players to more easily see where the laser is, to aid in aiming and game play. The cargo net used in the current implementation was used due to cost constraints, but clearer game play would occur if players could more easily see where the laser was with respect to the next star target.
- A more obvious flashing pattern to indicate that a star has been hit. This seemed to be more of an issue for the last star, but players were not well aware of when this star was hit. This also would have been remedied by the sounds (which were not loud enough to hear during the demo). But it is clear that a more obvious light pattern would aid in game play.
- Louder sound system. We were limited by the speakers we could power from the Arduino, but in future implementations, a sound system that immerses the whole room would aid in game play.
- Larger sensors. Ideally the entire star would serve as a sensor and players would hit a star if the laser contacted any part of the star. Additionally, constructing the stars so that the sensor cannot be seen would make the stars look more realistic.