Chapter 5. Working with Your Contacts
This chapter will show you how to use the Evolution address book to organize any amount of contact information, share addresses over a network, and several ways to save time with everyday tasks. To learn about configuring the address book, see the section called Managing the Contact Manager in Chapter 9.
The toolbar for the address book is quite simple.
Click New Contact to create a new card, or double-click in a blank space in the contact list.
Click New List to create a new card, or double-click in a blank space in the contact list.
The printer icon sends one or more of your cards to the printer.
The stop sign icon stops loading contact data from the network. This button is only relevant if you are looking at contact information on a network.
Your contact information fills the rest of the display. Move through the cards alphabetically with the buttons and the scrollbar to the right of the window. Of course, if you have more than a few people listed, you'll want some way of finding them more quickly, which is why there's a search feature.
The Contact Editor
To delete a contact:
Click once on the contact.
Press the Delete button.
If you want to add or change cards, you'll use the contact editor. To change a card that already exists, double click on it to open the contact editor window. If you want to create a new card, clicking the New button in the toolbar will open the same window, with blank entry boxes for you to fill in.
The contact editor window has two tabs, General, for basic contact information, and Details, for a more specific description of the person. In addition, it contains a File menu and a toolbar with three items: Save and Close, Print, and Delete.
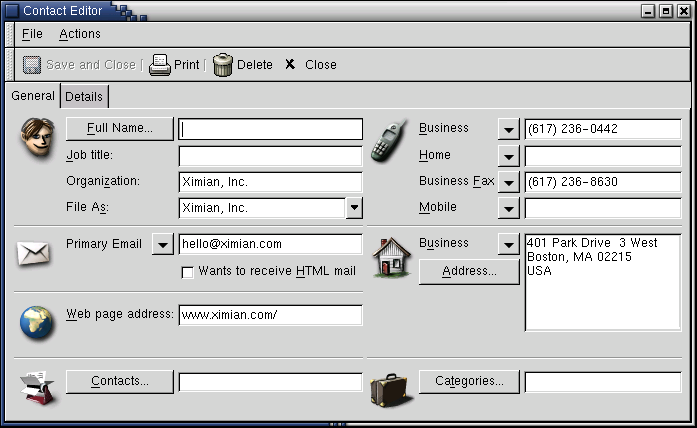
The General tab has seven sections, each with an icon: a face, for name and company; a telephone for phone numbers; an envelope for email address; a globe for web page address; a house for postal address; a file folder for contacts, and a briefcase for categories.
- Full Name
The Full Name field has two major features:
You can enter a name into the Full Name field, but you can also click the Full Name button to bring up a small dialog box with a few text boxes
- Title:
Enter an honorific or select one from the menu.
- First:
Enter the first, or given, name.
- Middle:
Enter the middle name or initial, if any.
- Last:
Enter the last name (surname).
- Suffix:
Enter suffixes such as "Jr." or "III."
The Full Name field also interacts with the File As box to help you organize your contacts.
To see how it works, type a name in the Full Name field: Rupert T. Monkey. You'll notice that the File As field also fills in, but in reverse: Monkey, Rupert. You can pick Rupert Monkey from the drop-down, or type in your own, such as T. Rupert Monkey .
Filing Suggestion: Don't enter something entirely different from the actual name, since you might forget that you've filed Rupert's information under "F" for "Fictitious Ximian Employee."
- Multiple Values for Fields
If you click on the downward pointing triangle buttons next to the Primary Email field, you can also choose Email 2 and Email 3. Although the contact editor will only display one of those at any given time, Evolution will store them all. Entries that have information in them have a check mark next to them. The buttons next to the telephone and postal address fields work in the same way.
The last item in the General tab is the Categories organization tool; for information on that, read the section called Organizing your Address Book.
The Details tab is much simpler:
The briefcase - Describes the person's professional life
The face - Describes the person's personal life
The globe - Miscellanious notes
Contact Shortcuts: You can add cards from within an email message or calendar appointment. While looking at an email, right-click on any email address or message, and choose Create Card for this Address or Create Card for this Sender from the menu.