Enclosure Design

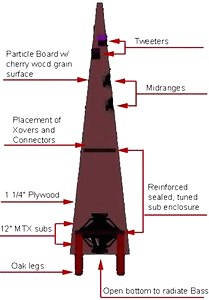
There are three main sections to the Pyramid. First is the base. This is composed of four 1.5"x1.5"x12" oak legs that support the main baffle (1-1/4" 11-ply OSB) on which the subwoofers are mounted. The walls (3/4" HDPB) of the pyramid are attached at this baffle and the next section is the sealed chamber of the subwoofers. A second baffle, partway up the pyramid seperates the sealed chamber from the top section. This non-acoustic chamber houses the tweeters and midranges, as well as the crossover electronics.
The final pyramid is 75" tall and 16.5" square at its base. Each is relatively heavy and the small legs keep it planted in place. The subwoofers are mounted to the lower main baffle using 3" machines screws with double locknuts and air-tight weather stripping. The pyramid is built around this chamber using marine grade wood glue and drywall screws (only for clamping). The subwoofer chamber is not stuffed with anything for fear it would settle on the speakers. Because the subwoofer is downfiring, it was thought this would mitigate any higher frequencies and allow for a simpler crossover. The upper chamber is tightly stuffed with a poly material to reduce any resonances where they should not be.
The actual volume of the subwoofer chamber was tightly controlled, although in retrospect the design volume itself is suspect. I did not use Theil/Small parameters to pick the design volume. Instead, I used the volume from the plans that came with the speaker kit, modified to support the isobaric configuration used here. I agonized over how to calculate the proper position of the upper baffle and ended up using a bizarre mix of triginometry to numerically solve the problem. Only after I had completed my work did my pre-calculus teacher see what I was doing and point out the utility of an integral.


The enclosure was finished with a cherry wood grain Formica laminate. It has a nice look and has been very durable. I never finished however putting a strip of black laminate as an accent strip around the bottom and top. The legs are painted with a red spray enamel.