


2.00b Toy Product Design
Thermometer Step-by-Step
Connect to the internet
Our final step in our system integration is to add WiFi capabilities to our thermometer so that it can be used for our daily wellness checks as part of the 2.00b health protocol.
Firmware upgrade (optional, but recommended)
The firmware for the WiFi component on the Arduino Nano 33 IoT is not the most recent firmware available. In general, it's recommended that the firmware for the WiFi component matches the version of the WiFi library you are using. If it doesn't, you may or may not run into problems. WiFi programs may warn you of the incompatibility but still try to run. It will not be a problem for our application, but if you wish, you may update the firmware as follows:
- Open up the Arduino IDE (desktop version only, not supported on web IDE)
- Connect your Arduino to the computer. Be sure the correct board type and port are selected.
- From the menubar, go to Tools --> WiFi101 / WiFiNINA Firmware Updater
- Select the port of the WiFi module
- Click Open Updater sketch. This will open up a sketch for updating the firmware. Verify and Upload the sketch.
- Check that the most recent firmware version (1.3.0) is selected in the dropdown.
- Click Update Firmware.
Watch the video below for a demonstration of the steps above.
(Remember: events in all the videos take longer than shown!)
Certificate installation
Our temperature readings will be sent to the 2.00b apps website, 200b.mit.edu, via SSL (Secure Sockets Layer), to keep your data secure. In order for the Arduino to establish a secure connection with 200b.mit.edu, it needs to have the SSL certificate for 200b.mit.edu. We can add the 200b.mit.edu SSL certificate to the Arduino using the WiFi101 / WiFiNINA Firmware Updater. Assuming you still have the updater open from the last step, please do the following to add the 200b.mit.edu SSL certificate to your Arduino:
- Click "Add domain" button.
- Enter 200b.mit.edu as the "website to fetch SSL certificate".
- Click "Upload Certificates to WiFi module".
Watch the video below for a demonstration of the steps above.
Library installation
To simplify our code for sending data to the 2.00b apps site, we will be using two additional libraries. The first library allows us to make http requests (e.g., fetching pages from a web server). The second library helps us to format the data we are sending into JSON, which is a data format written in JavaScript syntax. Please install the following libraries:
| search term | library name | purpose |
| http | ArduinoHttpClient | http support |
| json | ArduinoJson (by Benoit Blanchon) | json support |
Connect to WiFi
Download wifi_test.zip. Open the wifi_test.ino file. The Arduino IDE should open not only the wifi_test.ino, but also the arduino_secrets.h file. If it does not, then find and open the arduino_secrets.h file as well. The arduino_secrets.h file has been set up for the MIT Guest network. If you are on a different WiFi network, you will need to enter the name of the network and the password for it, if required.
Once the correct network information is in the file, Verify and Upload the file. Open the Serial Monitor to observe what happens. This program waits until the Serial Monitor opens before starting. The program does 3 things: tries to connect to a WiFi network, tries to retrieve information over HTTP (gets external IP address) and tries to retrieve information securely over HTTPS (gets message from 200b.mit.edu). You should get output similar to the picture below. An HTTP status code of 200 indicates that everything is OK.
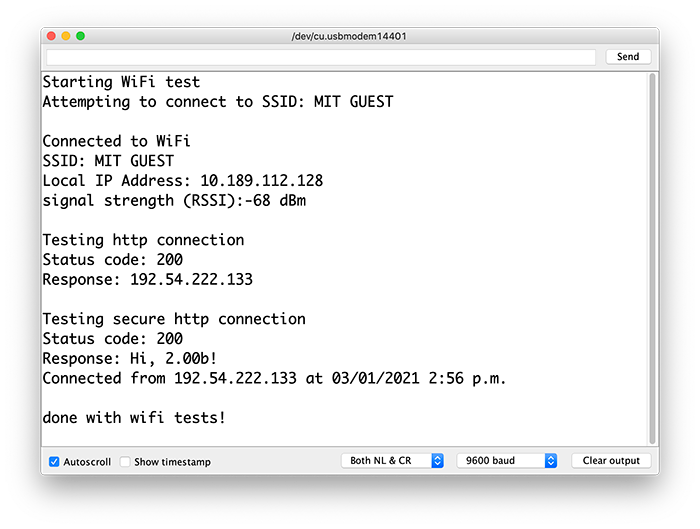
Different networks may take different amounts of time to connect to. Some home networks with multiple bands may take multiple tries (10-20 seconds per try) and may block the incoming responses. If the Arduino is able to connect to the wifi network but unable to get the responses back, the network may be blocking the responses. In that case, try using a different network (e.g., hotspot from a smartphone).
Using an API
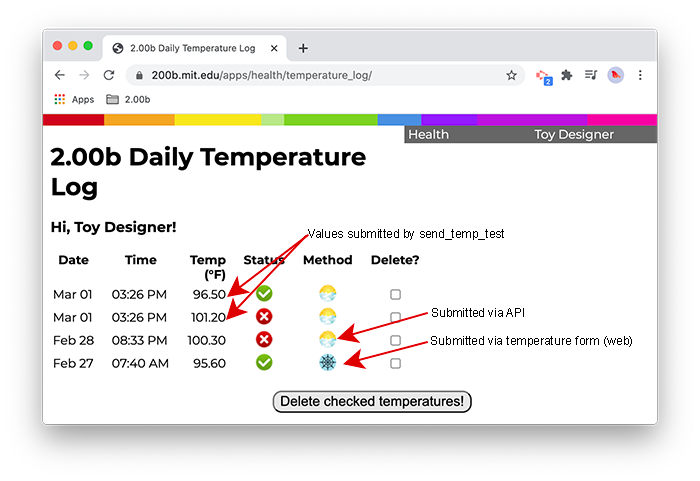
An Application Programming Interface (API) is provided by system operators to give other people access to features or functions of their system. For 2.00b, we are hosting a temperature log for each person on 200b.mit.edu. In addition to being able to enter this information on the temperature entry form (login required), a method has been provided so that the temperature information can be sent by a program, like the program we'll provide for your Arduino.
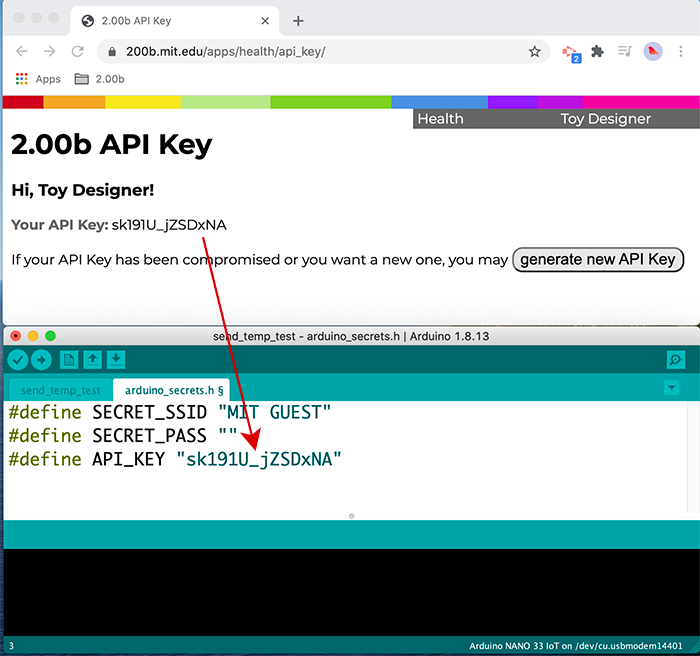
This tutorial is being published publicly on the Internet, so anyone can use the information in this tutorial to send temperature data to the 200b.mit.edu server. However, we only want "authorized users" to submit data. To do this, each in-person member of the 2.00b community is being given an API key. This serves as a secret handshake between your program and our server, so that we know the information is coming from you. You can find your API key from your API key page (login required). Do this now.
Download send_temp_test.zip. Open the send_temp_test.ino file. The arduino_secrets.h file should also open. Update arduino_secrets.h with the network information, as necessary, and also copy and paste your API key from the API key page to arduino_secrets.h.
Then Verify and Upload the file. Open the Serial Monitor to start the program and see the output.
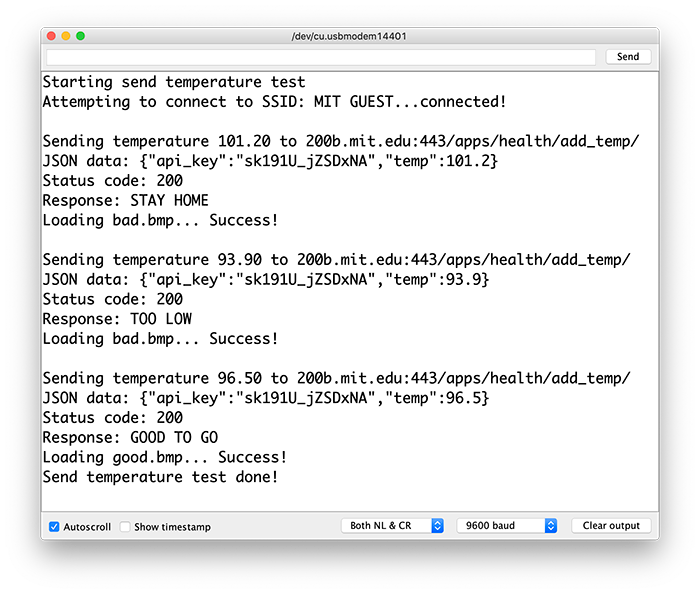
This program sends three temperature values to the 200b.mit.edu server, a normal high temperature value, an invalid body temperature value and a normal good temperature value. Because the temperature log is intended to record human body temperatures, temperatures that are not normal will not be accepted. The display will also show the results for each test run. Watch the video below for a demonstration of the program running.
The Serial Monitor output will look something like this:
Each time a reading is sent to the server, the server responds with a status message. The possible status messages are:
| message | meaning |
| ? USER | The API Key provided doesn't match a user in the system. |
| JSON ERROR | Valid JSON input was not provided. |
| INVALID TEMP | Number was not received for temperature. |
| TOO LOW | Temperature was too low, so will not be recorded. |
| TOO HIGH | Temperature was too high, so will not be recorded. |
| DB SAVE ERROR | Error saving data to database. Try again in a few minutes. |
| STAY HOME | Temperature was valid, but too high for in-person participation. |
| GOOD TO GO | Temperature was valid and in normal range. Come to class! |
As mentioned with the earlier test, depending on the network conditions, the Arduino occasionally isn't able to connect or to receive the confirmation response. In that case, the thermometer will take a long time to show a response and when it does it will be a red X followed by the message "???". You can then check your temperature log to see if it went through or not.
System Test
Now it's time to test the whole system together! Download thermometer_w_wifi.zip. Copy the arduino_secrets.h file from the send_temp_test folder to the thermometer_w_wifi folder, overwriting the default file we provided for you. Load the program onto the arduino and open the Serial Monitor to start it.
In this program, a short button press will trigger a temperature reading and a long button press (1/2+ second) will send the temperature to 200b.mit.edu. If a long button press is detected and there is no temperature reading yet, a "TAKE TEMP" message will appear.
If things don't work, maybe try a different network (e.g., your phone's hotspot). The MIT GUEST network seems to work well with the Arduino, so try to use it if it is available. Be careful not to send too many values in short succession as different networks might interpret your traffic as harmful and block it either to or from the 200b.mit.edu server.
At this point, we are all set with testing our system.