2.00b Toy Product Design
Thermometer Assembly Overview
For the final thermometer assembly, we need to rebuild the circuit so that it fits in the thermometer housing that we have designed. To do this, we are providing two options: the circuit may be rebuilt on a solderless mini-breadboard or on a soldered perma-proto breadboard.
There are three steps we need to take:
- update the software program so that it can run without being attached to a computer,
- transfer the circuit to a smaller form factor, and
- install the circuit in the housing.
The second and third steps are actually intertwined since some of our parts, the power switch and the control button need to be installed from the outside of the housing, so they will be connected to the rest of the circuit after they are installed in the housing. The circuit we will be building, shown below, is almost identical to the one we built before, except we are adding a battery power source with a power switch and swapping out the tactile button for a more robust pushbutton.

Let's get started!
The instructions below are very high level. Your party leader can help you understand what to do.
Updating the Arduino program
Open up the latest version of thermometer_w_wifi.ino (with whatever changes you have made to it). Your thermometer should be calibrated by now.
Comment out the line while (!Serial); by adding two forward slashes before it, so it looks like this:
Verify and Upload the program to your Arduino Nano and test it out. It should still work fine, but the program no longer waits for you to open the Serial Monitor before starting.
The rest of the lines related to the Serial interface may be left in the code without any harm.
Removing the Arduino from the breadboard
Caution! The Arduino Nano is somewhat fragile, especially at the ends, where the USB connector and WiFi components are. Please do not try to use your fingers to pry the Nano out of the breadboard. You are likely to accidentally lift on the USB or WiFi component instead of the board itself and break your Nano!
Please use a spudger! Your party leader can will tell you where all the extra supplies are. Please take a spudger for this step and return it by the end of the party.
Use the spudger to help remove the Arduino Nano out of the breadboard by prying on one side and then the other side, lifting each end a little bit each time until you are able to remove the Nano easily. The spudger goes between the Nano and the breadboard.

Install the 9V Battery Clip
- Find the 9V battery clip

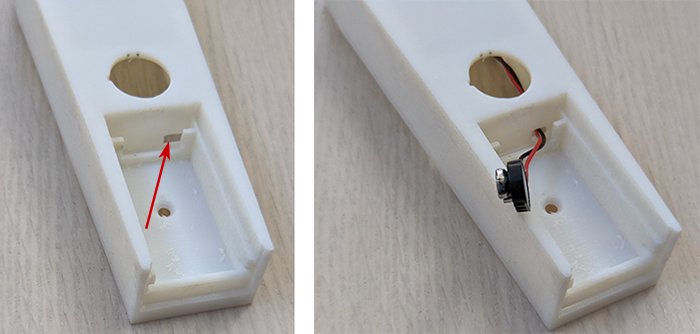
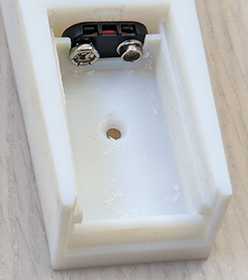
- Find the battery compartment on the back part of the housing. Feed the wires of the battery clip through the hole in the corner.

- Position the clip in slot.

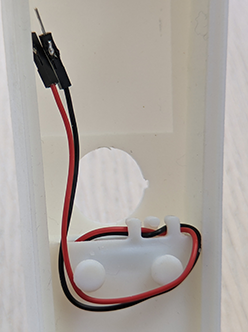
- Turn the housing over and wrap the wire through the pegs to provide strain relief.

Making a Choice
Now you need to choose whether you want to rebuild your circuit on the mini-breadboard included in your kit or on a perma-proto breadboard, which we have in the labs.
With the mini-breadboard, the connections are made with jumper cables and are fairly quick and easy to do. There is no soldering. The limitation is that the connections may sometimes come loose when your project has moving parts or is shaken.
For sturdier prototypes, people usually solder all connections onto a circuit board and onto components. The perma-protoboards we will use are a solderable form of a breadboard. It has pre-connected rows of 5 holes, just like a breadboard. However, in the interest of time for this project, we will only solder to the perma-protoboard and not to any components. The components we have (e.g., the IR sensor and display) have headers soldered onto them so that they could be used in a breadboard. The correct way to solder wires to these components would involve desoldering the headers. Instead, we will use pre-made jumper cables on the components and solder the other end to our perma-protoboard.
For sturdier prototypes, people usually solder all connections onto a circuit board and onto components. The perma-protoboards we will use are a solderable form of a breadboard. It has pre-connected rows of 5 holes, just like a breadboard. However, in the interest of time for this project, we will only solder to the perma-protoboard and not to any components.
The components we have (e.g., the IR sensor and display) have headers soldered onto them so that they could be used in a breadboard. The correct way to solder wires to these components would involve desoldering the headers. Instead, we will use pre-made jumper cables on the components and solder the other end to our perma-protoboard.
If you're not sure, you may read through both sets of instructions to help you decide what to do.


