Macintosh Development |
[Home]
[About Us]
[People]
[Information Systems]
[Kerberos for Macintosh]
[Applications]
[Miscellaneous Documentation]
Macintosh Development |
[Home]
[About Us]
[People]
[Information Systems]
[Kerberos for Macintosh]
[Applications]
[Miscellaneous Documentation]
You also need to install KClient 1.6.2 or better.
Unrelated to CVS, you need to install MIT Sync Linker.
You can get the most recent version of MacCVS that has been tested for MIT use from Pacific Grove in zone IS-DCNS, in the CVS folder. You need MacCVS application and cvs.lib shared library. They should reside in the same folder, anywhere on your development machine. You should avoid having multiple copies of MacCVS and cvs.lib, and you should always upgrade both MacCVS and cvs.lib at the same time.
Do not download the version of MacCVS available on the Internet, as it does not have Kerberos support built in. The sources available on the Internet are likely to be out of date, as the current sources are kept on our CVS server.
You can get the most recent version of CWCVS that has been tested for MIT use from Pacific Grove in zone IS-DCNS, in the CVS folder. You need to copy the CWCVS and CVS Environment plugins into your CodeWarrior Plugins folder. The plugins will be recognized the next time you lanch the CodeWarrior IDE.
The first time MacCVS is launched, it will prompt you for your settings.The first time you use it, you should probably use the recommended settings:
:kserver:cvs.mit.edu:/cvs/macdev
This is what your MacCVS preferences should look like if you used the recommended settings:

Once you become familiar with MacCVS, you might want to change some of these settings. Their effects on the way MacCVS works is explained in documentation on using MacCVS.
In order for MacCVS to do the right thing with binary files, you need to configure your Internet Config correctly. The easiest way to do this is to use the Glacier utility which will take an existing Internet Config settings file and merge its file mappings into your Internet Config settings. You can get the utility from Pacific Grove in zone IS-DCNS, in the CVS folder. It comes with "CVS File Mappings" file, which you should drag on Glacier, and Glacier will launch and configure your Internet Config for MacCVS.
It only makes sense to configure CWCVS if you have alrady obtained working files and folders, using MacCVS.
On Pacific Grove, in zone IS-DCNS, inside the CVS foder, you can find AppleScript called Configure CWCVS.as. Put it in your CodeWarrior "(Scripts)" folder. You can use it to vastly simplify setting your CWCVS settings correctly.
When you want to configure CWCVS settings for a particular
project, open the project in the CodeWarrior IDE, make sure it's the
default project, and then run the Configure CWCVS AppleScript from
the Scripts (![]() ) menu (you may
need to turn on the Scripts menu in your IDE preferences first).
The script assumes that your project conforms to the folder
organization that should be used for all projects in our build
tree. If this is not the case, you can edit the script or adjust
the settings manually.
) menu (you may
need to turn on the Scripts menu in your IDE preferences first).
The script assumes that your project conforms to the folder
organization that should be used for all projects in our build
tree. If this is not the case, you can edit the script or adjust
the settings manually.
If you want to configure the global version control settings, close all projects in the CW IDE and run the Configure CWCVS script from the Scripts menu. You will be prompted to select the top level of your working files.
After you configure CWCVS for a project, the version control menu
(![]() ) will appear in the IDE menubar
whenever that is the default project. If you configure global version
control to use CWCVS, the version control menu will also appear when
there are no projects open.
) will appear in the IDE menubar
whenever that is the default project. If you configure global version
control to use CWCVS, the version control menu will also appear when
there are no projects open.
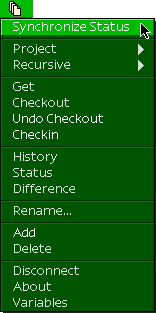
Once you configure CWCVS for a project, you need to execute the "Synchronize Status" command from the menu.
In order to configure a project to use CWCVS, open the project in the IDE and select "Version Control Settings" from IDE's Edit menu. In the "VCS Setup" preferences panel, enter the following settings:
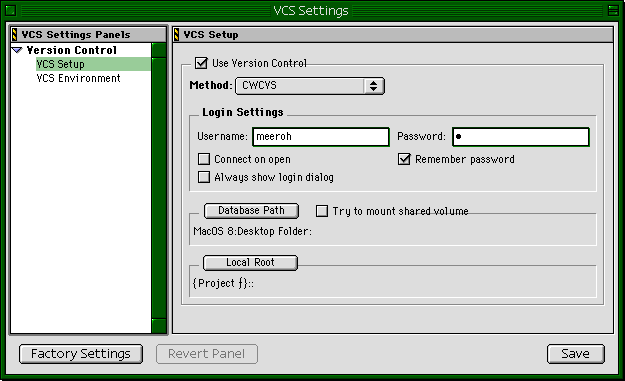
You may also configure global version control settings in the IDE; you may need this if you want to edit files that are not part of any project, such as CVS administrative files. To do this, close all projects and open "Version Control Settings" from IDE's Edit menu. In "VCS Setup" enter the same settings as above, except for Local root:
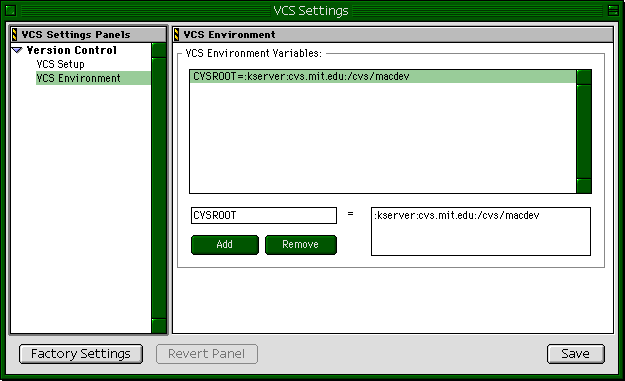
Next, select the "VCS Environment" preferences panel, and set CVS root for that project, by selecting the CVSROOT variable, typing the CVS root string, and clicking "Add".The CVS root string you should type in is the CVS root of the repository in which the project resides (if you are configuring CWCVS for a project), or CVS root of the repository you want to use by default (is you are configuring global CWCVS settings).
When you save the settings, a version control menu (![]() ) will spring to existence in IDE's menubar. If you have
just configured CWCVS for a project, you should choose "Synchronize
Status" from this menu.
) will spring to existence in IDE's menubar. If you have
just configured CWCVS for a project, you should choose "Synchronize
Status" from this menu.
Questions or comments? Send mail to macdev@mit.edu
Last updated on $Date: 2003/11/18 21:58:38 $
Last modified by $Author: smcguire $