|
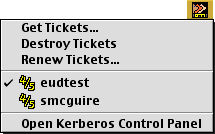
About the Kerberos Menu
The Kerberos Menu is a system-wide menu that installs
an icon (similar to the Kerberos control panel icon) in the right-hand
side of your menu bar, near the Applications menu and system clock.

The Kerberos Menu consists of three parts:
- an icon in the menu bar, indicating the state of the active user's
tickets;
- commonly used Kerberos commands;
- and a list of the currently authenticated users.
Kerberos Menu Icon
The Kerberos menu icon has four states, indicating the state of the
currently active user's tickets:
|

|
Yellow key: Active user has valid tickets |
|

|
Red key: Active user's tickets near expiration (less than
5 minutes lifetime remain) |
 |
No key: Active user's tickets expired, or no tickets are in
the cache |
|

|
X through icon: There is a problem with Kerberos for Macintosh.
Try opening the Kerberos control panel to make sure Kerberos Ticket
Keeper is running. If this doesn't solve the problem, reinstall
Kerberos for Macintosh. |
Kerberos Menu Commands
You can perform the following actions with the Kerberos Menu:
Get Tickets... - Choosing "Get Tickets..." from the
Kerberos menu brings up the Kerberos Login dialog, allowing you to get
tickets for a new user (or new tickets for an existing user).
Destroy Tickets - Choosing "Destroy Tickets" from
the Kerberos menu will destroy the tickets of the current active user
(indicated by a checkmark next to the user's principal in the user list).
This item will be greyed out if there are no authenticated users.
Renew Tickets... - Choosing "Renew Tickets..." from
the Kerberos menu will renew the tickets of the current active user
(indicated by a checkmark next to the user's principal in the user list).
This item will be greyed out if there are no authenticated users.
Active users (variable text) - These are the principals of the
currently authenticated users. The active user is marked with a checkmark.
You can change the active user by choosing another principal from the
menu. For more information, see below.
Open Kerberos Control Panel - Choosing "Open Kerberos Control
Panel" will open the Kerberos control panel and bring it to the
front. For more information about the Kerberos control panel, see the
Using the Kerberos
Control Panel documentation.
Kerberos Menu User List
After the Get, Destroy, and Renew Ticket menu items, Kerberos Menu
lists the principals of the currently authenticated users. The realm
part of the principal is omitted if the user is in the default Kerberos
realm.
The currently active user has a checkmark next to their principal.
To change the active user, choose another principal from the list.
Next to each principal is an icon:
 |
This principal has both Kerberos v4 and v5 tickets. |
 |
This principal has only Kerberos v4 tickets. |
 |
This principal has only v5 tickets. |
 |
This principal's tickets have expired or become invalid. |
Creating the Kerberos Floating Window
You can create the Kerberos Floating Window by "tearing off"
the Kerberos Menu:
- Click and hold down on the Kerberos Menu icon.
Result: the Kerberos Menu's menu items are displayed.
- Drag the mouse down past the bottom of the menu (you must drag past
the bottom, not the sides, of the menu).
Result: An outline of a rectangle is displayed.
- Drag the outlined rectangle to the desired position of the Kerberos
Floating Window, and let go of the mouse button.
Result: The Kerberos Floating Window is displayed.
For more information, see the Kerberos
Floating Window documentation.
|

