
Heidi Chen
Wireless Easy Off Button: Outlet Junction
Goals | Electronics | Design of Outlet JunctionWireless Method
| Technology | Issues |
| Bluetooth (2.4GHz) | Expensive |
| Infra-red (IR) | Needs line-of-sight |
| Wifi (5GHz) | Expensive, high power consumption |
| Radio Frequency (RF) (MHz range) | Might interfere with other RF devices like cordless phones |
| RFID (like CharlieCards) | Limited range of sensing |
After looking into various different methods of wireless transmission, I decided that Radio Frequency (RF) transmission was the most suitable method for our purposes because it is:
- Cheap (second to IR)
- Has a suitable range (max 500ft)
- Does not require line-of-sight to receiver
- Low frequency transmission means the outlet junction can be placed behind furniture
- Frequency of transmission can be set so that it does not interfere with other electronics
Electronics Design
The circuit was planned out as follows:
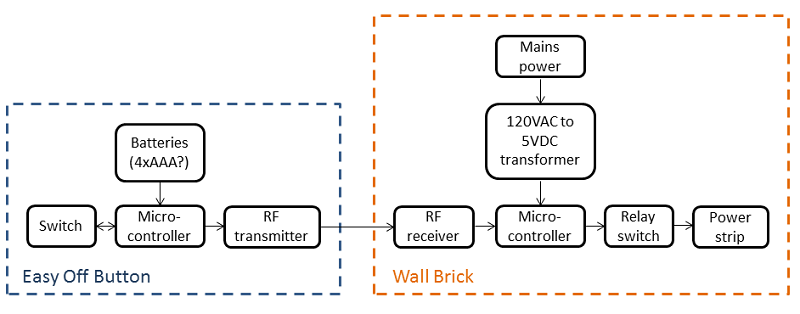
Pressing the Easy Off Button will send a signal to the button's microcontroller, which will make the RF transmitter send out a message. On the outlet junction, the RF receiver will capture the signal and send it to the brick's microcontroller, switching the relay to allow electricity to flow through the controlled power outlet, where the user's devices are plugged into.
Choosing components
As I have next to no electronics experience, I consulted this textbook for advice, and read up many sites online. What I realized was that our final prototype would look very different from a circuit intended for mass production. A mass produced version of our device would be:
- Much smaller/ more compact
- Much cheaper
- Have a custom PCB with surface mount components instead of a jumble of parts and wires
Hence, for the sake of our project, I decided to pick out components that would be suitable for our final prototype, with the understanding that if Staples should choose to mass produce it, the circuit would be redesigned by a professional. Keeping this in mind, as well as our team's lack of electronics know-how, I chose components from Sparkfun that had good documentation, and could be run off the Arduino prototyping platform.
| Component Choice | Rationale |
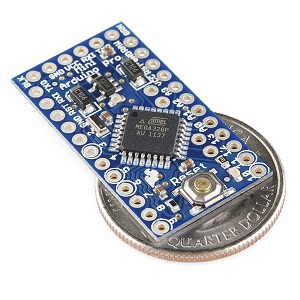 Microcontroller: Arduino Pro Mini 328 - 5V/16MHz |
Easy to program, smallest Arduino platform allows for more compact devices. For programming, need to buy male headers. Good tutorial documentation for novices! |
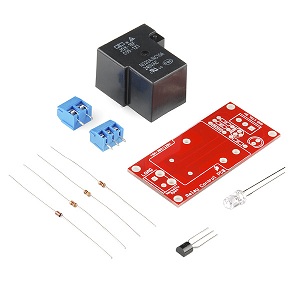 Relay switch: Relay switch: 20A Relay SPDT sealed |
Relays are necessary as a small microcontroller cannot switch 120V. Chose mechanical relays over solid state relays as they are cheaper and consume less power. Transistors were not chosen as they are not as suitale for high power (120V 20A) applications. The high 20A rating is to ensure that many devices can be plugged into the outlet. This kit was chosen for ease of prototyping as all the necessary parts are provided. |
RF Transmitter - 434MHz |
Simple RF transmitter, 5V supply voltage for Arduino compatibility. Good tutorial for how to link with Arduino. |
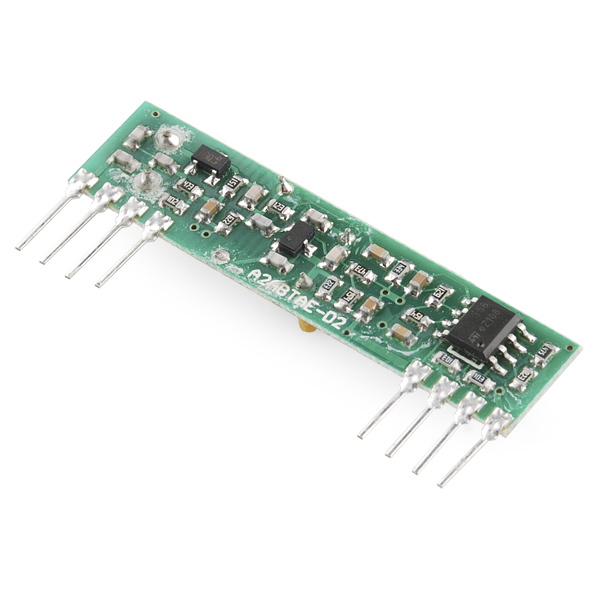 RF Receiver: RF Receiver: RF Receiver- 434MHz |
Simple RF receiver, matches up with transmitter. |
Other components, like the switch and batteries, will change depending on each implementation of the device, hence they were not picked out.
Next: Design of Outlet Junction